Bully Den: Difference between revisions
(warter wraith) |
No edit summary |
||
| Line 14: | Line 14: | ||
For this cavern, you may want to restart the challenge a few times to get the prime map, since the design is random. | For this cavern, you may want to restart the challenge a few times to get the prime map, since the design is random. | ||
At the start of the challenge, there are two [[Volatile Dweevil]]s and one [[Anode Dweevil]]. Throwing [[Purple Pikmin]] in the open areas and in the tunnel will cause a shock wave, causing more creatures to fall from the ceiling, those creatures being a [[Wollywog]], a [[Yellow Wollywog]], and 6 [[Anode Beetle]]s. You may want to take them out as fast as you can (before the Waterwraiths) appear since they can be irritating when trying to defeat a Waterwraith. You can also risk not trying to meet any of them at all and hope none of them fall while battling the Waterwraiths. | At the start of the challenge, there are two [[Volatile Dweevil]]s and one [[Anode Dweevil]]. Throwing [[Purple Pikmin]] in the open areas and in the tunnel will cause a shock wave, causing more creatures to fall from the ceiling, those creatures being a [[Wollywog]], a [[Yellow Wollywog]], and 6 [[Anode Beetle]]s. You may want to take them out as fast as you can (before the Waterwraiths) appear since they can be irritating when trying to defeat a Waterwraith. You can also risk not trying to meet any of them at all and hope none of them fall while battling the [[Waterwraiths]]. | ||
It is recommended that you do not break down any [[Obstacles#Walls|gate]] as they can be a tool in separating the | It is recommended that you do not break down any [[Obstacles#Walls|gate]] as they can be a tool in separating the [[Waterwraiths]] | ||
When the countdown timer reaches 270, the two Water wraiths fall and begin rolling around the cavern. In the optimal sublevel layout, the wraiths would be completely separated by the gates so you only have to deal with on at a time (or only one at all if the first one you fight drops The Key). | When the countdown timer reaches 270, the two Water wraiths fall and begin rolling around the cavern. In the optimal sublevel layout, the wraiths would be completely separated by the gates so you only have to deal with on at a time (or only one at all if the first one you fight drops The Key). | ||
Revision as of 14:47, May 26, 2014
| Bully Den | |||
|---|---|---|---|

| |||
| Sublevels | 1 | Ultra-bitter sprays | 2 |
| Red Pikmin | 0 | Ultra-spicy sprays | 2 |
| Yellow Pikmin | 0 | ||
| Blue Pikmin | 0 | ||
| White Pikmin | 0 | ||
| Purple Pikmin | 25 | ||
| Bulbmin | 0 | ||
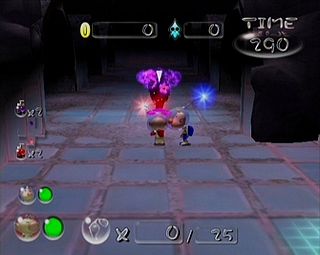
The Bully Den is the twenty-eighth level in Challenge Mode in Pikmin 2. You start in the stage with twenty-five Purple Pikmin, but the absence of Candy pop Buds means they cannot be converted into other types. One Water wraith drops The Key when defeated; the other drops the Silencer.
Music
- "Shower Room"
Strategy
For this cavern, you may want to restart the challenge a few times to get the prime map, since the design is random.
At the start of the challenge, there are two Volatile Dweevils and one Anode Dweevil. Throwing Purple Pikmin in the open areas and in the tunnel will cause a shock wave, causing more creatures to fall from the ceiling, those creatures being a Wollywog, a Yellow Wollywog, and 6 Anode Beetles. You may want to take them out as fast as you can (before the Waterwraiths) appear since they can be irritating when trying to defeat a Waterwraith. You can also risk not trying to meet any of them at all and hope none of them fall while battling the Waterwraiths.
It is recommended that you do not break down any gate as they can be a tool in separating the Waterwraiths
When the countdown timer reaches 270, the two Water wraiths fall and begin rolling around the cavern. In the optimal sublevel layout, the wraiths would be completely separated by the gates so you only have to deal with on at a time (or only one at all if the first one you fight drops The Key).
However, They can easily be subdued by petrifying both and assaulting their backsides once they break free. An alternate strategy employs hiding in one of the tunnels found in the Den and launching an attack from the limited safety they provide.