|
The following article or section contains guides.
The strategies shown are just suggestions.
|
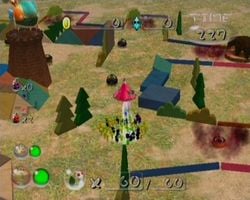
Three Color Training is the seventeenth level in Pikmin 2's Challenge Mode. It is named after the fact that there are three different colors of Pikmin: Yellow Pikmin, Purple Pikmin, and White Pikmin.
Sublevel 1
- Theme: Toybox
- Music: Grass
- Time: 230 (460 seconds)
- Starting Pikmin:
- Treasures:
- Enemies:
- Obstacles:
- Vegetation:
- Others:
The Gatling Groink has The Key, and it is at the top of a tower. You should try to place one of your leaders as close to the tower as possible; the Gatling Groink will try to fire at that leader, but the shot will be stopped by the tower. There are a few wooden blocks on one side of the tower that you can use to throw your Yellow Pikmin onto the platform of the Gatling Groink. Take caution when calling your Pikmin back; if you whistle for too long, the leader you left as bait will come back to your side, which will waste time. After defeating the Groink, collect The Key it drops (and the corpse, if you want to collect the other treasures), and either collect more treasures or just escape.
If you are just going for the pink flower, use this strategy: send one leader without any Pikmin to the Gatling Groink and find a spot where it can fire at you without hitting you. Now, take the other leader with all the Yellow Pikmin and attack the Gatling Groink until it dies. Now, quickly carry back the Gatling Groink (before it comes back to life) and the Key. With luck, the exit will appear somewhere easy.
Generate sample map →
| Technical sublevel information
|
| Internal cave name
|
ch_MAT_yellow_purple_white
|
| "Main" object maximum (?)
|
16
|
| "Treasure" object maximum (?)
|
4
|
| "Gate" object maximum (?)
|
0
|
| Dead end unit probability (?)
|
0
|
| Number of rooms (?)
|
1
|
| Corridor-to-room ratio (?)
|
0
|
| Escape geyser (?)
|
Yes
|
| Clogged hole (?)
|
No
|
| Cave units file (?)
|
1_MAT_tower2_toy.txt
|
| Lighting file (?)
|
hiroba_toy_light_cha.ini
|
| Background (?)
|
hiroba ( garden) garden)
|
| Cave units (?)
|
|
|
|
|
|
|
| Dead end with item |
Three-way crossing |
Four-way crossing |
Turning corridor |
Corridor |
Long corridor
|
|
|
| Room with tower and 8 exits
|
| Detailed object list
|
| The game spawns these "main" objects:
|
| ID |
Object |
Amount |
Fall method |
Spawn location
|
| 1
|
 Gatling Groink (pedestal) Gatling Groink (pedestal)
|
1
|
None
|
"Special" enemy spots
|
| -
|
 The Key The Key
|
Carried inside entry with ID 1
|
| 2
|
 Anode Beetle Anode Beetle
|
5
|
None
|
"Easy" enemy spots
|
| -
|
 Unknown Merit Unknown Merit
|
Carried inside entry with ID 2
|
| 3
|
 Anode Beetle Anode Beetle
|
4
|
None
|
"Hard" enemy spots
|
| -
|
 Unknown Merit Unknown Merit
|
Carried inside entry with ID 3
|
| 4
|
 Poison emitter Poison emitter
|
6
|
None
|
Cave unit seams
|
| Then it spawns these "treasure" objects:
|
| ID |
Object |
Amount |
Fall method |
Spawn location
|
| 5
|
 Fossilized Ursidae Fossilized Ursidae
|
1
|
None
|
Treasure spots
|
| 6
|
 Sulking Antenna Sulking Antenna
|
1
|
None
|
Treasure spots
|
| 7
|
 Flame Tiller Flame Tiller
|
1
|
None
|
Treasure spots
|
| 8
|
 Regal Diamond Regal Diamond
|
1
|
None
|
Treasure spots
|
| Then it spawns these "dead end" objects:
|
| ID |
Object |
Amount |
Fall method |
Spawn location
|
| 9
|
 Mitite (group of 10) Mitite (group of 10)
|
1
|
None
|
Dead ends
|
| 10
|
 Egg Egg
|
2
|
None
|
Dead ends
|
- For details on how objects are spawned, and how some may fail to spawn, see here.
Names in other languages
| Language
|
Name
|
Meaning
|
 Japanese Japanese |
三色試験場? |
3-colored Camp
|
 French (NoA) French (NoA) |
Camp tricolore |
Three-colored camp
|
 French (NoE) French (NoE) |
Camp Tricolore |
Three-colored Camp
|
 German German |
Drei Farben |
Three Colors
|
 Italian Italian |
Esercizi a tre colori |
Three Color Exercises
|
 Spanish (NoA) Spanish (NoA) |
Circuito Tricolor |
Tricolored Circuit
|

 Yellow Pikmin × 30 (leaf)
 Purple Pikmin × 15 (leaf)
 White Pikmin × 15 (leaf)
 Flame Tiller × 1 (fully buried)
 Fossilized Ursidae × 1
 Regal Diamond × 1 (fully buried)
 Sulking Antenna × 1
 The Key × 1 (inside Gatling Groink)
 Unknown Merit × 9 (inside Anode Beetles)
 Anode Beetle × 9
 Gatling Groink (pedestal) × 1
 Mitite (group of 10) × 1 (from the ground)
 Mitite (group of 10) × 0 - 2 (from eggs)
 Poison emitter × 6
 Egg × 2


