Fiery Bulblax
| |||
|---|---|---|---|

| |||
| Appears in | Pikmin 2 | ||
| Scientific name | Oculus vulcanus | ||
| Family | Grub-dog | ||
| Areas | Valley of Repose, Perplexing Pool | ||
| Caves | Submerged Castle, Cavern of Chaos, Hole of Heroes, Dream Den | ||
| Challenge Mode stages | Green Hole, Cryptic Cavern, Hazard Training, Cave of Pain, Emperor's Realm | ||
| 2-Player Battle stages | None | ||
| Attacks | Eats and burns Pikmin | ||
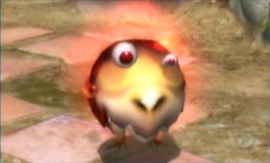
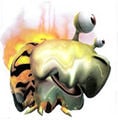
The Fiery Bulblax is a fairly rare enemy found in Pikmin 2. Its body parts appear to be melting away from its body's intense heat waves, and more strangely, one of its eyes is smaller than the other. Its fiery aura is caused by the glands and oils on this creature's body that result in a chemical reaction, which causes fire to ignite on its hide. Only Red Pikmin can withstand the blaze of this creature's body. However, if lured to water, the flame will go out, making it a prime target for Blue Pikmin (other Pikmin can technically harm it safely as well, but will be at risk of drowning). It is recommended to use a spray against this enemy, because it's more aggressive than other members of its family.
Due to the Bulblax's curtain-esque shape, Pikmin may get stuck under its body when they carry it. If that happens, call them and try dismissing them to pick it back up. As well as sharing the name with it, the Fiery Bulblax's melted features make it resemble the Emperor Bulblax, despite being the same size, and having the same attack strategy as, the smaller members of the the Grub-dog species.
Notes
Olimar's notes
Louie's notes
Killing Strategy
Obviously, Red Pikmin are desirable due to the flames. Beat it as if it were a standard Red Bulborb, by peppering its back with reds. Fiery Bulblaxes have high health for a grub-dog and can sometimes attack after shaking Pikmin off. Fiery Bulblaxes can also eat Pikmin much faster than a normal Bulborb can. An Ultra-Spicy Spray may be desirable for killing it effectively and without danger.
However, sometimes a Fiery Bulblax must be fought with Blue Pikmin, such as the lone one at the Valley of Repose. To kill it here, lure it into the water. The flames on its back will go out, but it will soon realize this, turn around, and head for dry land. During that time, its primary urge will be to leave the water and re-ignite, so in this short space of time, Pikmin will be safe from attack. Since repeatedly throwing blues at it puts them at high risk of being eaten, simply use an Ultra-Bitter Spray and beat it down. Note that spraying a Fiery Bulblax that has not been extinguished will not allow non-red Pikmin to attack; the Bulblax will still have flames coming out of its back.
A more risky way of defeating this creature is to throw many Purple Pikmin at it, and each will deal some damage before bursting into flames. Save them and, while the Fiery Bulblax is still stunned, attack again. This eliminates the need for Blue or Red Pikmin.
Technical information
| Pikmin 2 technical information (?) | |||
|---|---|---|---|
| Internal name | firechappy
| ||
| Global properties (List) | |||
| ID | Japanese comment | Property | Value |
| s000 | friction(not used) | Friction | 0.5 |
| s001 | wallReflection | Unknown (wall bounce speed multiplier?) | 0.5 |
| s002 | faceDirAdjust | Unknown | 0.25 |
| s003 | accel | Acceleration | 0.1 |
| s004 | bounceFactor | Unknown (bounce when it hits the ground?) | 0.3 |
| fp00 | ライフ | HP | 1400 |
| fp01 | マップとの当り | Unknown (related to slopes) | 40 |
| fp02 | ダメージスケールXZ | Horizontal damage scale | 0.25 |
| fp03 | ダメージスケールY | Vertical damage scale | 0.25 |
| fp04 | ダメージフレーム | Damage scale duration | 0.35 |
| fp05 | 質量 | Unknown (weight?) | 0.1 |
| fp06 | 速度 | Move speed | 110 |
| fp08 | 回転速度率 | Rotation acceleration | 0.4 |
| fp09 | テリトリー | Territory radius | 400 |
| fp10 | ホーム範囲 | "Home" radius | 15 |
| fp11 | プライベート距離 | "Private" radius | 70 |
| fp12 | 視界距離 | Sight radius | 500 |
| fp13 | 視界角度 | FOV | 90 |
| fp14 | 探索距離 | Unknown (exploration radius?) | 500 |
| fp15 | 探索角度 | Unknown (exploration angle?) | 120 |
| fp16 | 振り払い率 | Successful shake rate | 1 |
| fp17 | 振り払い力 | Shake knockback | 120 |
| fp18 | 振り払いダメージ | Shake damage | 1 |
| fp19 | 振り払い範囲 | Shake range | 40 |
| fp20 | 攻撃可能範囲 | Unknown (shock attack max range?) | 75 |
| fp21 | 攻撃可能角度 | Unknown (shock attack max angle?) | 25 |
| fp22 | 攻撃ヒット範囲 | Unknown (attack hit range?) | 80 |
| fp23 | 攻撃ヒット角度 | Unknown (attack hit angle?) | 35 |
| fp24 | 攻撃力 | Attack damage | 10 |
| fp25 | 視界高 | Unknown (height visibility?) | 50 |
| fp26 | 探索高 | Unknown (exploration height?) | 50 |
| fp27 | ライフの高さ | HP wheel height | 110 |
| fp28 | 回転最大速度 | Rotation speed | 4 |
| fp29 | 警戒時間 | Unknown (warning time?) | 15 |
| fp30 | 警戒ライフ | Unknown | 30 |
| fp31 | ライフ回復率 | Regeneration rate | 0.0001 |
| fp32 | LOD半径 | Off-camera radius | 75 |
| fp33 | マップとのあたりポリゴンの選定 | Collision processing radius | 60 |
| fp34 | ピクミンとのあたり | Pikmin damage radius | 30 |
| fp35 | 石化時間 | Petrification duration | 1 |
| fp36 | ヒップドロップダメージ | Purple Pikmin drop damage | 50 |
| fp37 | 地震気絶確立 | Purple Pikmin stun chance | 0.3 (30%) |
| fp38 | 地震気絶時間 | Purple Pikmin stun time | 5 |
| ip01 | 振り払い打撃A | Shake mode 1 – hit count | 6 |
| ip02 | 振り払い張付1 | Shake mode 1 – Pikmin requirement | 5 |
| ip03 | 振り払い打撃B | Shake mode 2 – hit count | 12 |
| ip04 | 振り払い張付2 | Shake mode 2 – Pikmin requirement | 10 |
| ip05 | 振り払い打撃C | Shake mode 3 – hit count | 17 |
| ip06 | 振り払い張付3 | Shake mode 3 – Pikmin requirement | 20 |
| ip07 | 振り払い打撃D | Shake mode 4 – hit count | 22 |
| Specific properties | |||
| ID | Japanese comment | Property | Value |
| fp01 | 足元範囲 | Unknown (foot range?) | 30 |
| fp02 | 白ピクミン毒 | White Pikmin poison damage | 300 |
Gallery
Trivia
- The Fiery Bulblax's Piklopedia icon is an 80x80 image. This size is only used for bosses. This could mean that at some point during development, the Fiery Bulblax could have been a boss.
