Ultimate Testing Range: Difference between revisions
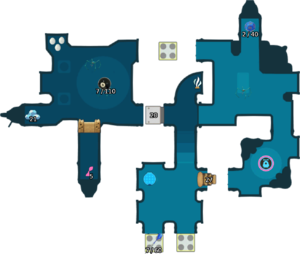
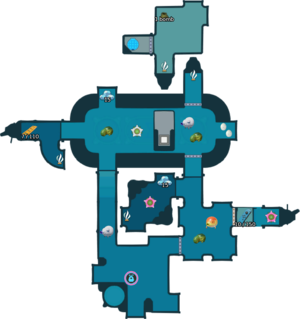
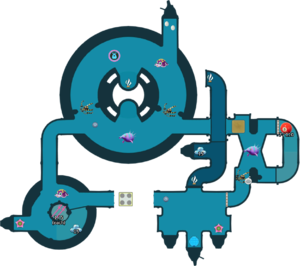
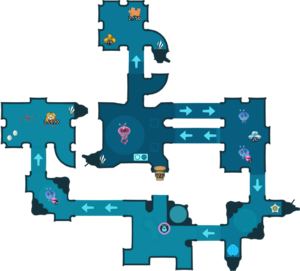
(Added maps of the sublevels.) |
GreenPikmin (talk | contribs) No edit summary |
||
| Line 25: | Line 25: | ||
{{game help|p4|List the objects in this sublevel, then write a guide on how to complete it.}} | {{game help|p4|List the objects in this sublevel, then write a guide on how to complete it.}} | ||
* '''Treasures''': | * '''Treasures''': | ||
** | ** {{icon|Long-Shot Totem|v=P4|y}} | ||
** {{icon|Relentless Spear|v=P4|y}} | |||
** {{icon|Sphere of Trust|v=P4|y}} | |||
* '''Enemies''': | * '''Enemies''': | ||
** {{icon|Venom Dweevil|y|v=P4}} × 4 | ** {{icon|Venom Dweevil|y|v=P4}} × 4 | ||
| Line 43: | Line 45: | ||
{{game help|p4|List the objects in this sublevel, then write a guide on how to complete it.}} | {{game help|p4|List the objects in this sublevel, then write a guide on how to complete it.}} | ||
* '''Treasures''': | * '''Treasures''': | ||
** | ** {{icon|Straight-and-Narrow Track|v=P4|y}} | ||
** {{icon|Telekinesis Detector|v=P4|y}} | |||
* '''Enemies''': | * '''Enemies''': | ||
** {{icon|Watery Blowhog|y|v=P4}} × 2 | ** {{icon|Watery Blowhog|y|v=P4}} × 2 | ||
| Line 66: | Line 69: | ||
{{game help|p4|List the objects in this sublevel, then write a guide on how to complete it.}} | {{game help|p4|List the objects in this sublevel, then write a guide on how to complete it.}} | ||
* '''Treasures''': | * '''Treasures''': | ||
** | ** {{icon|Heart Sword|v=P4|y}} × 2 | ||
** {{icon|Sphere of Heart|v=P4|y}} | |||
* '''Enemies''': | * '''Enemies''': | ||
** {{icon|Waddlepus|y|v=P4}} × 2 | ** {{icon|Waddlepus|y|v=P4}} × 2 | ||
| Line 88: | Line 92: | ||
{{game help|p4|List the objects in this sublevel, then write a guide on how to complete it.}} | {{game help|p4|List the objects in this sublevel, then write a guide on how to complete it.}} | ||
* '''Treasures''': | * '''Treasures''': | ||
** {{icon|Gold Nugget | ** {{icon|Disk of Surprising Wisdom|v=P4|y}} | ||
** {{icon|Gold Nugget|v=P4|y}} × 15 | |||
** {{icon|Memory Fragment (Right Edge)|v=P4|y}} | |||
* '''Enemies''': | * '''Enemies''': | ||
** {{icon|Lesser Spotted Jellyfloat|y|v=P4}} × 3 | ** {{icon|Lesser Spotted Jellyfloat|y|v=P4}} × 3 | ||
Revision as of 21:04, August 16, 2023
| Ultimate Testing Range | |
|---|---|
| [[File:|]] | |
| Location | Giant's Hearth |
| Sublevels | 5 |
| Rescues | 2 |
| Treasures | 12 |
| Onions | 0 |
|
The following article or section contains guides. |
The Ultimate Testing Range is a cave in the Giant's Hearth in Pikmin 4. The abundance of pits and flying enemies make Winged Pikmin the most recommend Pikmin to be taken down. The cavern's name doesn't come into play until its final sublevel, featuring a boss encounter with the gun-slinging Man-at-Legs.
How to reach
|
The following article or section is in need of assistance from someone who plays Pikmin 4. |
Notes
Louie's Voyage Log
Sublevel 1
|
The following article or section is in need of assistance from someone who plays Pikmin 4. |
- Treasures:
- Enemies:
 Venom Dweevil × 4
- Obstacles:
- Tools:
- Wild Pikmin:
 Winged Pikmin × 5 (buried sprouts)
- Others:
 Raw material × 21 (single pile)
Sublevel 2
|
The following article or section is in need of assistance from someone who plays Pikmin 4. |
- Treasures:
- Enemies:
 Watery Blowhog × 2
 Miniature Snootwhacker × 3
 Withering Blowhog × 1
- Obstacles:
- Tools:
- Wild Pikmin:
- Others:
 Candypop Bud (White)
 Candypop Bud (Winged) × 2
 Raw material × 30 (2 piles of 15)
Sublevel 3
|
The following article or section is in need of assistance from someone who plays Pikmin 4. |
- Treasures:
- Enemies:
 Waddlepus × 2
 Arachnode × 3
 Puffy Blowhog × 2
- Obstacles:
- Tools:
- Wild Pikmin:
- Others:
 Castaway (Leafling) × 1 (on Arachnode web)
 Candypop Bud (Winged) × 2
 Raw material × 30 (2 piles of 15)
Sublevel 4
|
The following article or section is in need of assistance from someone who plays Pikmin 4. |
- Treasures:
- Enemies:
- Obstacles:
- Tools:
- Wild Pikmin:
 White Pikmin
 Winged Pikmin × 10 (two lots of 5, both inside a Lesser Spotted Jellyfloat)
- Others:
 Candypop Bud (White)
Sublevel 5
|
The following article or section is in need of assistance from someone who plays Pikmin 4. |
- Treasures:
- Enemies:
 Man-at-Legs × 1
- Obstacles:
- Dirt wall × 3
- Numbered gate × 2 (1)
- Others:
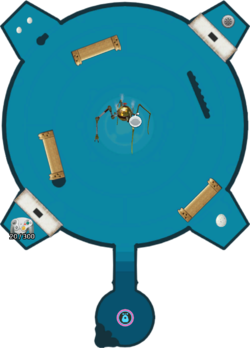
The Man-at-Legs resides in the middle of a circular arena that makes up most of the floor. Three dirt walls can be found around the arena which you can use to hide from its attacks. The walls seem to have a much higher health than normal, but will eventually be broken down if used to hide behind consistently.
Oatchi is a great help in the fight, as riding him will help keep your Pikmin together, and with upgraded running speed, can outrun the Man-at-Legs' attacks.
Gallery
|
This article or section is in need of more images. |
Names in other languages
|
The following article or section is in need of assistance from someone who plays Pikmin 4. |
| Language | Name | Meaning |
|---|---|---|
| Centre d'essais ultime | Ultimate testing center | |
| Ultimatives Testgelände | Ultimate proving ground |
Trivia
- This cave is similar in name to the Secret Testing Range, a challenge mode stage in Pikmin 2 to also feature the Man-at-Legs.
See also
|
The following article or section is in need of assistance from someone who plays Pikmin 4. |
