Doppelgänger's Den
| Doppelgänger's Den | |
|---|---|

| |
| Location | Hero's Hideaway |
| Sublevels | 4 |
| Rescues | 1 |
| Treasures | 16 |
| Onions | 0 |
| Suggested Pikmin | |
| Wild Pikmin | |
|
The following article or section contains guides. |
The Doppelgänger's Den is a cave in the Hero's Hideaway in Pikmin 4. It is named for its large presence of Amphibiland family members, who trick Pikmin and radars with false treasure, especially the large Gildemander, the cavern's boss. This cave has ![]() × 1,490 worth of treasure.
× 1,490 worth of treasure.
How to reach[edit]
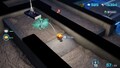
Near the table with the television is a buildable climbing wall. After building it, a single Gildemandwee is protecting the cave's entrance on the other side of the table.
Notes[edit]
Olimar's Voyage Log[edit]
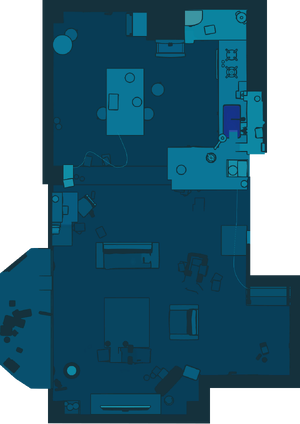
Sublevel 1[edit]

- Treasures:
 Astringent Clump × 1
 Face Wrinkler × 1
 Merciless Extractor × 1
- Enemies:
 Gildemandwee × 2 (one inside a nectar egg)
 Pricklepuff × 1
 Skeeterskate × 2
- Obstacles:
 Bubble blower × 3
 Hydro jelly × 2
 Ice wall × 1
- Tools:
 Tunnel × 1
- Wild Pikmin:
 Ice Pikmin × 5 (inside hydro jelly)
- Others:
 Nectar egg × 2
 Raw material pile × 1 (15 pieces)
First, destroy the ice wall and then use your Blue Pikmin to defeat the two Skeeterskates and collect the half-submerged Astringent Clump. Next, head slightly east and defeat the Pricklepuff. Once the Pricklepuff has been defeated, collect the Face Wrinkler on the raised platform either using Blue Pikmin or by freezing the water and having any Pikmin type collect the treasure. Head back to the S.S. Beagle to gather all of your Pikmin and head west to defeat the Glidemandwee. Destroy the nearby hydro jelly to obtain 5 more Ice Pikmin. Dig out the tunnel, destroy the bubble blower on the other side with Ice Pikmin, and collect the Merciless Extractor. Destroying the large hydro jelly in the central section allows for the Merciless Extractor to be retrieved faster. Additionally, a pile of 15 raw materials is next to the hydro jelly.
Sublevel 2[edit]

- Treasures:
 Gifting Vase × 1
 Gold Nugget × 50
 Granddaughter Doll Head × 1
 Life Controller × 1
- Enemies:
- Gildemandwee × 2
 Mitite × 10
 Moldy Dwarf Bulborb × 2
- Pricklepuff × 1
- Obstacles:
- Tools:
 Switch × 1 (red and blue, red is pressed by default) (lowers red and blue gates respectively)
- Wild Pikmin:
- Ice Pikmin × 5 (sprouts)
- Others:
 Candypop Bud × 1 (White)
- Nectar egg × 1
Firstly, head north and past the lowered blue switch gate. Defeat the nearby Gildemandwee and continue forward until you reach the White Candypop Bud. If needed, convert some Pikmin into White Pikmin and then return back to the base.
Next, head east and defeat another Gildemandwee. Enter the metal tube, pluck the five Ice Pikmin, and exit to the south. Near the tube's exit, you'll find a Moldy Dwarf Bulborb. Use White Pikmin or Oatchi (if he has the ![]() Pup Sniff Saver upgrade) to defeat it. Collect the Gifting Vase, which will unearth a group of Mitites and then proceed to the northeastern section, the water-filled section. Defeat the Pricklepuff and destroy the two water spouts using Blue Pikmin or Oatchi, and begin collecting the Gold Nuggets.
Pup Sniff Saver upgrade) to defeat it. Collect the Gifting Vase, which will unearth a group of Mitites and then proceed to the northeastern section, the water-filled section. Defeat the Pricklepuff and destroy the two water spouts using Blue Pikmin or Oatchi, and begin collecting the Gold Nuggets.
Return to the base and split up from Oatchi. Have the rookie Rescue Officer remain at the base while Oatchi, along with at least 10 White Pikmin, heads back to the northern section you entered earlier. Once Oatchi arrives, switch back to the rookie and press the nearby switch that will lower the red switch gate and raise the blue one. Now, have Oatchi jump up the platforms and defeat the other Moldy Dwarf Bulborb. Throw 10 White Pikmin onto the Life Controller, which is hanging from a cobweb.
Next, have Oatchi head back down to the now-risen blue switch gate and head down the narrow path, leading to the tunnel. Head through the tunnel and continue forward. Switch back to the rookie and press the switch again to allow the Life Controller to be collected. Finally, have Oatchi (and any remaining Pikmin) retrieve the Granddaughter Doll Head. Once all treasures have been collected, return to the northeastern section and enter the next sublevel.
Sublevel 3[edit]

- Treasures:
 Citrus Lump × 1
 Dusk Pustules × 1
- Gold Nugget × 30
 Memory Fragment (Top-ish) × 1
 Pocked Airhead × 1
- Enemies:
 Armored Cannon Larva × 1 (guarding a base)
 Flighty Joustmite × 2
 Hydro Dweevil × 2
 Moldy Slooch × 1
- Obstacles:
 Breakable pot × 3
- Bubble blower × 3
 Iron fence × 3
 Kingcap × 1
 Poison Kingcap × 2
 Poison Spotcap × 10
 Spotcap × 6
 Sticky mold × 4
 Water body × 2
- Tools:
 Climbing wall × 1 (requires 15 raw material)
 Fan × 2
 Floating platform × 2 (1 stationary, 1 mobile)
 Moving walkway × 5
 Switch × 1 (lowers the iron fences)
- Switch × 1 (switches the direction of moving walkways)
- Wild Pikmin:
- Candypop Bud × 2 (1 covered by sticky mold)
- Others:
- Raw material pile × 1 (15 pieces)
Head west from the base and enter the oval-shaped section. Defeat the two Hydro Dweevils using Blue Pikmin and wait for the floating platform to move north. Once it reaches the northernmost position, use the nearby fan with Oatchi to launch up onto it. The floating platform will then move south, passing underneath a raised platform. Carefully time Oatchi's jump to land on the raised platform. Once the floating platform reaches the other side, jump back on and throw 15 Pikmin at the hanging Dusk Pustules.
Next, head up the metal slope, destroy the small Spotcaps, and convert any Pikmin into White Pikmin if needed. Use White Pikmin to destroy the poisonous Spotcaps and Kingcaps, then enter the new section. The island surrounded by water holds an alternate base location, but it is guarded by an Armored Cannon Larva. Defeat it carefully before moving the S.S. Beagle over.
Head slightly south, defeat the Moldy Slooch, and destroy the large Spotcap beneath the Citrus Lump. Ride across the moving walkway and throw a Pikmin at the white switch to lower all the iron fences. Return to the Citrus Lump and collect it using either Blue Pikmin or by freezing the moat around the base beforehand.
Then, head northeast, defeat the Flighty Joustmite, and destroy the remaining Spotcaps (some of which are poisonous). Begin constructing the nearby climbing wall and move toward the southeast. Defeat the other Flighty Joustmite and collect the Gold Nuggets next to it.
Once the climbing wall is complete, climb up and throw at least 12 Pikmin at the Pocked Airhead, which is on another floating platform. Keep Oatchi in this raised area while the rookie Rescue Officer returns to the original base. Move the base over, then have Oatchi switch the moving walkway's direction using the nearby switch. Head up the moving walkway and collect the Memory Fragment (Top-ish). Make sure Oatchi reverts the moving walkway direction, and once all treasures have been collected, proceed to the next sublevel
Sublevel 4[edit]

- Treasures:
 Difficult-Choice Totem × 1
- Gold Nugget × 10
 Go-with-the-Flow Totem × 1
 Thrill-Ride Track × 1 (inside Glidemander)
- Enemies:
 Gildemander × 1
- Obstacles:
- Breakable pot × 13 (one group of 2, two groups of 3, one group of 5)
 Numbered gate × 1 (lowers when 1 Gildemander is defeated)
- Tools:
- None
- Wild Pikmin:
- None
- Others:
- See also: Gildemander strategy.
The boss of this cave is a Gildemander, and it holds the Thrill-Ride Track. Use the detailed strategy linked above to defeat the enemy and collect the treasure it is holding. Once defeated, the nearby numbered gate will lower, allowing for the leafling castaway to be rescued (inside of a breakable pot). Finally, each group of breakable pots contains a treasure.
The group of 2 breakable pots contains 10 Gold Nuggets, the group of 3 contain the Go-with-the-Flow Totem, the group of 5 contain the Difficult-Choice Totem.
Gallery[edit]
|
This article or section is in need of more images. |

The Face Wrinkler in the location it is discovered, next to the corpse of a Pricklepuff and a destroyed bubble blower.
The Life Controller in the location it is discovered, hanging. A poison emitter, the Granddaughter Doll Head, and a pile of 50 Gold Nuggets are nearby.

The Pocked Airhead in the location it is discovered, on a floating platform.


Names in other languages[edit]
| Language | Name | Meaning |
|---|---|---|
| まがいものの巣窟? Magaimono no Sōkutsu |
Sham's Den | |
(traditional) |
贗品巢穴 Yànpǐn Cháoxué |
Sham's Den |
(simplified) |
赝品巢穴 Yànpǐn Cháoxué |
Sham's Den |
| Grot der gedaantes | Cave of guises | |
| Antre des imitateurs | Mimics lair | |
| Höhle der Doppelgänger | Cave of Doppelgängers | |
| Rifugio degli imitatori | Imitators' refuge | |
| 거짓된 것의 소굴 Geojitdoen Geos-ui Sogul |
False Something's Den | |
| Antro de sósias | Doppelgängers' den | |
| Refugio del imitador | Imitator's refuge |
See also[edit]
| Caves in Pikmin 4 | |
|---|---|
| Rescue Command Post | Burrow of Beginnings |
| Sun-Speckled Terrace | Last-Frost Cavern • Crackling Cauldron • Aquiferous Summit • Industrial Maze • Hectic Hollows |
| Blossoming Arcadia | Drafty Gallery • Secluded Courtyard • Sightless Passage • Kingdom of Beasts |
| Serene Shores | Seafloor Resort • Subzero Sauna • Below-Grade Discotheque • Engulfed Castle |
| Hero's Hideaway | Doppelgänger's Den • Frozen Inferno • Plunder Palace |
| Giant's Hearth | Ultimate Testing Range • Dream Home • Cradle of the Beast |
| Primordial Thicket | The Mud Pit • Subterranean Swarm • Cavern for a King |
| Dandori Challenges | Dandori Day Care • Hotshock Canyon • Rockaway Cellars • Test Tubs • Ice-Cross Course • Hefty Haulway • Aerial Incinerator • Strategic Freezeway • Planning Pools • Toggle Training • Cliff-Hanger's Hold • Oasis of Order • Trial of the Sage Leaf |
| Dandori Battles | Trial Run • Battle in a Box • Dandori Castle • Leafy Showdown • Hot Sandy Duel • Final Battle |