Seafloor Resort
| Seafloor Resort | |
|---|---|

| |
| Location | Serene Shores |
| Sublevels | 4 |
| Rescues | 2 |
| Treasures | 23 |
| Onions | 1 |
| Suggested Pikmin | |
| Wild Pikmin | |
|
The following article or section contains guides. |
The Seafloor Resort is a cave in the Serene Shores in Pikmin 4. It is located within the touch tank of a massive aquarium, with platforms made out of stone and varnished tree stumps. Seafloor Resort has a large amount of water, making Blue Pikmin necessary. Non-aquatic enemies, such as jellyfloats, aristocrabs, and Fiery Blowhogs appear as well, including an encounter with a large Masterhop. This cave has ![]() × 1,625 worth of treasure.
× 1,625 worth of treasure.
How to reach[edit]

This cave is found at the foot of the large sand castle. Directly across from the Water's Edge base, there is a ramp that provides easy access to the entrance on the right (even during high tide, there is no water surrounding the ramp). From The Sand Keep base, the entrance can be found at the end of the bottom road populated with Armored Cannon Larva. Alternatively, Oatchi can jump over the sand castle's walls, allowing for an easy shortcut to the foot of the structure.
Notes[edit]
Olimar's Voyage Log[edit]
Sublevel 1[edit]

- Treasures:
 False Lollipop × 1 (pulled out of the ground by a fishing rope)
 Gold Nugget × 15
 Maestro of Flavor × 2
 Maternal Sculpture × 1
 Sunseed Berry × 1
- Enemies:
- Obstacles:
 Dirt wall × 1
 Hydro jelly × 1
 Iron fence × 1
 Sprinkler × 2
 Water spout × 2
- Tools:
 Clay valve × 1 (requires 12 pieces of raw material) (turns off both sprinklers)
 Fishing rope × 1
 Geyser × 1
- Wild Pikmin:
 Blue Pikmin × 5 (Sprouts)
- Blue Pikmin × 5 (inside Lesser Spotted Jellyfloat)
 Ice Pikmin × 5 (Sprouts)
- Others:
 Flarlic × 1 (inside hydro jelly)
The first thing you'll notice about this cave is the excessive amounts of water, so keeping your Blue Pikmin alive will be a must. The first thing you should do is send Oatchi with a squad of Blue Pikmin to get the Sunseed Berry (it's in the area past the small step) as there are no enemies over there, and the Blue Pikmin will allow you to transport it without turning off the sprinklers. After that, take a stroll down the beach to pluck some Ice Pikmin and deal with the two Lesser Spotted Jellyfloats. There are two water geysers, fifteen Gold Nuggets, and a path up to a building spot in this area. But taking out the Jellyfloats first would be a good idea as they'll just get in the way. If you're having trouble with these enemies, remember that freezing an airborne Jellyfloat causes it to die instantly upon hitting the ground, and doing this with the second one will cause no harm to come to the Blue Pikmin it's holding. For the nuggets, once again Blue Pikmin can transport them without having to worry about the water. Use five Blue Pikmin to fish the False Lollipop out of the river, and head for the sponge on the right to find two Maestros of Flavor guarded by two Fiery Blowhogs. Without Red Pikmin, dealing with these twins can get really annoying if they're too close together. Wait until they're separated and use Oatchi's Charge to attack the first one while the other is none the wiser. Once you're done over here, head up the hill to get the Maternal Sculpture down from the ceiling. To transport it, use seven Blue Pikmin or freeze the middle lake using Ice Pikmin if you have enough. Use twelve raw materials to build the valve and turn off the sprinklers to make things easier. The passage to the next sublevel is behind an iron fence only the Recruit can pass through. Use them to take care of the Jellyfloat and knock down the Dirt Wall so Oatchi can join you. Once all the enemies are defeated, you should be able to finish up here with ease. Grab the Flarlic by freezing the hydro jelly with Ice Pikmin, and pluck the five Blue Pikmin on the island hidden behind said Jelly.
Sublevel 2[edit]

- Treasures:
 Dapper Blob × 1
 Octoplus × 2
 Planetary Rubber Cutie × 2
 Trap Lid × 1
 Universal Rubber Cutie × 1 (surrounded and caged by 4 iron fences)
- Enemies:
 Fiery Blowhog × 3
 Fiery Dweevil × 2
 Greater Spotted Jellyfloat × 1 (contains castaway)
 Peckish Aristocrab × 1
- Obstacles:
 Bubble blower × 3
 Ice wall × 1
 Iron fence × 5 (lowered by pressing the switch)
- Hydro jelly × 3
- Tools:
 Climbing stick × 1 (inside a hydro jelly)
- Geyser × 4 (one is plugged)
 Switch × 1 (lowers iron fences)
- Wild Pikmin:
- Ice Pikmin × 5 (Sprouts)
- Others:
 Castaway × 1 (inside Greater Spotted Jellyfloat)
 Raw material pile × 1 (30 pieces)
First destroy the hydro jelly to transport things underwater. Collect the 2 Planetary Rubber Cuties, but kill first the Fiery Dweevils. Then pluck the 5 Ice Pikmin. Kill the Fiery Blowhog next to the climbing stick inside the hydro jelly, and then destroy the hydro jelly. Throw Pikmin into the climbing stick to dig it out. Then press the button. Then return to the base and destroy the bubble blower near the base. Then kill the Peckish Aristocrab and collect the Planetary Rubber Cutie with Yellow Pikmin if you brought them. If not, use Oatchi’s rush to push it down. Then collect the Dapper Blob and the Universal Rubber Cutie with Blue Pikmin. Then swim out into the water and collect the 2 Octopluses with Blue Pikmin. Then kill the 2 Fiery Blowhogs and destroy the bubble blower. Then destroy the ice wall with Ice Pikmin and the bubble blowers. Finally, kill the Greater Spotted Jellyfloat, collect the castaway, the pile of 30 raw materials and the Trap Lid. Then enter the next sublevel.
Sublevel 3[edit]

- Treasures:
 Brush of Foolishness × 1
- Gold Nugget × 15
 Monster Teeth × 1
 Mystery Squish Fish × 3
 Spirit Sword × 3
- Enemies:
- Obstacles:
- Bubble blower × 5
 Clipboard × 1 (weight of 10)
- Dirt wall × 2
- Iron fence × 2 (lowered by pressing the switch)
- Tools:
 Clay bridge × 1 (requires 27 pieces of raw material)
- Geyser × 1
- Switch × 1 (lowers the iron fences)
- Wild Pikmin:
- Blue Pikmin × 5 (sprouts)
- Blue Pikmin × 5 (sprouts hidden in seaweed)
- Others:
- Raw material pile × 2 (one pile of 15 pieces, one pile of 20 pieces)
First destroy the dirt wall to transport things underwater. Then collect the 3 Spirit Swords, and kill the Pricklepuffs. Then collect the 3 Mystery Squish Fishes, and the pile of 20 raw materials. Then build the clay bridge with you only passing over the iron fences, as Oatchi can’t. When the bridge is builded, pass to the other side and destroy the bubble blower. Then kill the Lesser Spotted Jellyfloat and press the button. Now, collect the Brush of Foolishness and the 15 Gold Nuggets. Then return to the base, and head east from the base. Lower the clipboard with 30 Pikmin. Then destroy the bubble blowers, thenkill the Aristocrab Offspring, and the Peckish Aristocrab. Collect the Monster Teeth with 20 Pikmin (preferably Blue Pikmin), and then head to where the Greater Spotted Jellyfloat is. You can just use your Ice Pikmin to freeze it and kill it instantly or kill it with Yellow Pikmin, Red Pikmin or Blue Pikmin. Then destroy the dirt wall and enter the next sublevel.
Sublevel 4[edit]

- Treasures:
 Greed-Inducement Device (inside Masterhop)
- Enemies:
 Masterhop × 1
- Obstacles:
 Numbered gate × 1 (lowered when 1 Masterhop is defeated)
- Tools:
- Geyser × 1
- Fishing rope × 1 (used to pull out the Castaway)
- Wild Pikmin:
- Blue Pikmin × 15 (Sprouts)
- Others:
 Candypop Bud (Blue) × 2 (if you have less than 85 Blue Pikmin)( 3 if you have at least 90 Pikmin)
- Castaway × 1 (Pulled out of the ground by a fishing rope)
 Candypop Bud (Ice) × 2 (Replacing the 2 blue Candypop buds if you have 85 Pikmin)
- See also: Masterhop strategy.
There's a Masterhop as a boss on a sandy floor. A good trick is to either freeze the water, or to freeze the Masterhop while it's in the air. Unlike most final sublevels, the castaway can be obtained without fighting the boss. To do this, you'll probably need to bring 10 Yellow Pikmin, have them ride Oatchi, throw them onto the fishing rope, then rush into the wall.
Gallery[edit]
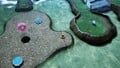
Sublevel 1[edit]
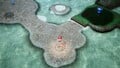
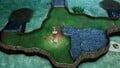
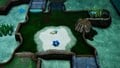
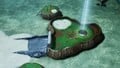
The southeastern section of sublevel 1, where the base is located.
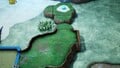
The southwestern section of sublevel 1.
The western section of sublevel 1.

The northwestern section of sublevel 1.

The northeastern section of sublevel 1.

The eastern section of sublevel 1.


Sublevel 2[edit]
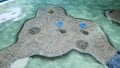
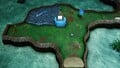
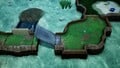
The central section of sublevel 2, where the base is located.
The southwestern section of sublevel 2.
The northwestern section of sublevel 2.
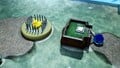
The northern section of sublevel 2.

The northeastern section of sublevel 2.
The southeastern section of sublevel 2.


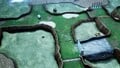
Sublevel 3[edit]
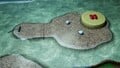
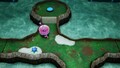
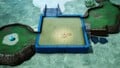
The southwestern section of sublevel 3, where the base is located.
The northwestern section of sublevel 3.
The northern section of sublevel 3.
The northeastern section of sublevel 3.
The eastern section of sublevel 3.
The southeastern section of sublevel 3.


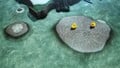
Sublevel 4[edit]
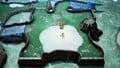
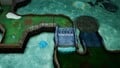
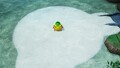
The southwestern section of sublevel 4, where the base is located.
The northwestern section of sublevel 4, where the boss arena is located.
The northeastern section of sublevel 4, where the cave exit is located.
The southeastern section of sublevel 4.


Names in other languages[edit]
| Language | Name | Meaning |
|---|---|---|
| 海底リゾート? Kaitei Risōto |
Seafloor Resort | |
(traditional) |
海底度假村 Hǎidǐ Dùjiǎcūn |
Seafloor Resort |
(simplified) |
海底度假村 Hǎidǐ Dùjiǎcūn |
Seafloor Resort |
| Zeebodemresort | Seabed resort | |
| Station des fonds marins | Seabed station | |
| Meeresgrundgrotte | Seabed Grotto | |
| Località sottomarina | Underwater resort | |
| 해저 리조트 Haejeo Rijoteu |
Seafloor Resort | |
| Balneário marinho | Marine spa | |
| Balneario marino | Marine spa |
Trivia[edit]
- Louie specifically mentions this cave ("that Resort place") in his third Fit for a Feast quest, when requesting a single Peckish Aristocrab.
See also[edit]
| Caves in Pikmin 4 | |
|---|---|
| Rescue Command Post | Burrow of Beginnings |
| Sun-Speckled Terrace | Last-Frost Cavern • Crackling Cauldron • Aquiferous Summit • Industrial Maze • Hectic Hollows |
| Blossoming Arcadia | Drafty Gallery • Secluded Courtyard • Sightless Passage • Kingdom of Beasts |
| Serene Shores | Seafloor Resort • Subzero Sauna • Below-Grade Discotheque • Engulfed Castle |
| Hero's Hideaway | Doppelgänger's Den • Frozen Inferno • Plunder Palace |
| Giant's Hearth | Ultimate Testing Range • Dream Home • Cradle of the Beast |
| Primordial Thicket | The Mud Pit • Subterranean Swarm • Cavern for a King |
| Dandori Challenges | Dandori Day Care • Hotshock Canyon • Rockaway Cellars • Test Tubs • Ice-Cross Course • Hefty Haulway • Aerial Incinerator • Strategic Freezeway • Planning Pools • Toggle Training • Cliff-Hanger's Hold • Oasis of Order • Trial of the Sage Leaf |
| Dandori Battles | Trial Run • Battle in a Box • Dandori Castle • Leafy Showdown • Hot Sandy Duel • Final Battle |