Subzero Sauna: Difference between revisions
Chazmatron (talk | contribs) m (added category) |
|||
| (24 intermediate revisions by 11 users not shown) | |||
| Line 1: | Line 1: | ||
{{game icons|p4=y}} | {{game icons|p4=y}} | ||
{{infobox cave | {{infobox cave | ||
|image = | |image = P4 Voyage Log Olimar 50.png | ||
|size = | |size = 256px | ||
|caption = | |caption = | ||
|location = Serene Shores | |location = Serene Shores | ||
| Line 10: | Line 10: | ||
|onions = 0 | |onions = 0 | ||
|suggested = {{icon|Blue Pikmin|v=P4 HUD}} {{icon|Ice Pikmin|v=P4 HUD}} | |suggested = {{icon|Blue Pikmin|v=P4 HUD}} {{icon|Ice Pikmin|v=P4 HUD}} | ||
|wild = {{icon|Blue Pikmin|v=P4 HUD}} {{icon|Ice Pikmin|v=P4 HUD}} {{icon|White Pikmin|v=P4 HUD}} | |||
}} | }} | ||
{{guide}} | {{guide}} | ||
| Line 19: | Line 20: | ||
== Notes == | == Notes == | ||
=== Olimar's Voyage Log === | === Olimar's Voyage Log === | ||
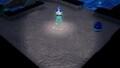
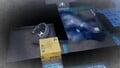
{{transcript|The temperature keeps dropping the further I dive underground. It's as if I'm in a sauna, but the air is stiflingly cold instead of hot. My space suit protects me, but the Pikmin keep shivering. I wonder if there's a way I could warm them up down here...|block=y}} | [[File:P4 Voyage Log Olimar 50.png|left|200px]] | ||
{{transcript|The temperature keeps dropping the further I dive underground. It's as if I'm in a sauna, but the air is stiflingly cold instead of hot. My space suit protects me, but the Pikmin keep shivering. I wonder if there's a way I could {{color|warm them up|darkorange}} down here...|block=y}} | |||
{{clear}} | |||
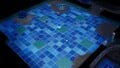
== Sublevel 1 == | == Sublevel 1 == | ||
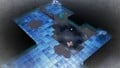
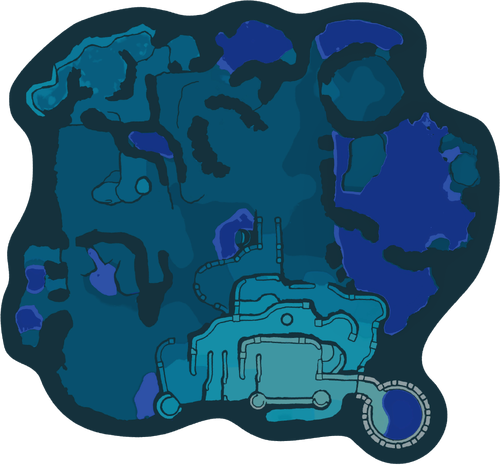
[[File:P4 Map Subzero Sauna 1.png|thumb|300px|Map of sublevel 1.]] | [[File:P4 Map Subzero Sauna 1.png|thumb|300px|Map of sublevel 1.]] | ||
* '''Treasures''': | * '''Treasures''': | ||
** {{icon|Disguised Delicacy|y|v=P4}} (inside hydro jelly) | ** {{icon|Disguised Delicacy|y|v=P4}} (inside hydro jelly) | ||
| Line 32: | Line 35: | ||
* '''Obstacles''': | * '''Obstacles''': | ||
** {{icon|Hydro jelly|y|v=P4}} × 5 | ** {{icon|Hydro jelly|y|v=P4}} × 5 | ||
** {{icon|Ice | ** {{icon|Ice vent|y|v=P4}} × 6 | ||
** {{icon|Ice wall|y|v=P4}} × 1 | ** {{icon|Ice wall|y|v=P4}} × 1 | ||
** {{icon|Poison | ** {{icon|Poison emitter|y|v=P4}} × 1 | ||
* '''Tools''': | * '''Tools''': | ||
** None | ** None | ||
| Line 44: | Line 47: | ||
** {{icon|Raw material pile|l=Raw material|y|v=P4}} × 1 (pile of 15) | ** {{icon|Raw material pile|l=Raw material|y|v=P4}} × 1 (pile of 15) | ||
Firstly, destroy the [[ice wall]] west of the base, defeat the [[Chillyhop]] and destroy the three [[ice vent]]s. Next, destroy the [[hydro jelly]] containing a White [[Candypop Bud]], convert any [[Pikmin family|Pikmin]] into [[White Pikmin]] if needed, and head south. Destroy a lone ice vent, then follow the path to the [[Gold Nugget]], guarded by a [[poison emitter]]. Destroy the emitter using White Pikmin and collect the Gold Nuggets. Regroup back at the base and head into the northern room. Defeat the two [[Snowy Blowhog]]s, destroy the two hydro jellies and another ice vent. Collect the [[Disguised Delicacy]] inside of the southern jelly and return back to base. Destroy the final hydro jelly next to the base to retrieve some more Gold Nuggets. Once completed, head towards the northwest and destroy the large hydro jelly, allowing for the next sublevel to be entered. | |||
{{clear}} | {{clear}} | ||
== Sublevel 2 == | == Sublevel 2 == | ||
* '''Treasures''': | * '''Treasures''': | ||
** {{icon|Memory Fragment (Left Edge)|y|v=P4}} | ** {{icon|Memory Fragment (Left Edge)|y|v=P4}} | ||
| Line 58: | Line 61: | ||
* '''Obstacles''': | * '''Obstacles''': | ||
** {{icon|Box|y|v=P4}} × 1 | ** {{icon|Box|y|v=P4}} × 1 | ||
** {{icon|Hydro jelly|v=P4|y}} × 2 | ** {{icon|Hydro jelly|v=P4|y}} × 2 | ||
** {{icon|Ice block|y|v=P4}} × 3 | |||
** {{icon|Iron fence|y|v=P4}} × 2 | ** {{icon|Iron fence|y|v=P4}} × 2 | ||
** {{icon|Iron fence|y|v=P4 switch}} × 3 | ** {{icon|Iron fence|y|v=P4 switch}} × 3 | ||
** {{icon|Poison | ** {{icon|Poison emitter|y|v=P4}} × 1 | ||
** {{icon|Stalactite|y|v=P4}} × 5 | |||
** {{icon|Water body|y|v=P4}} × 3 | |||
* '''Tools''': | * '''Tools''': | ||
** {{icon|Button|y|v=P4|l=Switch}} × 1 | ** {{icon|Button|y|v=P4|l=Switch}} × 1 | ||
* '''Wild Pikmin''': | * '''Wild Pikmin''': | ||
** {{icon|Ice Pikmin|y|v=P4}} × 5 (Sprouts) | ** {{icon|Ice Pikmin|y|v=P4}} × 5 (Sprouts) | ||
** {{icon|Blue Pikmin|y|v=P4}} × 5 (Sprouts) | ** {{icon|Blue Pikmin|y|v=P4}} × 5 (Sprouts) (if 5 or less Blue Pikmin) | ||
* '''Others''': | * '''Others''': | ||
** {{icon|Castaway|y|v=P4}} | ** {{icon|Castaway|y|v=P4}} | ||
| Line 73: | Line 78: | ||
** {{icon|Candypop Bud|y|v=P4 white}} × 1 | ** {{icon|Candypop Bud|y|v=P4 white}} × 1 | ||
** {{icon|Raw material pile|y|v=P4|l=Raw material}} × 1 (pile of 20) | ** {{icon|Raw material pile|y|v=P4|l=Raw material}} × 1 (pile of 20) | ||
'''Advice''' The [[Rookie Rescue Officer]] must take the Ice Pikmin before exploring and defrost the cold air while [[Oatchi]] look after the other Pikmin, because this sublevel has iron fences which lowered later by the button | |||
'''Defrost the air:''' You'll find the first [[ice block]] right near the start but there will be a [[stalactite]] falling in frost so you must destroy them. Next right through the tunnel with the frozen water you'll find another stalactite falling, make sure you destroy it so it would distract your Pikmin. Then go through an [[iron fence]] and there's a small room with an [[Arctic Cannon Larva]] which must be defeated and 5 buried Ice Pikmin, and there's another room with another Arctic Cannon Larva which also need to be defeated and another ice block inside a frozen [[hydro jelly]]. Finally there's another iron fence you could go through then you'll find on a frozen body of water with 3 [[Puckering Blinnow]]s which you don't have to defeat yet, there's another iron fence and another ice block to destroy, make sure let you or your Ice or Blue Pikmin press the button to lower the iron fences, destroy stalactite, and move the [[box]]. | |||
'''Exploring:''' First put some Pikmin inside the white [[Candypop Bud]] then defeat the 3 Puckering Blinnows if you want to transport the objects you can freeze the bodies of water with Ice Pikmin if you transport the objects quicker. Both treasures, the pile of raw material, and the castaway is in the same large room with one of the Arctic Cannon Larvae the [[True Goo]] is inside the other hydro jelly, but make sure destroy [[poison emitter]] to transport it. The [[Memory Fragment (Left Edge)]] and the castaway is in another body of water. Warning there's an [[Iceblown Dweevil]] falling from the sky and it might take the object so you defeat it first so it'll quit stopping the transportation. | |||
'''Next sublevel:''' To get to the next sublevel must freeze the water where Puckering Blinnows were, with 10 Ice Pikmin or an [[Ice Blast]] then jump to the upper platform with Oatchi to reach it. | |||
{{clear}} | {{clear}} | ||
| Line 85: | Line 98: | ||
* '''Obstacles''': | * '''Obstacles''': | ||
** {{icon|Hydro jelly|v=P4|y}} × 3 | ** {{icon|Hydro jelly|v=P4|y}} × 3 | ||
** {{icon|Ice block|v=P4|y}} × | ** {{icon|Ice block|v=P4|y}} × 3 | ||
** {{icon|Numbered gate|y|v=P4}} × 1 (lowers when 1 Arctic Cannon Beetle is defeated) | ** {{icon|Numbered gate|y|v=P4}} × 1 (lowers when 1 Arctic Cannon Beetle is defeated) | ||
* '''Tools''': | ** {{icon|Stalactite|y|v=P4}} × 14 (plus indefinite falling from the ceiling after the Arctic Cannon Beetle does its attack) | ||
'''Tools''': | |||
** None | ** None | ||
* '''Wild Pikmin''': | * '''Wild Pikmin''': | ||
| Line 94: | Line 108: | ||
** {{icon|Castaway|y|v=P4}} (Inside Arctic Cannon Beetle) | ** {{icon|Castaway|y|v=P4}} (Inside Arctic Cannon Beetle) | ||
** {{icon|Egg|y|v=P4 large}} × 1 | ** {{icon|Egg|y|v=P4 large}} × 1 | ||
{{see also|Arctic Cannon Beetle#Strategy|t1=Arctic Cannon Beetle strategy}} | |||
{{clear}} | {{clear}} | ||
==Gallery== | ==Gallery== | ||
===Sublevel 1=== | |||
<gallery> | |||
P4 Sublevel 1 Landing Site SS.jpg|The landing site and surrounding area. | |||
P4 Poison Emitter & Gold Nuggets SS.jpg|A pile of [[Gold Nugget]]s, a [[Hazard generator#Poison emitter|poison emitter]], and two [[Hazard generator#Ice vent|ice vents]]. | |||
P4 Chillyhop & Raw Material SS.jpg|A [[Chillyhop]], a pile of [[raw material]], a [[hydro jelly]], some ice vents, and an [[ice wall]]. | |||
P4 Snowy Blowhogs & Disguised Delicacy SS.jpg|Two [[Snowy Blowhog]]s, two hydro jellies, one containing a [[Disguised Delicacy]], and a [[nectar egg]]. | |||
P4 Sublevel 2 Entrance in Hydro Jelly SS.jpg|The entrance to the second sublevel engulfed in a hydro jelly and adjacent to an ice vent. | |||
</gallery> | |||
===Sublevel 2=== | |||
<gallery> | |||
P4 Sublevel 2 Landing Site SS.jpg|The landing site and surrounding area. | |||
P4 Tunnel Entrance SS.jpg|The entrance to the tunnel-like passage. | |||
P4 Tunnel Interior SS.jpg|The interior of the tunnel-like passage. | |||
P4 Tunnel Exit & Ice Sprouts SS.jpg|The exit of the tunnel-like passage, an [[iron fence]], and some [[Ice Pikmin]] [[Maturity|sprouts]]. | |||
P4 Cardboard Box & Switch SS.jpg|A [[switch]], some frozen [[Puckering Blinnow]]s, an iron fence, and a [[cardboard box]] impeding the way to an [[Candypop Bud|white Candypop Bud]]. | |||
P4 Castaway & Memory Fragment (Left Edge) SS.jpg|A [[castaway]], the [[Memory Fragment (Left Edge)]], two hydro jellies, one containing the [[True Goo]] and the other containing an [[ice block]], two iron fences, a poison emitter, and a pile of raw material. | |||
P4 Sublevel 3 Entrance SS.jpg|An ice block and the entrance to the third sublevel. | |||
</gallery> | |||
===Sublevel 3=== | |||
<gallery> | <gallery> | ||
P4_Sublevel_3_Landing_Site_SS.jpg|The landing site and surrounding area. | |||
P4 ACB Arena (1) SS.jpg|One segment of the arena in which the [[Arctic Cannon Beetle]] is fought, with a frozen hydro jelly, nectar egg, two ice blocks, and some fallen icicles. | |||
P4 ACB Arena (2) & Exit SS.jpg|The other portion of the arena where the Arctic Cannon Beetle is fought, with fallen icicles and ice blocks, as well as a frozen hydro jelly impeding the cave's exit. | |||
</gallery> | </gallery> | ||
| Line 130: | Line 168: | ||
==See also== | ==See also== | ||
*[[Serene Shores]] | |||
*[[Arctic Cannon Beetle]] | |||
*[[Frozen Inferno]] | |||
{{Serene Shores}} | |||
{{P4 caves}} | {{P4 caves}} | ||
[[Category:Subzero Sauna| ]] | [[Category:Subzero Sauna| ]] | ||
Latest revision as of 17:11, February 25, 2025
| Subzero Sauna | |
|---|---|

| |
| Location | Serene Shores |
| Sublevels | 3 |
| Rescues | 2 |
| Treasures | 5 |
| Onions | 0 |
| Suggested Pikmin | |
| Wild Pikmin | |
|
The following article or section contains guides. |
The Subzero Sauna is a cave in the Serene Shores in Pikmin 4. It has 3 sublevels where White Pikmin can be found. There is a large amount of obstacles and enemies using ice, making Ice Pikmin a good choice to bring down. The final sublevel has an encounter with an adult Arctic Cannon Beetle. This cave has ![]() × 545 worth of treasure.
× 545 worth of treasure.
How to reach[edit]
The cave can be found buried west of the Water's Edge base just past the alcove with the Engulfed Castle. The clay bridge near the base can be built to reach the other side of the lake if necessary, or the player can swim across with Oatchi or wait until noon for the water level to ebb. The cave is buried just around the corner past the bridge with a Peckish Aristocrab and Aristocrab Offspring prowling near the mound hiding it.
Notes[edit]
Olimar's Voyage Log[edit]
Sublevel 1[edit]

- Treasures:
 Disguised Delicacy (inside hydro jelly)
 Gold Nugget × 15 (5 inside a hydro jelly)
- Enemies:
 Snowy Blowhog × 2
 Chillyhop × 1
- Obstacles:
 Hydro jelly × 5
 Ice vent × 6
 Ice wall × 1
 Poison emitter × 1
- Tools:
- None
- Wild Pikmin:
 Ice Pikmin × 5 (inside a hydro Jelly)
- Others:
 Candypop Bud × 1 (inside a hydro jelly)
 Egg × 2
 Raw material pile × 1 (pile of 15)
Firstly, destroy the ice wall west of the base, defeat the Chillyhop and destroy the three ice vents. Next, destroy the hydro jelly containing a White Candypop Bud, convert any Pikmin into White Pikmin if needed, and head south. Destroy a lone ice vent, then follow the path to the Gold Nugget, guarded by a poison emitter. Destroy the emitter using White Pikmin and collect the Gold Nuggets. Regroup back at the base and head into the northern room. Defeat the two Snowy Blowhogs, destroy the two hydro jellies and another ice vent. Collect the Disguised Delicacy inside of the southern jelly and return back to base. Destroy the final hydro jelly next to the base to retrieve some more Gold Nuggets. Once completed, head towards the northwest and destroy the large hydro jelly, allowing for the next sublevel to be entered.
Sublevel 2[edit]
- Treasures:
 Memory Fragment (Left Edge)
 True Goo (inside hydro jelly)
- Enemies:
 Puckering Blinnow × 3
 Arctic Cannon Larva × 2
 Iceblown Dweevil × 1
- Obstacles:
 Box × 1
- Hydro jelly × 2
 Ice block × 3
 Iron fence × 2
 Iron fence × 3
- Poison emitter × 1
 Stalactite × 5
 Water body × 3
- Tools:
 Button × 1
- Wild Pikmin:
- Ice Pikmin × 5 (Sprouts)
 Blue Pikmin × 5 (Sprouts) (if 5 or less Blue Pikmin)
- Others:
 Castaway
 Candypop Bud × 1
- Candypop Bud × 1
- Raw material pile × 1 (pile of 20)
Advice The Rookie Rescue Officer must take the Ice Pikmin before exploring and defrost the cold air while Oatchi look after the other Pikmin, because this sublevel has iron fences which lowered later by the button
Defrost the air: You'll find the first ice block right near the start but there will be a stalactite falling in frost so you must destroy them. Next right through the tunnel with the frozen water you'll find another stalactite falling, make sure you destroy it so it would distract your Pikmin. Then go through an iron fence and there's a small room with an Arctic Cannon Larva which must be defeated and 5 buried Ice Pikmin, and there's another room with another Arctic Cannon Larva which also need to be defeated and another ice block inside a frozen hydro jelly. Finally there's another iron fence you could go through then you'll find on a frozen body of water with 3 Puckering Blinnows which you don't have to defeat yet, there's another iron fence and another ice block to destroy, make sure let you or your Ice or Blue Pikmin press the button to lower the iron fences, destroy stalactite, and move the box.
Exploring: First put some Pikmin inside the white Candypop Bud then defeat the 3 Puckering Blinnows if you want to transport the objects you can freeze the bodies of water with Ice Pikmin if you transport the objects quicker. Both treasures, the pile of raw material, and the castaway is in the same large room with one of the Arctic Cannon Larvae the True Goo is inside the other hydro jelly, but make sure destroy poison emitter to transport it. The Memory Fragment (Left Edge) and the castaway is in another body of water. Warning there's an Iceblown Dweevil falling from the sky and it might take the object so you defeat it first so it'll quit stopping the transportation.
Next sublevel: To get to the next sublevel must freeze the water where Puckering Blinnows were, with 10 Ice Pikmin or an Ice Blast then jump to the upper platform with Oatchi to reach it.
Sublevel 3[edit]

|
The following article or section is in need of assistance from someone who plays Pikmin 4. |
- Treasures:
- Enemies:
- Obstacles:
- Hydro jelly × 3
- Ice block × 3
 Numbered gate × 1 (lowers when 1 Arctic Cannon Beetle is defeated)
- Stalactite × 14 (plus indefinite falling from the ceiling after the Arctic Cannon Beetle does its attack)
Tools:
- None
- Wild Pikmin:
- Ice Pikmin × 10 (inside Hydro Jelly)
- Others:
- See also: Arctic Cannon Beetle strategy.
Gallery[edit]
Sublevel 1[edit]
The landing site and surrounding area.

A pile of Gold Nuggets, a poison emitter, and two ice vents.
A Chillyhop, a pile of raw material, a hydro jelly, some ice vents, and an ice wall.
Two Snowy Blowhogs, two hydro jellies, one containing a Disguised Delicacy, and a nectar egg.
The entrance to the second sublevel engulfed in a hydro jelly and adjacent to an ice vent.


Sublevel 2[edit]
The landing site and surrounding area.
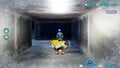
The entrance to the tunnel-like passage.
The interior of the tunnel-like passage.
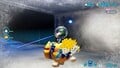
The exit of the tunnel-like passage, an iron fence, and some Ice Pikmin sprouts.
A switch, some frozen Puckering Blinnows, an iron fence, and a cardboard box impeding the way to an white Candypop Bud.
A castaway, the Memory Fragment (Left Edge), two hydro jellies, one containing the True Goo and the other containing an ice block, two iron fences, a poison emitter, and a pile of raw material.
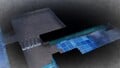
An ice block and the entrance to the third sublevel.


_SS.jpg)

Sublevel 3[edit]
The landing site and surrounding area.
One segment of the arena in which the Arctic Cannon Beetle is fought, with a frozen hydro jelly, nectar egg, two ice blocks, and some fallen icicles.
The other portion of the arena where the Arctic Cannon Beetle is fought, with fallen icicles and ice blocks, as well as a frozen hydro jelly impeding the cave's exit.

_SS.jpg)
_%26_Exit_SS.jpg)
Names in other languages[edit]
| Language | Name | Meaning |
|---|---|---|
| 氷温サウナ? Hyōon Sauna |
Ice-Temperature Sauna | |
(traditional) |
冷凍三溫暖 Lěngdòng Sānwēnnuǎn |
Freezing Sauna |
(simplified) |
冷冻三温暖 Lěngdòng Sānwēnnuǎn |
Freezing Sauna |
| IJssauna | Ice sauna | |
| Sauna des glaces | Ice sauna | |
| Eissauna | Ice Sauna | |
| Sauna sottozero | Subzero sauna | |
| 혹한 사우나 Hokhan Sauna |
Biting Cold Sauna | |
| Sauna glacial | Glacial sauna | |
| Sauna gélida | Icy sauna |
See also[edit]
| Caves in Pikmin 4 | |
|---|---|
| Rescue Command Post | Burrow of Beginnings |
| Sun-Speckled Terrace | Last-Frost Cavern • Crackling Cauldron • Aquiferous Summit • Industrial Maze • Hectic Hollows |
| Blossoming Arcadia | Drafty Gallery • Secluded Courtyard • Sightless Passage • Kingdom of Beasts |
| Serene Shores | Seafloor Resort • Subzero Sauna • Below-Grade Discotheque • Engulfed Castle |
| Hero's Hideaway | Doppelgänger's Den • Frozen Inferno • Plunder Palace |
| Giant's Hearth | Ultimate Testing Range • Dream Home • Cradle of the Beast |
| Primordial Thicket | The Mud Pit • Subterranean Swarm • Cavern for a King |
| Dandori Challenges | Dandori Day Care • Hotshock Canyon • Rockaway Cellars • Test Tubs • Ice-Cross Course • Hefty Haulway • Aerial Incinerator • Strategic Freezeway • Planning Pools • Toggle Training • Cliff-Hanger's Hold • Oasis of Order • Trial of the Sage Leaf |
| Dandori Battles | Trial Run • Battle in a Box • Dandori Castle • Leafy Showdown • Hot Sandy Duel • Final Battle |