Crystal wall

|
The following article or section is in need of assistance from someone who plays Pikmin 3. |
Crystal walls are a type of gate in Pikmin 3 and Pikmin 4 that require Rock Pikmin to break.
In Pikmin 3, the gate itself is made of a piece of glass (identified as "crystal") stuck between 2 clamps, and will crack as Rock Pikmin hit it. Once enough damage has occurred, the wall will shatter altogether rather than break gradually or sink in the ground. The cracks are split in quadrants, and once a quadrant has been damaged enough, the whole structure breaks. As such, hitting the same quadrant repeatedly will take the wall down faster than hitting several quadrants. Although uncertain, it appears that all crystal walls in Story Mode take 24 direct hits to break if the same quadrant is hit every time, and 28 direct hits if a different quadrant is hit each time. Most crystal gates needs 2 bomb rock explosions in order to shatter, regardless of health value. Some crystal walls are placed in locations where an iron ball can be pushed down a slope to break the wall. In Pikmin 3 Deluxe, there are 3 designs of this wall: one with the standard dark rusted metal on the sides, one with much lighter rusted metal, and one with rust-free metal.
In Pikmin 4, the glass comprising the gate is now similar in appearance to crystals such as crystal nodules. Crystal walls in Pikmin 4 act as one surface instead of being split into four quadrants, and damage is the same regardless of location struck. It is the only destructible gate that Oatchi is incapable of demolishing by himself.
In a prerelease version of Pikmin 3, this gate was called a "crystallized wall". It may have been changed at some point in the game's development to shorten and simplify it.
Locations[edit]
Pikmin 3[edit]
Areas[edit]
- Garden of Hope
- There are three crystal walls in this area. The first wall can be found in the landing site, towards the north. This wall allows for the northern part of the area to be accessed. The second wall is located towards the southeast, adjacent to the Sunseed Berry on the ledge. The path towards the south leads to the Rock Pikmin cave. The third and final wall is located behind the second wall, and it is blocking Brittany inside of her crash site. In Pikmin 3 Deluxe's Normal difficulty, a nectar egg will be on the right side of this wall.
- Distant Tundra
- There are two crystal walls in this area. The first wall is located slightly southeast of the landing site, underneath the thin path between the Fiery Blowhog and the Joustmite. This wall allows access to the small section containing the two Pyroclasmic Slooches and the blue bridge fragments. The second wall can be found in the Spotty Bulbear cave, just behind the bamboo gate. The wall is north of the Astringent Clump, and it is adjacent to multiple Bomb Rocks.
- Formidable Oak
- There is one crystal wall in this area. It is located in the first main segment and towards the central-north. It is north of an iron ball, which can be used to break the wall, and it blocks the alcove containing the game's only instance of Shearwigs (in Story Mode).
Side Stories[edit]
Olimar's Comeback[edit]
- Creature Hunting
- There are two crystal walls in this story's area. They can both be found in the main segment. The first wall is in the area's landing site during Story Mode and towards the west, replacing what would be a reinforced wall. The second wall is located slightly southeast of this same landing site, adjacent to multiple Dwarf Bulbears and a Spotty Bulbear.
- Team Monster Hunt
- There is one crystal wall in this story's area. It can be found slightly south of the Yellow Onion, replacing what would be a dirt wall during story mode.
- Another Part Found
- There is one crystal wall in this story's area. It shares the same location as the one found during Story Mode, blocking the alcove towards the central-north. This alcove contains some Yellow Pikmin sprouts.
Mission Mode[edit]
Collect Treasures![edit]
- Tropical Forest
- There is one crystal wall in this stage. It is located towards the southwest, blocking the section containing the two Pyroclasmic Slooches and multiple fruits.
- Shaded Garden
- There is one crystal wall in this stage. It is south of the SPERO, with some Dwarf Bulborbs on the east and a Skutterchuck on the west.
- Twilight Hollow Remix
- There are two crystal walls in this stage. They can both be found toward the southwest and in the section containing the Bulborb and the Swooping Snitchbug. The first wall is slightly north, and the other wall is slightly west.
- Clockwork Chasm
- There is one crystal wall in this stage. It is located slightly northeast of the SPERO, just beyond the dirt wall and slightly north. The wall is on the eastern side of the square-shaped pool containing a Hermit Crawmad and a Golden Sunseed.
Battle Enemies![edit]
- Thirsty Desert
- There are two crystal walls in this stage. The first wall is adjacent to the Red Onion, with it being below the raised section the Onion is on and slightly east. The second wall can be found towards the north, towards the west of the lake surrounding the Rock Onion.
- Twilight Hollow
- There are two crystal walls in this stage. The first wall is directly south of the Rock Onion, and the second wall can be found towards the southwest with some Male Sheargrubs nearby.
- Garden of Hope Remix
- There is one crystal wall in this stage. It shares the same location as one of the crystal walls found during Story Mode; specifically, it's the wall north of the Story Mode's landing site, or south of the SPERO. Opposite this wall is a pair of Burgeoning Spiderworts, alongside a Burrowing Snagret.
- Distant Tundra Remix
- There is one crystal wall in this stage. It shares the same location as the crystal found in the main segment during Story Mode, underneath the thin pathway between the Fiery Blowhog and some Male Sheargrubs. A Joustmite would be where the Male Sheargrubs are located during Story Mode.
- Twilight River Remix
- There is one crystal wall in this stage. It is located north of the SPERO, blocking access to the section containing the Calcified Crushblat and the Flighty Joustmite. An electric gate would be here during Story Mode.
- Formidable Oak Remix
- There are three crystal walls in this stage. The first wall shares the same location as the one found during Story Mode, blocking the alcove that now contains a Red Candypop Bud. The second wall is located towards the far north, in the section containing a Whiptongue Bulborb. The wall is towards the west and blocks access to some Blue Pikmin sprouts from being plucked. The third and final wall can be found towards the south. It is in the section with the three Bulborbs and slightly south. Some Dwarf Bulborbs are also in this section.
- Fortress of Festivity
- There are two crystal walls in this stage. The first wall is directly west of the SPERO, blocking access to the small section with the Burgeoning Spiderwort. The second wall can be found northwest of the previous wall, blocking the section containing three Watery Blowhogs.
- The Rustyard
- There is one crystal wall in this stage. It is slightly southeast of the Rock Onion with a geyser on the other side.
- Beastly Caverns
- There is one crystal wall in this stage. It is in the central segment, and it is adjacent to the pair of Blue Candypop Buds.
Bingo Battle[edit]
- Twisted Cavern
- There are two crystal walls in layout A. The first wall is located in the connecting path between the eastern section and the small middle section. The second wall can be found in the opposite connect path between the western section and the small middle section. Each wall is blocking access to the small central section full of Skutterchucks.
- Arid Metropolis
- There are ten crystal walls in layout A. The first wall is located east of the westernmost Onion, and the second wall can be found west of the easternmost Onion. The third wall is located towards the southwest, blocking an alcove. The fourth wall can be found directly north of the third wall. The fifth and sixth walls will be on the western side of this path: one on the second row, one on the fifth row. The seventh wall can be found towards the northeast, blocking another alcove. The eighth wall is located directly south of the seventh wall. The ninth and tenth walls will be on the eastern side of this path: one on the second row, one on the fifth row.
- There are six crystal walls in layout B. The first pair of walls can be found east of the westernmost Onion, with one on row two and the other on row five. The second pair of walls are located west of the easternmost Onion, with one on row one and the other on row four. The final pair of walls can be found towards either the north or the south. Both walls are directly opposite the large purple tub that is adjacent to multiple nectar eggs. Each wall blocks access to some Yellow Pikmin sprouts.
- Rusted Labyrinth
- There are two crystal walls in layout C. The first wall is slightly southeast of the westernmost Onion, and the second wall is slightly northwest of the easternmost Onion.
- Jigsaw Colosseum
- There are two crystal walls in layout B. The first wall is east of the westernmost Onion, just north of some Pellet Posies, and the second wall is west of the easternmost Onion, just south of some Pellet Posies.
- There are eight crystal walls in layout C. The first four walls are in each corner of the map. The fifth wall is directly south of the center of the map, and the sixth wall is directly north of the center of the map. The seventh wall is directly north of the westernmost Onion, and the eighth wall is directly south of the easternmost Onion.
Pikmin 4[edit]
Areas[edit]
- Giant's Hearth - Has 1120 HP
- There is one crystal wall in this area. It is located towards the east, adjacent to the pair of Burgeoning Spiderwort. The wall is southeast of the Abandoned Throne base and northeast of The Central Flame base. It has 1120 HP.
Caves[edit]
- Kingdom of Beasts - Four have 747 HP, two have 1120 HP
- There are three crystal walls on sublevel 2. The first wall is slightly south of the S.S. Beagle, with a pile of raw materials on the opposite side. This wall has 747 HP. The second wall is towards the northeast, blocking the alcove containing the Ambiguous Goo. This wall also has 747 HP. The third and final wall is directly north of the S.S. Beagle, blocking access to the next sublevel entrance. This wall has 1120 HP.
- There is one crystal wall on sublevel 4. It is located in the northern section containing the Planetary Rubber Cutie and one of the Whiptongue Bulborbs. The wall blocks Oatchi from using the pup tunnel, and it has 1120 HP.
- There are two crystal walls on sublevel 5. The first wall is located slightly northeast of the S.S. Beagle, blocking the path leading to the next sublevel entrance. The Spotty Bulbear spawns next to this wall. The second wall can be found directly north of the S.S. Beagle, blocking the alcove containing the switch that lowers an iron fence. A Dwarf Bulbear guards this wall. Each wall has 747 HP.
- Frozen Inferno - Has 1120 HP
- There is one crystal wall on sublevel 2. It is located in the northwestern section that contains a Frosty Bulborb. The wall is towards the west, stopping the Insect Condo from being collected. The wall has 1120 HP.
- Plunder Palace - Two have 747 HP, two have 1120 HP
- There are two crystal walls on sublevel 2. The first wall is slightly southwest of the S.S. Beagle, and the second wall is slightly northeast of the S.S. Beagle. Each wall has 747 HP.
- There is one crystal wall on sublevel 4. It can be found directly west of the S.S. Beagle, just below the unraveled climbing rope. This wall has 1120 HP.
- There is one crystal wall on sublevel 5. It is located northeast of the S.S. Beagle, with the Perforated Raft on the opposite side, in the patch of vegetation. This wall has 1120 HP.
Dandori Challenges[edit]
- Rockaway Cellars - Each has 1120 HP
- There are three crystal walls in this challenge. The first wall is next to the base, on the eastern side. Opposite this wall is a Joustmite. The second wall is located slightly southwest, in the section with the multiple Shearfleas. This wall is close to the dirt wall adjacent to the base. The third and final wall can be found towards the southeast, blocking the alcove containing the Foolish Fruit.
- Cliff-Hanger's Hold - Each has 1120 HP
- There are two crystal walls in this challenge. The first wall is located towards the northwest, on the raised section furthest west. This wall is next to the Wollyhop guarding the Shake-a-Smile, and the exit of the pup tunnel. The second wall can be found slightly northeast of the base, with an Orange Bulborb on the northern side and another Wollyhop on the southern side. Each wall has 1120 HP.
Trial of the Sage Leaf[edit]
- 6th Story: Gimmick Gambit - Has 373 HP
- There is one crystal wall found in this story. It can be found in the section southeast of the base, where the Fiery Dweevil carrying a Bomb Rock spawns. The wall has 373 HP
- 9th Story: Turf Turmoil - Each has 1120 HP
- There are two crystal walls found in this story. The first wall is adjacent to the base and slightly southeast. Opposite this wall is a Purple Candypop Bud. The second wall can be found towards the northwest, at the end of the section containing the two Mama Sheargrubs. Opposite this wall is another Purple Candypop Bud, as well as the pathway leading to the Foolix's arena. Each wall has 1120 HP.
- Final Story: The Purple Key - Has 747 HP,
- There is one crystal wall found in this story. It is towards the northeast, in the section past the dirt wall and the bag. The wall is along the western path, allowing for the dirt-mound that produces Bulborb Larvae to be skipped. It has 747 HP.
Dandori Battle[edit]
Gallery[edit]
|
This article or section is in need of more images. Particularly: |
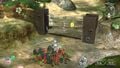
Alph and some Pikmin near a crystal wall.
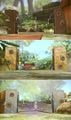
The 3 designs of crystal walls in Pikmin 3 Deluxe.
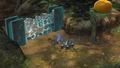
The crystal wall in an earlier version of Pikmin 3.
The wall locked on in an earlier version of Pikmin 3. Notice the different name.
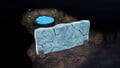
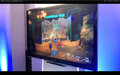
The crystal wall design in Pikmin 4. Notice how it isn't see-through, and how it is attached with clamps on the floor instead of having two supports on either side.


Names in other languages[edit]
| Language | Name | Meaning |
|---|---|---|
| ガラスのカべ? Garasu no Kabe |
Glass wall | |
| Muro de cristal | Crystal wall |
See also[edit]
| hideObstacles |
|---|
|
|
| Minor obstacles |
![[icon]](/index.php?title=Special:Upload&wpDestFile=Stubborn_rocks_icon.png)