Tropical Forest
|
This article is a stub. You can help Pikipedia by expanding it.
|

Tropical Forest (原生の社?, lit.: "Primeval Forest") is a Mission Mode stage in Pikmin 3. It is a compact stage with several small rooms, set in a forest environment with a lake in the center. The stage is playable in the Collect Treasure! and Battle Enemies! modes, and has a remixed version, Tropical Forest Remix.
As the first stage in Mission Mode, it has been playable in various demo versions of Pikmin 3. The Collect Treasure! version is featured in the Pikmin 3 demo and the Pikmin 3 Deluxe demo, and also in the demo at E3 2012, where after defeating the Medusal Slurker, players were been greeted with a cutscene introducing Rock Pikmin.
Overview[edit]
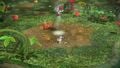
As the first map of Mission Mode, this area is rather simple and small. The environment is a bit similar than that of Tropical Wilds, and this map takes place in a forest, featuring lots of plants, mushrooms and vines. A lake can be found at the center of the map, right next to the starting point in Collect Treasure! mode.
Collect Treasure![edit]
| Tropical Forest Collect Treasure! | |||||||||
|---|---|---|---|---|---|---|---|---|---|

| |||||||||
| Starting Pikmin | |||||||||
| |||||||||
| Requirements | |||||||||
| |||||||||
| Time limit | 7:00 | ||||||||
| Music | Mission Mode (Levels 1-10) | ||||||||
Layout[edit]
The player starts out on a small, grassy area which surrounds the SPERO. Red Pikmin can be found in the leaves around this area. Several of the Cupid's Grenades can also be found in this area.
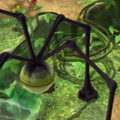
As they go down the small slope in front of them, they will encounter two Dwarf Bulborbs and an Iridescent Flint Beetle. Several Spotcaps and a Kingcap can be removed to obtain more Red Pikmin (making for the full 25), a Sunseed Berry, and a Golden Sunseed. Then they will reach a small, dirt pathway that leads up to a dirt wall. A Face Wrinkler can be found to the right on this path. After the dirt wall has been removed, players will be able to fight the Medusal Slurker to obtain Rock Pikmin. More Rock Pikmin can be found in this area under some leaves located beyond the Medusal Slurker.
Using the newly-acquired Rock Pikmin, the player can now break down a nearby crystal, containing another Sunseed Berry. Behind the Bulborb are more Sunseed Berries, and the Bulborb itself has swallowed several Cupid's Grenades. A little bit more up the path is a pile of fragments which can be crafted into a bridge along with a nugget pile. However, one must be cautious of the nearby Skutterchuck, which will try to kill the Red Pikmin by launching the three crystal nodules nearby. Behind the Skutterchuck is a crystal wall that can be broken only by Rock Pikmin.
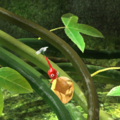
Behind the crystal wall is an area covered in dirt and dry leaves. Here the player will encounter two Pyroclasmic Slooches that set anything they touch ablaze. Behind these Slooches are another couple of Sunseed Berries and Golden Sunseeds, as well as an Insect Condo.
Lastly, in the opposite direction of the nugget pile is a small, enclosed area with fungus growing on the sides. Next to the entrance of the area is a group of Skitter Leaves and another Face Wrinkler. Inside this area is a fearsome Whiptongue Bulborb that will swiftly slurp up the Pikmin with its long tongue; it can be taken out either by throwing Rock Pikmin when it's not facing the leaders or by throwing Pikmin at its eyes to distract it. Once it dies, it will cough up another Golden Sunseed. A final set of Sunseed Berries can be found behind it.
Strategy[edit]
|
The following article or section contains guides. |
First, whistle all the Red Pikmin to your side and have them take the Cupid's Grenades and Sunseed Berry. Defeat the 2 Dwarf Bulborbs and take them, too. Have some Pikmin work on the Kingcap while others tear down the wall. Get the Face Wrinkler and the fruit behind the Kingcap.
Once the Pikmin are done with the wall, defeat the Medusal Slurker to get Rock Pikmin. More Rock Pikmin are under some clovers. Go back to the alcove and collect the Sunseed Berry, Golden Sunseed, and Golden Grenade encased in crystals. Go along the path and order some Pikmin to build the bridge while you destroy the crystal blocking a Bulborb and defeat it. It will cough up multiple Cupid's Grenades.
By now, the bridge should be finished, so have your Pikmin take back everything. Next, kill the Skutterchuck and destroy the crystal wall. Use Red Pikmin to kill the two Pyroclasmic Slooches to clear the path to bring back the fruit behind it. Next, have some Pikmin take back the Face Wrinkler and nuggets. In the last "room", there is a Whiptounge Bulborb. Defeat it, carry back its spoils, and you should've made it to Platinum.
Objects[edit]
| Leaders | ||||||||
|---|---|---|---|---|---|---|---|---|
| Icon | Name | Starting location | Starting leader | |||||
| Alph | Underneath the SPERO in the center of the stage | Player 1 | ||||||
| Brittany | Underneath the SPERO in the center of the stage | Player 2 (co-op only) | ||||||
| Pikmin | ||||||||
|---|---|---|---|---|---|---|---|---|
| Icon | Type | Amount | Location(s) | |||||
| Red Pikmin | 25 |
| ||||||
| Rock Pikmin | 25 |
| ||||||
| Treasures | ||||||||
|---|---|---|---|---|---|---|---|---|
| Icon | Name | Amount | Value | Total value | Notes | |||
| Cupid's Grenade | 12 | 6 are inside of the Bulborb | ||||||
| Sunseed Berry | 5 | 1 is inside of a small crystal | ||||||
| Face Wrinkler | 2 | |||||||
| Golden Grenade | 6 | 1 is inside of a small crystal 3 are inside of the Whiptongue Bulborb | ||||||
| Insect Condo | 1 | |||||||
| Golden Sunseed | 2 | 1 is inside of a large crystal | ||||||
| Nuggets | 60 | 2 piles of 30 | ||||||
| Enemies | 10[note 1] | Varies | ||||||
| Enemies | ||||||||
|---|---|---|---|---|---|---|---|---|
| Icon | Name | Amount | Value | Total value | Notes | |||
| Bulborb | 1 | Contains 3 Cupid's Grenades | ||||||
| Dwarf Bulborb | 2 | |||||||
| Iridescent Flint Beetle | 1 | Drops 6 nectars | ||||||
| Medusal Slurker | 1 | Contains 10 Rock Pikmin | ||||||
| Pyroclasmic Slooch | 2 | |||||||
| Skitter Leaf | 2 | |||||||
| Skutterchuck | 1 | |||||||
| Whiptongue Bulborb | 1 | Drops 3 Golden Grenades | ||||||
| Tools and obstacles | ||||||||
|---|---|---|---|---|---|---|---|---|
| Icon | Name | Amount | Notes | |||||
| Crystal nodule | 3 | The Skutterchuck can pick these up. | ||||||
| Crystal wall | 1 | |||||||
| Dirt wall | 1 | |||||||
| Large crystal | 2 | 1 contains a Golden Sunseed. | ||||||
| Kingcap | 1 | |||||||
| Red fragment bridge | 1 | Requires 50 | ||||||
| Small crystal | 2 | 1 contains a Golden Grenade 1 contains a Sunseed Berry. | ||||||
| Spotcap | 4 | |||||||
| Water body | 1 | |||||||
- ^ Only includes enemies that give pokos.
Battle Enemies![edit]
| Tropical Forest Battle Enemies! | |||||||||
|---|---|---|---|---|---|---|---|---|---|

| |||||||||
| Starting Pikmin | |||||||||
| |||||||||
| Requirements | |||||||||
| |||||||||
| Time limit | 7:00 | ||||||||
| Music | Mission Mode (Levels 1-10) | ||||||||
Terrain[edit]
The player starts with Alph in a small alcove with the Red Onion. Outside this alcove is a group of nine planted Red Pikmin, and some pellets to help boost the Red Pikmin's population. Unlike in the Collect Treasure! mode, the player starts with these nine Pikmin only and has to build up an army from there. Following this grassy area is a split path. On the right path is a family of two Dwarf Bulborbs and one Bulborb. Just beyond them is a crystal wall. Since there are no Rock Pikmin in this level, the player must use the bomb rocks in the level to clear the wall.
The left path has a few Red and Yellow Spectralids fluttering about, as well as a Swooping Snitchbug. Around this section, the player will notice the wild Baldy Long Legs traversing the area, posing a major threat to Pikmin carrying back objects, but also a benefit, as it may kill a few creatures in the process. Nearby is a geyser, which will lead to a dirt area, location of the Yellow Onion, Brittany, and the nine planted Yellow Pikmin. It should be noted that the Baldy Long Legs can trespass in this area, even with it belonging to the Onion.
Outside of this Onion area are a few Spectralids and an egg, which should be used to flower up the Yellow Pikmin. A vine leading downwards is also present, which will allow access back down to the Red Onion, but only if the Pikmin aren't carrying anything. To carry objects back to the Onion, the player must venture right, where they will find a area full of decaying leaves, home to a family of some Dwarf Orange Bulborbs and Orange Bulborbs, as well as a few more Spectralids fluttering about.
Outside of that area is dirt wall, directly in the path of the Baldy Long Legs. It can come and crush any Pikmin working on the wall, so, once again, bomb rocks are advised for a quick finish. Beyond the wall is another Swooping Snitchbug, who can also interfere with carrying objects back. Here is a good spot to fight the Baldy Long Legs. With a medium sized group of Pikmin, an ultra-spicy spray can be used to attack it.
After that, a few Dwarf Bulborbs can be seen, with an Orange Bulborb just beyond them. Beside the Dwarf Bulborbs is another side area, with a dirt path leading straight into a family of Skitter Leaves. Bomb rocks can make quick work of them. Going past the Orange Bulborb will bring the player back to the Red Onion.
Objects[edit]
| Leaders | ||||||||
|---|---|---|---|---|---|---|---|---|
| Icon | Name | Starting location | Starting leader | |||||
| Alph | Underneath the Red Onion in the southwesternmost alcove | Player 1 | ||||||
| Brittany | Underneath the Yellow Onion in the southeasternnmost alcove | Player 2 | ||||||
| Pikmin | ||||||||
|---|---|---|---|---|---|---|---|---|
| Icon | Type | Amount | Location(s) | |||||
| Red Pikmin | 9 |
| ||||||
| Yellow Pikmin | 9 |
| ||||||
| Onions | ||||||||
|---|---|---|---|---|---|---|---|---|
| Icon | Name | Starting Location | ||||||
| Red Onion | In an alcove towards the southwest; Alph starts here | |||||||
| Yellow Onion | In the large alcove towards the southeast; Brittany starts here | |||||||
| Pellets and Pellet Posies | ||||||||
|---|---|---|---|---|---|---|---|---|
| Icon | Name | Amount | Notes | |||||
| Red 1-pellet | 3 | |||||||
| Enemies | ||||||||
|---|---|---|---|---|---|---|---|---|
| Icon | Name | Amount | Value | Total value | Notes | |||
| Baldy Long Legs | 1 | |||||||
| Bulborb | 2 | |||||||
| Dwarf Bulborb | 7 | |||||||
| Dwarf Orange Bulborb | 5 | |||||||
| Orange Bulborb | 3 | |||||||
| Red Spectralids | 2 | Each drops 1 ultra-spicy nectar | ||||||
| Swooping Snitchbug | 2 | |||||||
| Yellow Spectralids | 4 | Each drops 1 nectar | ||||||
| Tools and obstacles | ||||||||
|---|---|---|---|---|---|---|---|---|
| Icon | Name | Amount | Notes! | |||||
| Crystal wall | 1 | |||||||
| Dirt wall | 1 | |||||||
| Geyser | 1 | |||||||
| Spotcap | 4 | |||||||
| Water body | 1 | |||||||
| Others | ||||||||
|---|---|---|---|---|---|---|---|---|
| Icon | Name | Amount | Notes | |||||
| Nectar egg | 1 | Drops 1 nectar | ||||||
| Bomb Rock | 5 | |||||||
World records[edit]
In Pikmin 3, these are the world records for the challenge, as obtained from the in-game global rankings feature. The following scores were retrieved on June 20th, 2016. Since the in-game leaderboards have been compromised, it is impossible to obtain more up-to-date legitimate records from the game, though players may have obtained higher scores since.
- Collect Treasure!
- Solo:
 × 9760
 - Co-op: × 9130
- Solo:
- Battle Enemies!
- Solo:
 × 10460
 - Co-op: × 10760
- Solo:
In Pikmin 3 Deluxe, these are the world records for the challenge, as obtained from the in-game global rankings feature. The following scores were retrieved on June 30th, 2022.
- Collect Treasure!
- Solo: × 10690
- Co-op: × 10810
- Solo:
- Battle Enemies!
- Solo: × 11210
- Co-op: × 11330
- Solo:
Gallery[edit]
|
This article or section is in need of more images. Particularly: |
Collect Treasure! preview.
Collect Treasure! icon.
Battle Enemies! icon.
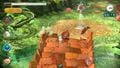
Starting location of the Collect Treasure! version.
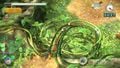
The vines can be slid down as a shortcut back to the base.
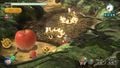
The bridge creates a straight path from the end of the area back to base.
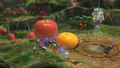
Two Pyroclasmic Slooches guard the fruit past the crystal wall.

Orange Bulborbs in Battle Enemies! mode.

The scoreboard for after completing Collect Treasure!
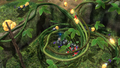
An early E3 2012 screenshot of Pikmin carrying a Citrus Lump and an Insect Condo.
An early E3 2012 screenshot showing that both Yellow and Blue Pikmin would appear in the area at some point.
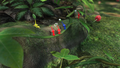
An early E3 2012 screenshot of Red and Rock Pikmin carrying nuggets while sliding down a vine. A climbing stick is on the left side.
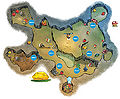
Concept art map for the Pikmin 3 area in the E3 2012 demo.


Trivia[edit]
- Tropical Forest in Battle Enemies! mode is the only stage to have a crystal wall present on the field, yet no way of obtaining Rock Pikmin, meaning two bomb rocks are required to destroy it.
Names in other languages[edit]
|
The following article or section needs help from someone who can translate Korean text. |
| Language | Name | Meaning |
|---|---|---|
| 原生の杜? Gensei no Mori |
Primeval Forest | |
(traditional) |
原生森林 | Primitive forest |
(simplified) |
原生森林 | Primitive forest |
| Forêt primitive | Primitive forest | |
| Urwüchsiger Wald | Primeval forest | |
| Foresta origine | Origin forest | |
| 원주의 술 Wonju-ui Sul |
||
| Bosque Primigenio | Primitive forest |