Hectic Hollows: Difference between revisions
1337Walrus (talk | contribs) m (louie request) |
|||
| (16 intermediate revisions by 6 users not shown) | |||
| Line 10: | Line 10: | ||
|onions = 0 | |onions = 0 | ||
|suggested = {{icon|Red Pikmin|v=P4 HUD}} {{icon|Ice Pikmin|v=P4 HUD}} | |suggested = {{icon|Red Pikmin|v=P4 HUD}} {{icon|Ice Pikmin|v=P4 HUD}} | ||
|wild = {{icon|Ice Pikmin|v=P4 HUD}} | |||
}} | }} | ||
{{guide}} | {{guide}} | ||
| Line 15: | Line 16: | ||
== How to reach == | == How to reach == | ||
The cave is located right next to the area's first base, Ancient Arches, but cannot be reached due to the entrance being on a high ledge requiring Oatchi's [[jump]] ability. Once unlocked, simply jump up the ledge and the cave will be accessible. | The cave is located right next to the area's first base, Ancient Arches, but cannot be reached initially due to the entrance being on a high ledge requiring Oatchi's [[jump]] ability. Once this ability is unlocked, simply jump up the ledge and the cave will be accessible. | ||
== Notes == | == Notes == | ||
| Line 26: | Line 27: | ||
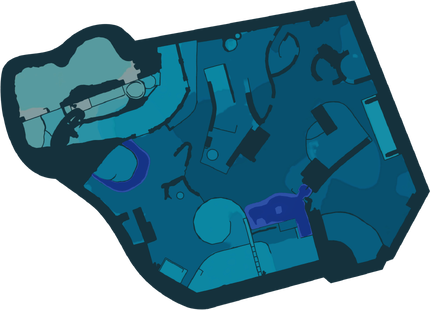
[[File:P4 Map Hectic Hollows 1.png|thumb|300px|Map of the sublevel.]] | [[File:P4 Map Hectic Hollows 1.png|thumb|300px|Map of the sublevel.]] | ||
* '''Treasures''': | * '''Treasures''': | ||
** {{icon|Empty Vase|v=P4|y}} × 1 ( | ** {{icon|Empty Vase|v=P4|y}} × 1 (inside hydro jelly) | ||
** {{icon|Mama Doll Head|v=P4|y}} × 1 | ** {{icon|Mama Doll Head|v=P4|y}} × 1 | ||
* '''Enemies''': | * '''Enemies''': | ||
** {{icon|Bulborb|v=P4|y}} × 1 (drops 1 | ** {{icon|Bulborb|v=P4|y}} × 1 (drops 1 raw material) | ||
** {{icon|Dwarf Bulborb|v=P4|y}} × 4 | ** {{icon|Dwarf Bulborb|v=P4|y}} × 4 | ||
* '''Obstacles''': | * '''Obstacles''': | ||
** {{icon|Breakable pot|v=P4|y}} × 3 | ** {{icon|Breakable pot|v=P4|y}} × 3 | ||
** {{icon|Hydro jelly|v=P4|y}} × 2 ( | ** {{icon|Hydro jelly|v=P4|y}} × 2 (1 contains 5 Ice Pikmin, 1 contains the Empty Vase) | ||
** {{icon|Iron fence|v=P4|y}} × 1 | ** {{icon|Iron fence|v=P4|y}} × 1 | ||
** {{icon|Kingcap|y|v=P4}} × 1 (drops 8 raw material) | ** {{icon|Kingcap|y|v=P4}} × 1 (drops 8 raw material) | ||
** {{icon|Paper bag|v=P4|y}} × 1 (10 weight) | ** {{icon|Paper bag|v=P4|y}} × 1 (10 weight) | ||
** {{icon|Spotcap|y|v=P4}} × 5 (drop 4 raw material) | ** {{icon|Spotcap|y|v=P4}} × 5 (drop 4 raw material) | ||
** {{icon|Water body|y|v=P4}} × 1 ( | ** {{icon|Water body|y|v=P4}} × 1 (requires 10 Ice Pikmin to freeze) | ||
* '''Tools''': | * '''Tools''': | ||
| Line 46: | Line 47: | ||
* '''Wild Pikmin''': | * '''Wild Pikmin''': | ||
** {{icon|Ice Pikmin|v=P4|y}} × 15 (5 buried, 5 inside a hydro jelly, 3 fighting a | ** {{icon|Ice Pikmin|v=P4|y}} × 15 (5 buried, 5 inside a hydro jelly, 3 fighting a Dwarf Bulborb, and 2 pushing the paper bag) | ||
* '''Others''': | * '''Others''': | ||
** {{icon|Egg|y|v=P4}} × 2 | ** {{icon|Egg|y|v=P4}} × 2 | ||
** {{icon|Raw material|v=P4|y|l=Raw material}} × 28 (pile of 15 and 13 more from other sources) | ** {{icon|Raw material|v=P4|y|l=Raw material}} × 28 (pile of 15, and 13 more from other sources) | ||
Start by building the [[climbing wall]], and once it is built, go up with the [[rookie Rescue Officer]] and push the [[paper bag]] to allow [[Oatchi]] to access the upper section. Defeat the enemies, then carry the treasures to the S.S. Beagle. The hole to the next sublevel is behind some [[breakable pot]]s which require Oatchi's Rush to break. | |||
{{clear}} | {{clear}} | ||
| Line 63: | Line 66: | ||
* '''Obstacles''': | * '''Obstacles''': | ||
** {{icon|Breakable pot|v=P4|y}} × 11 ( | ** {{icon|Breakable pot|v=P4|y}} × 11 (groups of 1, 2, 4, and 4; the group of 2 contains 2 nectar, one group of 4 contains 5 Ice Pikmin, and the other group of 4 blocks the cave exit) | ||
** {{icon|Hydro jelly|v=P4|y}} × 1 | ** {{icon|Hydro jelly|v=P4|y}} × 1 | ||
* '''Wild Pikmin''': | * '''Wild Pikmin''': | ||
** {{icon|Ice Pikmin|v=P4|y}} × 5 (inside pots) | ** {{icon|Ice Pikmin|v=P4|y}} × 5 (inside breakable pots) | ||
* '''Others''': | * '''Others''': | ||
** {{icon|Castaway|v=P4|y}} × 1 (requires Oatchi's rush) | ** {{icon|Castaway|v=P4|y}} × 1 (requires Oatchi's rush) | ||
** {{icon|Raw material|v=P4|y|l=Raw material}} × 5 (dropped by Tusked Blowhog) | ** {{icon|Raw material|v=P4|y|l=Raw material}} × 5 (dropped by Tusked Blowhog) | ||
** {{icon|Nectar|v=P4|y}} × 2 (1 drop each inside a group breakable pots) | |||
{{see also|Tusked Blowhog#Strategy|t1=Tusked Blowhog strategy}} | |||
This sublevel contains a [[Tusked Blowhog]], which acts like the [[boss]] of this cave. Defeat the Tusked Blowhog, then collect the treasure and the castaway (which requires rushing at the pillar which the castaway is on with Oatchi). The exit is blocked by some breakable pots. | |||
{{clear}} | {{clear}} | ||
== Gallery == | == Gallery == | ||
<gallery> | |||
P4 S1 Entrance Chamber HH.jpg|The chamber in which the player lands in the Hectic Hollows. | |||
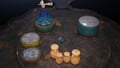
P4 S1 1st Chamber & Pool HH.jpg|The first large chamber in the Hectic Hollows as well as a sizable pool of water to the side of it. | |||
P4 S1 2nd Chamber HH.jpg|The second large chamber in the Hectic Hollows. | |||
P4 S1 Exit & Obstacles HH.jpg|The hole leading to the second sublevel of Hectic Hollows along with some breakable pots and a hydro jelly. | |||
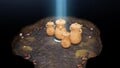
P4 S2 Entrance Chamber HH.jpg|The small room in which the player lands in the second sublevel of Hectic Hollows. It contains two sets of breakable pots. | |||
P4 S2 Battle Chamber HH.jpg|The chamber in which the Tusked Blowhog at the end of Hectic Hollows is fought. | |||
P4 S2 Exit Chamber HH.jpg|Some breakable pots covering the air vent used to exit the Hectic Hollows. | |||
</gallery> | |||
==Trivia== | |||
*[[Louie]] specifically mentions this cave ("something-something Hollows") in his first [[Mission (Pikmin 4)#Side Missions|Fit for a Feast]] quest, when requesting four [[Dwarf Bulborb]]s. | |||
== Names in other languages == | == Names in other languages == | ||
| Line 106: | Line 125: | ||
}} | }} | ||
==See also== | ==See also== | ||
*[[Sun-Speckled Terrace]] | *[[Sun-Speckled Terrace]] | ||
Latest revision as of 17:05, February 23, 2025
| Hectic Hollows | |
|---|---|

| |
| Location | Sun-Speckled Terrace |
| Sublevels | 2 |
| Rescues | 1 |
| Treasures | 3 |
| Onions | 0 |
| Suggested Pikmin | |
| Wild Pikmin | |
|
The following article or section contains guides. |
The Hectic Hollows is a cave in the Sun-Speckled Terrace in Pikmin 4. It has two sublevels, and 20 Ice Pikmin can be found inside. Due its higher presence of enemies compared to other caves in the area, it could be considered the area's hardest. The final sublevel has an encounter with a Tusked Blowhog. While water is the only hazard, Ice Pikmin are prefered to be used to avoid it over Blue Pikmin as to also take care of the hydro jelly. This cave has ![]() × 450 worth of treasure.
× 450 worth of treasure.
How to reach[edit]
The cave is located right next to the area's first base, Ancient Arches, but cannot be reached initially due to the entrance being on a high ledge requiring Oatchi's jump ability. Once this ability is unlocked, simply jump up the ledge and the cave will be accessible.
Notes[edit]
Olimar's Voyage Log[edit]

Sublevel 1[edit]

- Treasures:
 Empty Vase × 1 (inside hydro jelly)
 Mama Doll Head × 1
- Enemies:
 Bulborb × 1 (drops 1 raw material)
 Dwarf Bulborb × 4
- Obstacles:
 Breakable pot × 3
 Hydro jelly × 2 (1 contains 5 Ice Pikmin, 1 contains the Empty Vase)
 Iron fence × 1
 Kingcap × 1 (drops 8 raw material)
 Paper bag × 1 (10 weight)
 Spotcap × 5 (drop 4 raw material)
 Water body × 1 (requires 10 Ice Pikmin to freeze)
- Tools:
 Climbing wall × 1 (requires 14 raw material)
- Wild Pikmin:
 Ice Pikmin × 15 (5 buried, 5 inside a hydro jelly, 3 fighting a Dwarf Bulborb, and 2 pushing the paper bag)
- Others:
 Egg × 2
 Raw material × 28 (pile of 15, and 13 more from other sources)
Start by building the climbing wall, and once it is built, go up with the rookie Rescue Officer and push the paper bag to allow Oatchi to access the upper section. Defeat the enemies, then carry the treasures to the S.S. Beagle. The hole to the next sublevel is behind some breakable pots which require Oatchi's Rush to break.
Sublevel 2[edit]

- Treasures:
- Enemies:
 Tusked Blowhog × 1 (drops 5 raw material)
- Obstacles:
- Breakable pot × 11 (groups of 1, 2, 4, and 4; the group of 2 contains 2 nectar, one group of 4 contains 5 Ice Pikmin, and the other group of 4 blocks the cave exit)
- Hydro jelly × 1
- Wild Pikmin:
- Ice Pikmin × 5 (inside breakable pots)
- Others:
 Castaway × 1 (requires Oatchi's rush)
- Raw material × 5 (dropped by Tusked Blowhog)
 Nectar × 2 (1 drop each inside a group breakable pots)
- See also: Tusked Blowhog strategy.
This sublevel contains a Tusked Blowhog, which acts like the boss of this cave. Defeat the Tusked Blowhog, then collect the treasure and the castaway (which requires rushing at the pillar which the castaway is on with Oatchi). The exit is blocked by some breakable pots.
Gallery[edit]
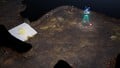
The chamber in which the player lands in the Hectic Hollows.
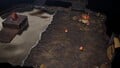
The first large chamber in the Hectic Hollows as well as a sizable pool of water to the side of it.
The second large chamber in the Hectic Hollows.

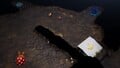
The hole leading to the second sublevel of Hectic Hollows along with some breakable pots and a hydro jelly.
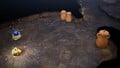
The small room in which the player lands in the second sublevel of Hectic Hollows. It contains two sets of breakable pots.
The chamber in which the Tusked Blowhog at the end of Hectic Hollows is fought.
Some breakable pots covering the air vent used to exit the Hectic Hollows.


Trivia[edit]
- Louie specifically mentions this cave ("something-something Hollows") in his first Fit for a Feast quest, when requesting four Dwarf Bulborbs.
Names in other languages[edit]
| Language | Name | Meaning |
|---|---|---|
| 猛進の穴ぐら? Mōshin no Anagura |
Rush Cave | |
(traditional) |
猛進的洞穴 Měngjìn de Dòngxué |
Rush Cave |
(simplified) |
猛进的洞穴 Měngjìn de Dòngxué |
Rush Cave |
| Hectische holtes | Hectic hollows | |
| Caverne de la cavalcade | Cavalcade cavern | |
| Höhle der Hektik | Cave of Rush | |
| Grotta frenetica | Frenetic cave | |
| 맹진의 움막 Maengjin-ui Ummak |
Rush Hut | |
| Caverna caótica | Chaotic cave | |
| Oquedad del asalto | Hollow of rushing |
See also[edit]
| Caves in Pikmin 4 | |
|---|---|
| Rescue Command Post | Burrow of Beginnings |
| Sun-Speckled Terrace | Last-Frost Cavern • Crackling Cauldron • Aquiferous Summit • Industrial Maze • Hectic Hollows |
| Blossoming Arcadia | Drafty Gallery • Secluded Courtyard • Sightless Passage • Kingdom of Beasts |
| Serene Shores | Seafloor Resort • Subzero Sauna • Below-Grade Discotheque • Engulfed Castle |
| Hero's Hideaway | Doppelgänger's Den • Frozen Inferno • Plunder Palace |
| Giant's Hearth | Ultimate Testing Range • Dream Home • Cradle of the Beast |
| Primordial Thicket | The Mud Pit • Subterranean Swarm • Cavern for a King |
| Dandori Challenges | Dandori Day Care • Hotshock Canyon • Rockaway Cellars • Test Tubs • Ice-Cross Course • Hefty Haulway • Aerial Incinerator • Strategic Freezeway • Planning Pools • Toggle Training • Cliff-Hanger's Hold • Oasis of Order • Trial of the Sage Leaf |
| Dandori Battles | Trial Run • Battle in a Box • Dandori Castle • Leafy Showdown • Hot Sandy Duel • Final Battle |