Sightless Passage: Difference between revisions
(→Olimar's Voyage Log: Added voyage log image.) Tags: Mobile edit Advanced mobile edit |
|||
| (9 intermediate revisions by 5 users not shown) | |||
| Line 17: | Line 17: | ||
== How to reach == | == How to reach == | ||
From the Misshapen Pond base location, it's a simple walk up a slope to the cave entrance. | From the Misshapen Pond base location, it's a simple walk up a slope to the cave entrance. The exit of this cave leads to an otherwise unreachable part of the area, and the cave can be re-entered from here. | ||
== Notes == | == Notes == | ||
| Line 23: | Line 23: | ||
[[File:P4 Voyage Log Olimar 47.png|left|200px]] | [[File:P4 Voyage Log Olimar 47.png|left|200px]] | ||
{{transcript|A {{color|cave of utter darkness|darkorange}} into which almost no light filters. I explored for a bit, relying on the glowing mushrooms to guide the way, but I turned back to avoid unnecessary risk. I wish I had a better {{color|Headlamp|darkorange}} at my disposal. I’m starting to regret this bargain buy.|block=y}} | {{transcript|A {{color|cave of utter darkness|darkorange}} into which almost no light filters. I explored for a bit, relying on the glowing mushrooms to guide the way, but I turned back to avoid unnecessary risk. I wish I had a better {{color|Headlamp|darkorange}} at my disposal. I’m starting to regret this bargain buy.|block=y}} | ||
{{clear}} | |||
== Sublevel 1 == | == Sublevel 1 == | ||
| Line 32: | Line 34: | ||
** {{icon|Micromanagement Station|v=P4|y}} × 1 | ** {{icon|Micromanagement Station|v=P4|y}} × 1 | ||
* '''Enemies''': | * '''Enemies''': | ||
** {{icon|Anode Beetle|v=P4|y}} × 4 | ** {{icon|Anode Beetle|v=P4|y}} × 4 (all guarding one base) | ||
** {{icon|Mitite|v=P4|y}} × 10 | ** {{icon|Mitite|v=P4|y}} × 10 | ||
** {{icon|Pyroclasmic Slooch|v=P4|y}} × 3 | ** {{icon|Pyroclasmic Slooch|v=P4|y}} × 3 | ||
** {{icon|Shockcake|v=P4|y}} × 1 | ** {{icon|Shockcake|v=P4|y}} × 1 (guarding a base) | ||
** {{icon|Water Dumple|v=P4|y}} × 2 | ** {{icon|Water Dumple|v=P4|y}} × 2 | ||
* '''Tools''' | * '''Tools''' | ||
** {{icon|Climbing stick|y|v=P4}} × 1 | ** {{icon|Climbing stick|y|v=P4}} × 1 | ||
** {{icon|Clay mound|y|v=P4}} × 1 (20 pieces of raw material required) | ** {{icon|Clay mound incomplete|y|v=P4|l=Clay mound|n=Clay mound}} × 1 (20 pieces of raw material required) | ||
* '''Obstacles''': | * '''Obstacles''': | ||
** {{icon|Breakable pot|y|v=P4}} × 13 (one group of 3 pots, two groups of 5 pots) | ** {{icon|Breakable pot|y|v=P4}} × 13 (one group of 3 pots, two groups of 5 pots) | ||
** {{icon|Dirt wall|y|v=P4}} × 1 | ** {{icon|Dirt wall|y|v=P4}} × 1 | ||
** {{icon|Electric gate|y|v=P4}} × 1 | ** {{icon|Electric gate|y|v=P4}} × 1 | ||
** {{icon|Fire geyser|y|v=P4}} × 4 | ** {{icon|Fire geyser|y|v=P4}} × 4 | ||
** {{icon|Iron fence|y|v=P4}} × 4 | ** {{icon|Iron fence|y|v=P4}} × 4 | ||
| Line 54: | Line 56: | ||
** {{icon|Egg|y|v=P4}} × 2 | ** {{icon|Egg|y|v=P4}} × 2 | ||
** {{icon|Raw material pile|l=raw material|y|v=P4}} × 3 (10 pieces each) | ** {{icon|Raw material pile|l=raw material|y|v=P4}} × 3 (10 pieces each) | ||
{{ | ** {{icon|Nectar|v=P4|y}} (not inside an egg) × 10 (1 drop in each Mititle) | ||
Heading south, you'll find a lone [[Water Dumple]]. Defeat the enemy and head down the bottom right path, entering the section containing a [[Pyroclasmic Slooch]]. Using [[Red Pikmin]], defeat the Slooch and the nearby [[fire geyser]]s, and then collect the [[Micromanagement Station]]. There will be some Red Pikmin [[sprout]]s in the southern alcove that can be plucked if needed. Heading back to the base, you'll spot a group of [[breakable pot]]s. Smash them using a Rush from [[Oatchi]] (or an [[Bomb rock|explosive item]]) and defeat another Water Dumple on the opposite side. On a ledge towards the south, you'll find the [[Masterpiece Plank]]. Have Oatchi Rush into the ledge to knock it down and then collect it. Heading right, you'll see a patch of vegetation that contains some [[Yellow Pikmin]] sprouts. Head towards the northwest, and there will be a long pathway leading to an alternate base location. | |||
This base is guarded by four [[Anode Beetle]]s. Defeat them using Yellow Pikmin and call over the [[S.S. Beagle]]. North of this base is an [[iron fence]]. Behind this fence are some more Yellow Pikmin sprouts. The path left of the base leads to a pair of [[sizzling floor]]s being inhabited by more Pyroclasmic Slooches. Once more, use Red Pikmin to defeat the two Slooches. Towards the northeast is another alcove containing a pile of 10 [[raw material]]s. Before you leave this area, use Oatchi's Command skill to sniff out the nearby treasure and have him (and some additional Pikmin) dig it up. Once the treasure, the [[Heat Sensor]], has been dug up completely, have some Pikmin carry it back and enter the next section towards the right. There will be a high ledge containing a [[castaway]], meaning Oatchi will need to Rush into it. Once more, head into the next section (after the [[dirt wall]] is destroyed). | |||
This section contains another alternate base location, guarded by a lone [[Shockcake]]. Defeat the enemy and call the S.S. Beagle over. Smash the nearby breakable pots and send Oatchi into the [[pup tunnel]]. Once Oatchi has exited the tunnel, have him carry back the [[Hoop of Healing]]. Slightly south is an [[electric gate]]. Once destroyed, enter the new section that contains some [[Common Glowcap]]s and have some Pikmin attach the nearby [[climbing stick]]. If the Glowcaps are interacted with, a group of Mitites will unearth themselves, panicking all nearby Pikmin and Oatchi. Once the stick is fully built, collect the pile of 10 raw materials. Return back to the section where the castaway was rescued and build the [[clay mound]]. Once built, exit the cave using the fan. | |||
== Gallery == | == Gallery == | ||
| Line 92: | Line 100: | ||
*[[Gear]] | *[[Gear]] | ||
{{Blossoming Arcadia}} | |||
{{p4 caves}} | {{p4 caves}} | ||
[[Category:Sightless Passage]] | [[Category:Sightless Passage| ]] | ||
Latest revision as of 17:28, February 23, 2025
| Sightless Passage | |
|---|---|

| |
| Location | Blossoming Arcadia |
| Sublevels | 1 |
| Rescues | 1 |
| Treasures | 4 |
| Onions | 0 |
| Suggested Pikmin | |
| Wild Pikmin | |
|
The following article or section contains guides. |
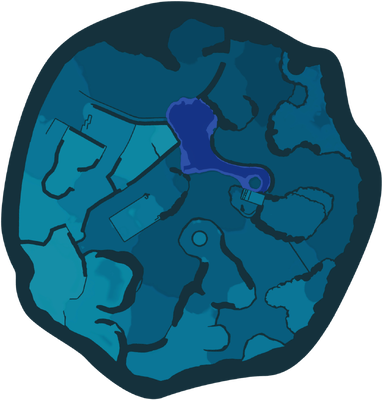
The Sightless Passage is a cave in the Blossoming Arcadia in Pikmin 4. While the cave has only 1 sublevel, it consists of five large rooms interconnected by many narrow pathways. Many fire and electric hazards are also present, requiring the use of Red Pikmin and Yellow Pikmin. As the name implies, the entire cave is also shrouded in intense darkness. It's recommended the player purchase the Headlamp upgrade before entering, though it is not required. This cave has ![]() × 510 worth of treasure.
× 510 worth of treasure.
How to reach[edit]
From the Misshapen Pond base location, it's a simple walk up a slope to the cave entrance. The exit of this cave leads to an otherwise unreachable part of the area, and the cave can be re-entered from here.
Notes[edit]
Olimar's Voyage Log[edit]
Sublevel 1[edit]

- Treasures:
 Heat Sensor × 1 (fully buried)
 Hoop of Healing × 1
 Masterpiece Plank × 1
 Micromanagement Station × 1
- Enemies:
 Anode Beetle × 4 (all guarding one base)
 Mitite × 10
 Pyroclasmic Slooch × 3
 Shockcake × 1 (guarding a base)
 Water Dumple × 2
- Tools
 Climbing stick × 1
 Clay mound × 1 (20 pieces of raw material required)
- Obstacles:
 Breakable pot × 13 (one group of 3 pots, two groups of 5 pots)
 Dirt wall × 1
 Electric gate × 1
 Fire geyser × 4
 Iron fence × 4
 Sizzling floor × 2 (both with Pyroclasmic Slooches)
- Wild Pikmin:
 Red Pikmin × 5 (sprouts)
 Yellow Pikmin × 10 (sprouts)
- Others:
 Castaway × 1
 Egg × 2
 Raw material pile × 3 (10 pieces each)
 Nectar (not inside an egg) × 10 (1 drop in each Mititle)
Heading south, you'll find a lone Water Dumple. Defeat the enemy and head down the bottom right path, entering the section containing a Pyroclasmic Slooch. Using Red Pikmin, defeat the Slooch and the nearby fire geysers, and then collect the Micromanagement Station. There will be some Red Pikmin sprouts in the southern alcove that can be plucked if needed. Heading back to the base, you'll spot a group of breakable pots. Smash them using a Rush from Oatchi (or an explosive item) and defeat another Water Dumple on the opposite side. On a ledge towards the south, you'll find the Masterpiece Plank. Have Oatchi Rush into the ledge to knock it down and then collect it. Heading right, you'll see a patch of vegetation that contains some Yellow Pikmin sprouts. Head towards the northwest, and there will be a long pathway leading to an alternate base location.
This base is guarded by four Anode Beetles. Defeat them using Yellow Pikmin and call over the S.S. Beagle. North of this base is an iron fence. Behind this fence are some more Yellow Pikmin sprouts. The path left of the base leads to a pair of sizzling floors being inhabited by more Pyroclasmic Slooches. Once more, use Red Pikmin to defeat the two Slooches. Towards the northeast is another alcove containing a pile of 10 raw materials. Before you leave this area, use Oatchi's Command skill to sniff out the nearby treasure and have him (and some additional Pikmin) dig it up. Once the treasure, the Heat Sensor, has been dug up completely, have some Pikmin carry it back and enter the next section towards the right. There will be a high ledge containing a castaway, meaning Oatchi will need to Rush into it. Once more, head into the next section (after the dirt wall is destroyed).
This section contains another alternate base location, guarded by a lone Shockcake. Defeat the enemy and call the S.S. Beagle over. Smash the nearby breakable pots and send Oatchi into the pup tunnel. Once Oatchi has exited the tunnel, have him carry back the Hoop of Healing. Slightly south is an electric gate. Once destroyed, enter the new section that contains some Common Glowcaps and have some Pikmin attach the nearby climbing stick. If the Glowcaps are interacted with, a group of Mitites will unearth themselves, panicking all nearby Pikmin and Oatchi. Once the stick is fully built, collect the pile of 10 raw materials. Return back to the section where the castaway was rescued and build the clay mound. Once built, exit the cave using the fan.
Gallery[edit]
|
This article or section is in need of more images. |
Names in other languages[edit]
| Language | Name | Meaning |
|---|---|---|
| まっくらトンネル? Makkura Tonneru |
Pitch Black Tunnel | |
(traditional) |
漆黑隧道 Qīhēi Suìdào |
Pitch Black Tunnel |
(simplified) |
漆黑隧道 Qīhēi Suìdào |
Pitch Black Tunnel |
| Doolhof der duisternis | Maze of darkness | |
| Passage obscur | Dark passage | |
| Tunnel ins Dunkel | Tunnel into the Dark | |
| Passaggio nel buio | Passage in the dark | |
| 칠흑의 터널 Chilheug-ui Teoneol |
Pitch Black Tunnel | |
| Passagem obscura | Dark passage | |
| Pasaje ciego | Blind passage |
See also[edit]
| Caves in Pikmin 4 | |
|---|---|
| Rescue Command Post | Burrow of Beginnings |
| Sun-Speckled Terrace | Last-Frost Cavern • Crackling Cauldron • Aquiferous Summit • Industrial Maze • Hectic Hollows |
| Blossoming Arcadia | Drafty Gallery • Secluded Courtyard • Sightless Passage • Kingdom of Beasts |
| Serene Shores | Seafloor Resort • Subzero Sauna • Below-Grade Discotheque • Engulfed Castle |
| Hero's Hideaway | Doppelgänger's Den • Frozen Inferno • Plunder Palace |
| Giant's Hearth | Ultimate Testing Range • Dream Home • Cradle of the Beast |
| Primordial Thicket | The Mud Pit • Subterranean Swarm • Cavern for a King |
| Dandori Challenges | Dandori Day Care • Hotshock Canyon • Rockaway Cellars • Test Tubs • Ice-Cross Course • Hefty Haulway • Aerial Incinerator • Strategic Freezeway • Planning Pools • Toggle Training • Cliff-Hanger's Hold • Oasis of Order • Trial of the Sage Leaf |
| Dandori Battles | Trial Run • Battle in a Box • Dandori Castle • Leafy Showdown • Hot Sandy Duel • Final Battle |