Aquiferous Summit: Difference between revisions
Tag: Mobile edit |
(→Gallery: Added P4 Sublevel 1 Landing Site AS.jpg, P4 Raw Material & Ice Pikmin AS.jpg, P4 Sublevel 2 Entrance AS.jpg, P4 Sublevel 2 Landing Site AS.jpg, P4 Iron Fence & Sizzling Floor AS.jpg, P4 Skin of the Phoenix & Nectar Egg AS.jpg, P4 Treasures & Clay Mound AS.jpg, and P4 Cave Exit AS.jpg, and removed {{image}} as it is no longer necessary.) |
||
| (14 intermediate revisions by 9 users not shown) | |||
| Line 10: | Line 10: | ||
|onions = 0 | |onions = 0 | ||
|suggested = {{icon|Red Pikmin|v=P4 HUD}} {{icon|Ice Pikmin|v=P4 HUD}} | |suggested = {{icon|Red Pikmin|v=P4 HUD}} {{icon|Ice Pikmin|v=P4 HUD}} | ||
|wild = {{icon|Red Pikmin|v=P4 HUD}} {{icon|Ice Pikmin|v=P4 HUD}} | |||
}} | }} | ||
{{guide}} | {{guide}} | ||
| Line 16: | Line 17: | ||
== How to reach == | == How to reach == | ||
It is the most remote cave in the area, being located far from the others a top a large hill. To get to it, head further up the hill where you find the [[Crackling Cauldron]] entrance. There is a buildable [[bridge]] guarded by three [[Male Sheargrub]]s. This bridge requires 39 [[raw | It is the most remote cave in the area, being located far from the others a top a large hill. To get to it, head further up the hill where you find the [[Crackling Cauldron]] entrance. There is a buildable [[bridge]] guarded by three [[Male Sheargrub]]s. This bridge requires 39 [[raw material]]s to build, requiring the player rescue [[Russ]] to obtain the ability to do so. Once built, proceed forward up the hill, avoiding or defeating the three [[Dwarf Bulborb]]s along the path. At the top, you will find the cave's entrance on top of a high ledge requiring Oatchi to learn how to jump in order to reach. | ||
The exit can also be used to re-enter the cave after it is complete, found directly next to the area's fourth base, Distant Summit. | The exit can also be used to re-enter the cave after it is complete, found directly next to the area's fourth base, Distant Summit. | ||
| Line 22: | Line 23: | ||
== Notes == | == Notes == | ||
=== Olimar's Voyage Log === | === Olimar's Voyage Log === | ||
{{transcript|I found a hole that should lead out to the top of the mountain, but the inside was more convoluted than expected, and only now do I see light at the end of the tunnel. If I ever make it out of this place, I'll deserve a good rest.|block=y}} | [[File:P4 Voyage Log Olimar 42.png|left|200px]] | ||
{{transcript|I found a {{color|hole that should lead out to the top of the mountain|darkorange}}, but the inside was more convoluted than expected, and only now do I see light at the end of the tunnel. If I ever make it out of this place, I'll deserve a good rest.|block=y}} | |||
{{clear}} | |||
== Sublevel 1 == | == Sublevel 1 == | ||
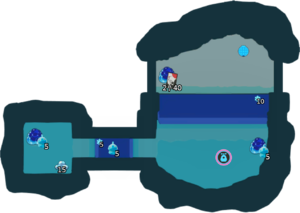
[[File:P4 Map Aquiferous Summit 1.png|thumb|300px|Map of the sublevel.]] | [[File:P4 Map Aquiferous Summit 1.png|thumb|300px|Map of the sublevel.]] | ||
* '''Treasures''': | * '''Treasures''': | ||
** {{icon|Talisman of Life (Crane)|v=P4|y}} | ** {{icon|Talisman of Life (Crane)|v=P4|y}} × 1 | ||
* '''Obstacles''': | * '''Obstacles''': | ||
** {{icon|Hydro jelly|y|v=P4}} × 3 | ** {{icon|Hydro jelly|y|v=P4}} × 3 (contain 10 Ice Pikmin and a treasure) | ||
** {{icon|Water body|y|v=P4}} × 2 (need 5 and 10 Ice Pikmin to freeze) | |||
* '''Wild Pikmin''': | * '''Wild Pikmin''': | ||
** {{icon|Ice Pikmin|v=P4|y}} × 10 | ** {{icon|Ice Pikmin|v=P4|y}} × 15 (10 inside hydro jellies and 5 in frozen water) | ||
* '''Others''': | * '''Others''': | ||
** {{icon|Raw material | ** {{icon|Raw material|y|v=P4|l=Raw material}} × 15 (pile of 15) | ||
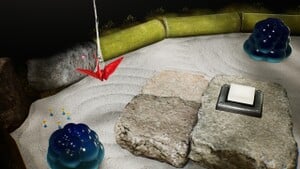
If Ice Pikmin weren't brought in, whistle the five wild ones found freezing the smaller of the two bodies of water. Throw them on the hydro jelly next to the [[S.S. Beagle]] for an additional five more. Throw five back onto the smaller body of water and break the second hydro jelly across the path. Collect the pile of fifteen raw material. Once completed, throw ten Ice Pikmin into the other both of water and throw any remaining Ice Pikmin on the last hydro jelly (on the ledge) and collect the Talisman of Life (Crane). Once collected, jump on Oatchi and enter the next sublevel. | |||
{{clear}} | {{clear}} | ||
| Line 46: | Line 49: | ||
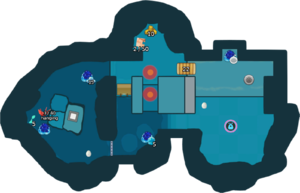
[[File:P4 Map Aquiferous Summit 2.png|thumb|300px|Map of the sublevel.]] | [[File:P4 Map Aquiferous Summit 2.png|thumb|300px|Map of the sublevel.]] | ||
* '''Treasures''': | * '''Treasures''': | ||
** {{icon|Gold Nugget|v=P4|y}} × 10 | ** {{icon|Gold Nugget|v=P4|y}} × 10 | ||
** {{icon|Memory Fragment (Top Left)|v=P4|y}} | ** {{icon|Memory Fragment (Top Left)|v=P4|y}} × 1 | ||
* | ** {{icon|Skin of the Phoenix|v=P4|y}} × 1 | ||
* '''Obstacles''': | * '''Obstacles''': | ||
** {{icon|Hydro jelly|v=P4|y}} × 4 | ** {{icon|Hydro jelly|v=P4|y}} × 4 (contain 5 Ice Pikmin, a pile of raw material, 1 nectar, and a castaway) | ||
** {{icon|Iron fence|v=P4 switch|y}} × 1 | ** {{icon|Iron fence|v=P4 switch|y}} × 1 (lowered by button press) | ||
** {{icon|Paper bag|v=P4|y}} × 1 | ** {{icon|Paper bag|v=P4|y}} × 1 (10 weight) | ||
** {{icon|Sizzling floor|v=P4|y}} × 2 | ** {{icon|Sizzling floor|v=P4|y}} × 2 | ||
* '''Tools''': | * '''Tools''': | ||
** {{icon|Button|v=P4|y|l=Switch}} × 1 | ** {{icon|Button|v=P4|y|l=Switch}} × 1 | ||
** {{icon|Clay | ** {{icon|Clay mound|y|v=P4}} × 1 (requires 22 raw material) | ||
* '''Wild Pikmin''': | * '''Wild Pikmin''': | ||
** {{icon|Ice Pikmin|v=P4|y}} × 5 | ** {{icon|Ice Pikmin|v=P4|y}} × 10 (5 buried, 5 inside hydro jelly) | ||
* '''Others''': | * '''Others''': | ||
** {{icon|Castaway|y|v=P4}} × 1 (inside hydro jelly) | ** {{icon|Castaway|y|v=P4}} × 1 (inside hydro jelly) | ||
** {{icon|Egg|y|v=P4}} × 2 | ** {{icon|Egg|y|v=P4}} × 2 | ||
** {{icon|Raw material|y|v=P4}} × 1 (15 pieces, | ** {{icon|Raw material|y|v=P4}} × 1 (pile of 15 inside hydro jelly) | ||
** {{icon|Candypop Bud|y|v=P4 red}} × 1 (if 5 Red Pikmin or less) | |||
If any Pikmin need flowering, break the egg near the base. Enter the next room with the hydro jelly and destroy it for an additional five Ice Pikmin. If you don't have any Red Pikmin, walk through the iron fence and you'll see a Red Candypop Bud which allows for five Red Pikmin to be spawned. Walk back through the gate and throw your Red Pikmin at the sizzling floors, using Oatchi to climb up the ledges. Once both are destroyed, push down the paper bag with 10 Pikmin and have some start collecting the Gold Nuggets and the Memory Fragment (Top Left) and have some more start to build the clay bridge. Trace back to the room through the iron fence and break the big egg for some nectar (or raw material/ultra spicy spray if spawned) and destroy the two hydro jellies. The larger one has 15 pieces of raw material inside, so put some Pikmin to collect it and the other one has five Ice Pikmin sprouts. Pluck them and have Oatchi jump up the platforms which hold the [[Switch]]. Throw a Pikmin (or Pikpik carrot) on the button, lowering the iron fence, and throw three more to pull down the Skin of the Phoenix treasure and have them carry it back to the ship. Return to the, now built, clay bridge and destroy the hydro jelly at the top of the area, revealing a castaway. Bring them back to the ship. Once everything's collected, make sure to leave the cave via the fan. | |||
{{clear}} | {{clear}} | ||
== Gallery == | == Gallery == | ||
<gallery> | |||
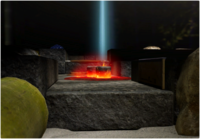
P4 Sublevel 1 Landing Site AS.jpg|The landing site on the first sublevel of the Aquiferous Summit. | |||
P4 Raw Material & Ice Pikmin AS.jpg|A pile of [[raw material]], some [[Ice Pikmin]] stuck in a frozen body of water, and a [[hydro jelly]] on sublevel one. | |||
P4 Sublevel 2 Entrance AS.jpg|A hydro jelly and the entrance to the second sublevel. | |||
P4 Sublevel 2 Landing Site AS.jpg|The landing site on the second sublevel of the Aquiferous Summit. | |||
P4 Iron Fence & Sizzling Floor AS.jpg|A hydro jelly, [[sizzling floor]], [[iron fence]], and [[paper bag]] on sublevel two. | |||
P4 Skin of the Phoenix & Nectar Egg AS.jpg|The [[Skin of the Phoenix]], some hydro jellies, a [[switch]] to open the nearby iron fence, and a [[nectar egg]] on the second sublevel. | |||
P4 Treasures & Clay Mound AS.jpg|Some [[Gold Nugget]]s, the [[Memory Fragment (Top Left)]], a sizzling floor, a paper bag, and a [[Clay#Clay mound|clay mound]] on sublevel two. | |||
P4 Cave Exit AS.jpg|A hydro jelly containing a [[castaway]] and the exit to the Aquiferous Summit. | |||
</gallery> | |||
== Names in other languages == | == Names in other languages == | ||
| Line 102: | Line 116: | ||
}} | }} | ||
==See also== | |||
*[[Sun-Speckled Terrace]] | |||
*[[Last-Frost Cavern]] | |||
*[[Secluded Courtyard]] | |||
{{Sun-Speckled Terrace}} | |||
{{p4 caves}} | {{p4 caves}} | ||
[[Category:Aquiferous Summit| ]] | [[Category:Aquiferous Summit| ]] | ||
Latest revision as of 02:31, January 3, 2025
| Aquiferous Summit | |
|---|---|
| |
| Location | Sun-Speckled Terrace |
| Sublevels | 2 |
| Rescues | 1 |
| Treasures | 4 |
| Onions | 0 |
| Suggested Pikmin | |
| Wild Pikmin | |
|
The following article or section contains guides. |
The Aquiferous Summit is a cave in the Sun-Speckled Terrace in Pikmin 4. It has two sublevels where Ice Pikmin can be found, totaling to 25, making it a good cave to farm this type. There are no enemies, but there are fire and ice-related hazards to be wary of. This cave has ![]() × 180 worth of treasure. It has an exit leading to the top of the hill, providing access to the otherwise unreachable fourth base of area, Distant Summit.
× 180 worth of treasure. It has an exit leading to the top of the hill, providing access to the otherwise unreachable fourth base of area, Distant Summit.
How to reach[edit]
It is the most remote cave in the area, being located far from the others a top a large hill. To get to it, head further up the hill where you find the Crackling Cauldron entrance. There is a buildable bridge guarded by three Male Sheargrubs. This bridge requires 39 raw materials to build, requiring the player rescue Russ to obtain the ability to do so. Once built, proceed forward up the hill, avoiding or defeating the three Dwarf Bulborbs along the path. At the top, you will find the cave's entrance on top of a high ledge requiring Oatchi to learn how to jump in order to reach.
The exit can also be used to re-enter the cave after it is complete, found directly next to the area's fourth base, Distant Summit.
Notes[edit]
Olimar's Voyage Log[edit]
Sublevel 1[edit]
- Treasures:
- Obstacles:
 Hydro jelly × 3 (contain 10 Ice Pikmin and a treasure)
 Water body × 2 (need 5 and 10 Ice Pikmin to freeze)
- Wild Pikmin:
 Ice Pikmin × 15 (10 inside hydro jellies and 5 in frozen water)
- Others:
 Raw material × 15 (pile of 15)
If Ice Pikmin weren't brought in, whistle the five wild ones found freezing the smaller of the two bodies of water. Throw them on the hydro jelly next to the S.S. Beagle for an additional five more. Throw five back onto the smaller body of water and break the second hydro jelly across the path. Collect the pile of fifteen raw material. Once completed, throw ten Ice Pikmin into the other both of water and throw any remaining Ice Pikmin on the last hydro jelly (on the ledge) and collect the Talisman of Life (Crane). Once collected, jump on Oatchi and enter the next sublevel.
Sublevel 2[edit]
- Treasures:
 Gold Nugget × 10
 Memory Fragment (Top Left) × 1
 Skin of the Phoenix × 1
- Obstacles:
 Hydro jelly × 4 (contain 5 Ice Pikmin, a pile of raw material, 1 nectar, and a castaway)
 Iron fence × 1 (lowered by button press)
 Paper bag × 1 (10 weight)
 Sizzling floor × 2
- Tools:
 Button × 1
 Clay mound × 1 (requires 22 raw material)
- Wild Pikmin:
 Ice Pikmin × 10 (5 buried, 5 inside hydro jelly)
- Others:
 Castaway × 1 (inside hydro jelly)
 Egg × 2
 Raw material × 1 (pile of 15 inside hydro jelly)
 Candypop Bud × 1 (if 5 Red Pikmin or less)
If any Pikmin need flowering, break the egg near the base. Enter the next room with the hydro jelly and destroy it for an additional five Ice Pikmin. If you don't have any Red Pikmin, walk through the iron fence and you'll see a Red Candypop Bud which allows for five Red Pikmin to be spawned. Walk back through the gate and throw your Red Pikmin at the sizzling floors, using Oatchi to climb up the ledges. Once both are destroyed, push down the paper bag with 10 Pikmin and have some start collecting the Gold Nuggets and the Memory Fragment (Top Left) and have some more start to build the clay bridge. Trace back to the room through the iron fence and break the big egg for some nectar (or raw material/ultra spicy spray if spawned) and destroy the two hydro jellies. The larger one has 15 pieces of raw material inside, so put some Pikmin to collect it and the other one has five Ice Pikmin sprouts. Pluck them and have Oatchi jump up the platforms which hold the Switch. Throw a Pikmin (or Pikpik carrot) on the button, lowering the iron fence, and throw three more to pull down the Skin of the Phoenix treasure and have them carry it back to the ship. Return to the, now built, clay bridge and destroy the hydro jelly at the top of the area, revealing a castaway. Bring them back to the ship. Once everything's collected, make sure to leave the cave via the fan.
Gallery[edit]
A pile of raw material, some Ice Pikmin stuck in a frozen body of water, and a hydro jelly on sublevel one.
A hydro jelly, sizzling floor, iron fence, and paper bag on sublevel two.
The Skin of the Phoenix, some hydro jellies, a switch to open the nearby iron fence, and a nectar egg on the second sublevel.
Some Gold Nuggets, the Memory Fragment (Top Left), a sizzling floor, a paper bag, and a clay mound on sublevel two.
A hydro jelly containing a castaway and the exit to the Aquiferous Summit.
Names in other languages[edit]
| Language | Name | Meaning |
|---|---|---|
| 山頂の地下水道? Sanchō no Chika Suidō |
Summit's Underground Canal | |
(traditional) |
山頂的地下水道 Shāndǐng de Dìxià Shuǐdào |
Summit's Underground Canal |
(simplified) |
山顶的地下水道 Shāndǐng de Dìxià Shuǐdào |
Summit's Underground Canal |
| Zen-zone | Zen zone | |
| Sommet aquifère | Aquiferous summit | |
| Wassergipfelhöhle | Water Summit Cave | |
| Cima acquifera | Aquiferous summit | |
| 산마루의 지하 수로 Sanmaru-ui Jiha Suro |
Summit's Underground Canal | |
| Pico aquífero | Aquiferous peak | |
| Cumbre acuífera | Aquiferous summit |
See also[edit]
| Caves in Pikmin 4 | |
|---|---|
| Rescue Command Post | Burrow of Beginnings |
| Sun-Speckled Terrace | Last-Frost Cavern • Crackling Cauldron • Aquiferous Summit • Industrial Maze • Hectic Hollows |
| Blossoming Arcadia | Drafty Gallery • Secluded Courtyard • Sightless Passage • Kingdom of Beasts |
| Serene Shores | Seafloor Resort • Subzero Sauna • Below-Grade Discotheque • Engulfed Castle |
| Hero's Hideaway | Doppelgänger's Den • Frozen Inferno • Plunder Palace |
| Giant's Hearth | Ultimate Testing Range • Dream Home • Cradle of the Beast |
| Primordial Thicket | The Mud Pit • Subterranean Swarm • Cavern for a King |
| Dandori Challenges | Dandori Day Care • Hotshock Canyon • Rockaway Cellars • Test Tubs • Ice-Cross Course • Hefty Haulway • Aerial Incinerator • Strategic Freezeway • Planning Pools • Toggle Training • Cliff-Hanger's Hold • Oasis of Order • Trial of the Sage Leaf |
| Dandori Battles | Trial Run • Battle in a Box • Dandori Castle • Leafy Showdown • Hot Sandy Duel • Final Battle |
