Plunder Palace: Difference between revisions
(vandal revert) Tag: Manual revert |
Chazmatron (talk | contribs) m (→Sublevel 3: removed the guide template, as it's already present at the top of the page) |
||
| (29 intermediate revisions by 18 users not shown) | |||
| Line 1: | Line 1: | ||
{{game icons|p4=y}} | {{game icons|p4=y}} | ||
{{infobox cave | {{infobox cave | ||
|image = | |image = Plunder Palace Sublevel 1.jpg | ||
|size = | |size = 300px | ||
|caption = | |caption = | ||
|location = Hero's Hideaway | |location = Hero's Hideaway | ||
| Line 9: | Line 9: | ||
|treasures = 29 | |treasures = 29 | ||
|onions = 1 | |onions = 1 | ||
|suggested = | |suggested = {{icon|Yellow Pikmin|v=P4 HUD}} {{icon|Rock Pikmin|v=P4 HUD}} {{icon|Purple Pikmin|v=P4 HUD}} | ||
|wild = {{icon|Rock Pikmin|v=P4 HUD}} {{icon|Purple Pikmin|v=P4 HUD}} | |||
}} | }} | ||
{{guide}} | {{guide}} | ||
The '''Plunder Palace''' is a [[cave]] in the [[Hero's Hideaway]] in {{p4}}. This toybox-themed cave has a large amount of treasure, but most of it will be likely stolen by wandering [[ | The '''Plunder Palace''' is a [[cave]] in the [[Hero's Hideaway]] in {{p4}}. This toybox-themed cave has a large amount of treasure, but most of it will be likely stolen by wandering [[Breadbug]]s. Because of that, [[Purple Pikmin]] have an advantage with their stomps and ability to lift more than the average pikmin. This especially comes in handy with the strong [[Giant Breadbug]]s who act as the cave's [[boss]], despite not being very dangerous. An encounter with a [[Porquillion]] atop a heightened vantage point acts as a mid-way encounter. This cave has {{sparklium|p4|1,613}} worth of treasure. | ||
== How to reach == | == How to reach == | ||
| Line 19: | Line 20: | ||
== Notes == | == Notes == | ||
=== Olimar's Voyage Log === | === Olimar's Voyage Log === | ||
{{transcript|Everywhere I look in this cave reminds me of home. Playing together with the children. Sitting around the table, sharing a meal as a family... as the | [[File:P4 Voyage Log Olimar 55.png|left|200px]] | ||
{{transcript|Everywhere I look in this cave reminds me of home. Playing together with the children. Sitting around the table, sharing a meal as a family...as the {{color|dog pilfers my side dish|darkorange}}. Just that humdrum, routine, irreplaceable everyday life.|block=y}} | |||
{{clear}} | |||
== Sublevel 1 == | == Sublevel 1 == | ||
| Line 25: | Line 28: | ||
{{game help|p4|List the objects in this sublevel, then write a guide on how to complete it.}} | {{game help|p4|List the objects in this sublevel, then write a guide on how to complete it.}} | ||
* '''Treasures''': | * '''Treasures''': | ||
** {{icon|Disk of Sorrowful Wisdom|y|v=P4}} | ** {{icon|Disk of Sorrowful Wisdom|y|v=P4}} × 1 | ||
** {{icon|Disk of | ** {{icon|Disk of Surprising Wisdom|y|v=P4}} × 1 | ||
** {{icon|Go-with-the-Flow Totem|y|v=P4}} × 2 | ** {{icon|Go-with-the-Flow Totem|y|v=P4}} × 2 | ||
** {{icon|Long-Shot Totem|y|v=P4}} × 1 | |||
** {{icon|Solar-Powered Computing Machine|y|v=P4}} × 1 | |||
* '''Enemies''': | * '''Enemies''': | ||
** {{icon|Bearded Amprat|y|v=P4}} × 2 | ** {{icon|Bearded Amprat|y|v=P4}} × 2 | ||
** {{icon|Breadbug|y|v=P4}} × 2 | |||
** {{icon|Dwarf Orange Bulborb|y|v=P4}} × 5 | ** {{icon|Dwarf Orange Bulborb|y|v=P4}} × 5 | ||
* '''Obstacles''': | * '''Obstacles''': | ||
** | ** {{icon|Dirt wall|y|v=P4}} × 1 (has 5333 HP) | ||
* '''Tools''': | * '''Tools''': | ||
** | ** {{icon|Fan|y|v=P4}} × 1 | ||
* '''Wild Pikmin''': | * '''Wild Pikmin''': | ||
** None | ** None | ||
* '''Others''': | * '''Others''': | ||
** | ** {{icon|Egg|y|v=P4|n=Nectar egg}} × 2 | ||
{{clear}} | |||
== Sublevel 2 == | == Sublevel 2 == | ||
[[File:P4 Map Plunder Palace 2.png|thumb|300px|Map of sublevel 2.]] | [[File:P4 Map Plunder Palace 2.png|thumb|300px|Map of sublevel 2.]] | ||
{{game help|p4|List the objects in this sublevel, then write a guide on how to complete it.}} | {{game help|p4|List the objects in this sublevel, then write a guide on how to complete it.}} | ||
* '''Treasures''': | * '''Treasures''': | ||
** {{icon|Dimension Converter|y|v=P4}} × 1 | |||
** {{icon|Dimension Converter|y|v=P4}} | |||
** {{icon|Gold Nugget|y|v=P4}} × 15 | ** {{icon|Gold Nugget|y|v=P4}} × 15 | ||
** {{icon|Kick-Start Combobot|y|v=P4}} × 1 | |||
** {{icon|Nexus Combobot|y|v=P4}} × 1 | |||
* '''Enemies''': | * '''Enemies''': | ||
** {{icon|Downy Snagret|y|v=P4}} × 3 | ** {{icon|Downy Snagret|y|v=P4}} × 3 (1 is inside of a [[nectar egg]]) | ||
** {{icon|Skutterchuck|y|v=P4}} × 3 | |||
** {{icon|Whiptongue Bulborb|y|v=P4}} × 1 | ** {{icon|Whiptongue Bulborb|y|v=P4}} × 1 | ||
* '''Obstacles''': | * '''Obstacles''': | ||
** {{icon|Crystal nodule|y|v=P4}} × 8 (3 are on the [[Skutterchuck]]s) | |||
** {{icon|Crystal wall|y|v=P4}} × 2 (each drops 6 [[raw material]]s once destroyed, and each has 747 HP) | |||
** | ** | ||
* '''Tools''': | * '''Tools''': | ||
** | ** {{icon|Fan|y|v=P4}} × 2 | ||
** {{icon|Switch|y|v=P4}} × 1 (toggles the [[fan]]s) | |||
* '''Wild Pikmin''': | * '''Wild Pikmin''': | ||
** {{icon|Rock Pikmin|y|v=P4}} × 5 ( | ** {{icon|Rock Pikmin|y|v=P4}} × 5 (sprouts) | ||
** {{icon|Rock Pikmin|y|v=P4}} × 5 ( | ** {{icon|Rock Pikmin|y|v=P4}} × 5 (fighting [[Whiptongue Bulborb]]) | ||
* '''Others''': | * '''Others''': | ||
** {{icon|Egg|y}} × 3 | ** {{icon|Egg|y|v=P4|n=Nectar egg}} × 3 (1 contains a [[Downy Snagret]]) | ||
** {{icon|Raw material pile|y|v=P4|l=Raw material}} × 1 (20 pieces) | |||
{{clear}} | {{clear}} | ||
| Line 76: | Line 82: | ||
** {{icon|Porquillion|y|v=P4}} × 1 | ** {{icon|Porquillion|y|v=P4}} × 1 | ||
* '''Obstacles''': | * '''Obstacles''': | ||
** | ** {{icon|Numbered gate|y|v=P4}} × 1 (lowers when 1 [[Porquillion]] is defeated) | ||
* '''Tools''': | * '''Tools''': | ||
** | ** None | ||
* '''Wild Pikmin''': | * '''Wild Pikmin''': | ||
** {{icon|Rock Pikmin|y|v=P4}} × 5 | ** {{icon|Rock Pikmin|y|v=P4}} × 5 (sprouts) | ||
* '''Others''': | * '''Others''': | ||
**{{icon|Castaway|y|v=P4}} × 1 (inside Porquillion) | **{{icon|Castaway|y|v=P4}} × 1 (inside of the Porquillion) | ||
**{{icon|Egg|y}} × 3 | **{{icon|Egg|y|v=P4|n=Nectar egg}} × 3 | ||
{{see also|Porquillion#strategy|t1=Porquillion strategy}} | |||
This sublevel features a [[Porquillion]] on a raised platform. Since [[Rock Pikmin]] are immune to stabbing, they're the ones you should use. | |||
{{clear}} | {{clear}} | ||
== Sublevel 4 == | == Sublevel 4 == | ||
[[File:P4 Map Plunder Palace 4.png|thumb|300px|Map of sublevel 4.]] | [[File:P4 Map Plunder Palace 4.png|thumb|300px|Map of sublevel 4.]] | ||
{{game help|p4|List the objects in this sublevel, then write a guide on how to complete it.}} | {{game help|p4|List the objects in this sublevel, then write a guide on how to complete it.}} | ||
* '''Treasures''': | * '''Treasures''': | ||
** {{icon| | ** {{icon|Disk of Amusing Wisdom|y|v=P4}} × 1 | ||
** {{icon|Disk of Joyous Wisdom|y|v=P4}} × 3 | ** {{icon|Disk of Joyous Wisdom|y|v=P4}} × 3 | ||
** {{icon|Disk of Surprising Wisdom|y|v=P4}} × | ** {{icon|Disk of Surprising Wisdom|y|v=P4}} × 1 | ||
** {{icon|Gold Nugget|y|v=P4}} × 20 | ** {{icon|Gold Nugget|y|v=P4}} × 20 | ||
** {{icon|Talisman of Life (Rain)|y|v=P4}} | ** {{icon|Memory Fragment (Bottom Left)|y|v=P4}} × 1 | ||
** {{icon|Planetary Rubber Cutie|y|v=P4}} × 1 (hanging from cobweb) | |||
** {{icon|Talisman of Life (Rain)|y|v=P4}} × 1 | |||
* '''Enemies''': | * '''Enemies''': | ||
** {{icon|Breadbug|y|v=P4}} × 3 | ** {{icon|Breadbug|y|v=P4}} × 3 | ||
** {{icon|Flighty Joustmite|y|v=P4}} × 2 | ** {{icon|Flighty Joustmite|y|v=P4}} × 2 | ||
** {{icon|Waddlequaff|y|v=P4}} × 2 | |||
* '''Obstacles''': | * '''Obstacles''': | ||
** | ** {{icon|Crystal wall|y|v=P4}} × 2 (drops 6 [[raw material]]s once destroyed, and has 1120 HP) | ||
* '''Tools''': | * '''Tools''': | ||
** | ** {{icon|Climbing rope|y|v=P4}} × 3 (1 is unravelled, 2 need to be unravelled) | ||
** {{icon|Fan|y|v=P4}} × 2 | |||
** {{icon|Switch|y|v=P4}} × 1 (toggles the [[fan]]s) | |||
* '''Wild Pikmin''': | * '''Wild Pikmin''': | ||
** None | ** None | ||
* '''Others''': | * '''Others''': | ||
** | ** {{icon|Egg|y|v=P4 large|n=Large nectar egg}} × 1 | ||
{{clear}} | {{clear}} | ||
== Sublevel 5 == | == Sublevel 5 == | ||
[[File:P4 Map Plunder Palace 5.png|thumb|300px|Map of sublevel 5.]] | [[File:P4 Map Plunder Palace 5.png|thumb|300px|Map of sublevel 5.]] | ||
{{game help|p4|List the objects in this sublevel, then write a guide on how to complete it.}} | {{game help|p4|List the objects in this sublevel, then write a guide on how to complete it.}} | ||
* '''Treasures''': | * '''Treasures''': | ||
** {{icon| | ** {{icon|Disguised Delicacy|y|v=P4}} × 1 | ||
** {{icon| | ** {{icon|Disk of Angry Wisdom|y|v=P4}} × 3 (all inside of a [[Giant Breadbug]]) | ||
** {{icon| | ** {{icon|Hearty Container|y|v=P4}} × 1 | ||
** {{icon| | ** {{icon|Love's Fortune Cookie|y|v=P4}} × 1 | ||
** {{icon| | ** {{icon|Perforated Raft|y|v=P4}} × 1 | ||
** {{icon| | ** {{icon|Sweet Stumble-Not|y|v=P4}} × 1 | ||
** {{icon| | ** {{icon|Sweet Torrent|y|v=P4}} × 1 | ||
** {{icon| | ** {{icon|S.S. Berry|y|v=P4}} × 1 (inside of a Giant Breadbug) | ||
* '''Enemies''': | * '''Enemies''': | ||
** {{icon|Dwarf Bulbear|y|v=P4}} × 8 | ** {{icon|Dwarf Bulbear|y|v=P4}} × 8 | ||
** {{icon|Giant Breadbug|y|v=P4}} × 2 | |||
** {{icon|Puffy Blowhog|y|v=P4}} × 1 | ** {{icon|Puffy Blowhog|y|v=P4}} × 1 | ||
** {{icon| | ** {{icon|Spotty Bulbear|y|v=P4}} × 1 | ||
* '''Obstacles''': | * '''Obstacles''': | ||
** | ** {{icon|Crystal wall|y|v=P4}} × 2 (drops 6 [[raw material]]s once destroyed, and has 1120 HP) | ||
** {{icon|Numbered gate|y|v=P4}} × 1 (lowers when 2 [[Giant Breadbugs]] are defeated) | |||
* '''Tools''': | * '''Tools''': | ||
** | ** {{icon|Clay mound incomplete|v=P4|y|l=Clay mound}} × 1 (requires 22 raw material) | ||
** {{icon|Floating platform|y|v=P4}} × 1 | |||
* '''Wild Pikmin''': | * '''Wild Pikmin''': | ||
** {{icon|Candypop Bud|v=P4 | ** {{icon|Candypop Bud|y|v=P4 purple}} × 2 (Purple) | ||
* '''Others''': | * '''Others''': | ||
**{{icon|Castaway|y|v=P4}} (Leafling) × 1 | **{{icon|Castaway|y|v=P4}} (Leafling) × 1 | ||
**{{icon|Flarlic|y|v=P4}} × 1 | **{{icon|Flarlic|y|v=P4}} × 1 | ||
** {{icon|Raw material pile|y|v=P4|l=Raw material}} × 1 (20 pieces) | |||
{{see also|Giant Breadbug#Strategy|t1=Giant Breadbug strategy}} | |||
{{clear}} | {{clear}} | ||
| Line 142: | Line 158: | ||
{{image}} | {{image}} | ||
<gallery> | <gallery> | ||
Plunder Palace Sublevel 2.jpg|Wild [[Rock Pikmin]] attacking a [[Whiptongue Bulborb]] on the second sublevel. | |||
Plunder Palace Sublevel 3.jpg|The [[Porquillion]] on the third sublevel. | |||
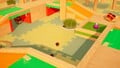
Plunder Palace Sublevel 4.jpg|The fourth sublevel, featuring a [[Waddlequaff]] on top of a xylophone. | |||
Plunder Palace Sublevel 5.jpg|The final sublevel with two [[Giant Breadbug]]s. | |||
</gallery> | </gallery> | ||
| Line 171: | Line 191: | ||
|PorM = Plunder palace | |PorM = Plunder palace | ||
}} | }} | ||
== Trivia == | |||
*[[Louie]] specifically mentions this cave (as "something-something Palace" and "'insert word here' Palace") in his fifth [[Mission (Pikmin 4)#Side Missions|Fit for a Feast]] quest, when requesting a single [[Giant Breadbug]]. | |||
**Unlike most of his other requests, this is the only cavern where Giant Breadbugs appear, meaning it cannot be completed elsewhere. | |||
== See also == | == See also == | ||
*[[Hero's Hideaway]] | |||
*[[Giant Breadbug]] | |||
*[[Glutton's Kitchen]] | *[[Glutton's Kitchen]] | ||
*[[Dream Home]] | |||
{{Hero's Hideaway}} | |||
{{p4 caves}} | {{p4 caves}} | ||
[[Category: | [[Category:Plunder Palace| ]] | ||
Latest revision as of 04:42, February 10, 2025
| Plunder Palace | |
|---|---|

| |
| Location | Hero's Hideaway |
| Sublevels | 5 |
| Rescues | 2 |
| Treasures | 29 |
| Onions | 1 |
| Suggested Pikmin | |
| Wild Pikmin | |
|
The following article or section contains guides. |
The Plunder Palace is a cave in the Hero's Hideaway in Pikmin 4. This toybox-themed cave has a large amount of treasure, but most of it will be likely stolen by wandering Breadbugs. Because of that, Purple Pikmin have an advantage with their stomps and ability to lift more than the average pikmin. This especially comes in handy with the strong Giant Breadbugs who act as the cave's boss, despite not being very dangerous. An encounter with a Porquillion atop a heightened vantage point acts as a mid-way encounter. This cave has ![]() × 1,613 worth of treasure.
× 1,613 worth of treasure.
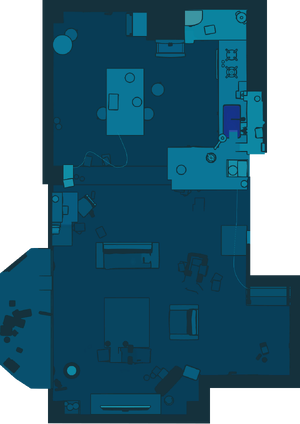
How to reach[edit]
Starting from the Stargazer's Spot, you first need to jump down onto the floor and head towards the top-left part of the living room, where you'll find a propeller platform that takes you to the top of a shelf. You may need to knock out Moss before you hop on the platform, but it isn't needed. Once you get up the top, you'll see the Buddy Display treasure, guarded by a Miniature Snootwhacker. Defeat it and walk past the treasure to the opposite side of the shelf. There, you'll find the entrance.
Notes[edit]
Olimar's Voyage Log[edit]

Sublevel 1[edit]

|
The following article or section is in need of assistance from someone who plays Pikmin 4. |
- Treasures:
- Enemies:
 Bearded Amprat × 2
 Breadbug × 2
 Dwarf Orange Bulborb × 5
- Obstacles:
 Dirt wall × 1 (has 5333 HP)
- Tools:
 Fan × 1
- Wild Pikmin:
- None
- Others:
 Nectar egg × 2
Sublevel 2[edit]

|
The following article or section is in need of assistance from someone who plays Pikmin 4. |
- Treasures:
 Dimension Converter × 1
 Gold Nugget × 15
 Kick-Start Combobot × 1
 Nexus Combobot × 1
- Enemies:
 Downy Snagret × 3 (1 is inside of a nectar egg)
 Skutterchuck × 3
 Whiptongue Bulborb × 1
- Obstacles:
- [icon] Crystal nodule × 8 (3 are on the Skutterchucks)
 Crystal wall × 2 (each drops 6 raw materials once destroyed, and each has 747 HP)
- Tools:
- Wild Pikmin:
 Rock Pikmin × 5 (sprouts)
- Rock Pikmin × 5 (fighting Whiptongue Bulborb)
- Others:
- Nectar egg × 3 (1 contains a Downy Snagret)
 Raw material pile × 1 (20 pieces)
Sublevel 3[edit]

|
The following article or section is in need of assistance from someone who plays Pikmin 4. |
- Treasures:
- None
- Enemies:
 Porquillion × 1
- Obstacles:
 Numbered gate × 1 (lowers when 1 Porquillion is defeated)
- Tools:
- None
- Wild Pikmin:
- Rock Pikmin × 5 (sprouts)
- Others:
 Castaway × 1 (inside of the Porquillion)
- Nectar egg × 3
- See also: Porquillion strategy.
This sublevel features a Porquillion on a raised platform. Since Rock Pikmin are immune to stabbing, they're the ones you should use.
Sublevel 4[edit]

|
The following article or section is in need of assistance from someone who plays Pikmin 4. |
- Treasures:
 Disk of Amusing Wisdom × 1
 Disk of Joyous Wisdom × 3
 Disk of Surprising Wisdom × 1
- Gold Nugget × 20
 Memory Fragment (Bottom Left) × 1
 Planetary Rubber Cutie × 1 (hanging from cobweb)
 Talisman of Life (Rain) × 1
- Enemies:
- Breadbug × 3
 Flighty Joustmite × 2
 Waddlequaff × 2
- Obstacles:
- Crystal wall × 2 (drops 6 raw materials once destroyed, and has 1120 HP)
- Tools:
 Climbing rope × 3 (1 is unravelled, 2 need to be unravelled)
- Fan × 2
 Switch × 1 (toggles the fans)
- Wild Pikmin:
- None
- Others:
 Large nectar egg × 1
Sublevel 5[edit]

|
The following article or section is in need of assistance from someone who plays Pikmin 4. |
- Treasures:
 Disguised Delicacy × 1
 Disk of Angry Wisdom × 3 (all inside of a Giant Breadbug)
 Hearty Container × 1
 Love's Fortune Cookie × 1
 Perforated Raft × 1
 Sweet Stumble-Not × 1
 Sweet Torrent × 1
 S.S. Berry × 1 (inside of a Giant Breadbug)
- Enemies:
 Dwarf Bulbear × 8
 Giant Breadbug × 2
 Puffy Blowhog × 1
 Spotty Bulbear × 1
- Obstacles:
- Crystal wall × 2 (drops 6 raw materials once destroyed, and has 1120 HP)
- Numbered gate × 1 (lowers when 2 Giant Breadbugs are defeated)
- Tools:
 Clay mound incomplete × 1 (requires 22 raw material)
 Floating platform × 1
- Wild Pikmin:
 Candypop Bud × 2 (Purple)
- Others:
- Castaway (Leafling) × 1
 Flarlic × 1
- Raw material pile × 1 (20 pieces)
- See also: Giant Breadbug strategy.
Gallery[edit]
|
This article or section is in need of more images. |
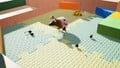
Wild Rock Pikmin attacking a Whiptongue Bulborb on the second sublevel.
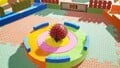
The Porquillion on the third sublevel.

The fourth sublevel, featuring a Waddlequaff on top of a xylophone.
The final sublevel with two Giant Breadbugs.


Names in other languages[edit]
| Language | Name | Meaning |
|---|---|---|
| ぶんどりレストラン? Bundori Resutoran |
Plunder Restaurant | |
(traditional) |
掠奪餐廳 Lüèduó Cāntīng |
Plunder Restaurant |
(simplified) |
掠夺餐厅 Lüèduó Cāntīng |
Plunder Restaurant |
| Broodrovershol | Bread robber hole | |
| Palais des pillards | Pillagers' palace | |
| Plünderpalast | Plunder Palace | |
| Palazzo del saccheggio | Plunder palace | |
| 약탈의 레스토랑 Yagtal-ui Reseutorang |
Plunder Restaurant | |
| Palácio da pilhagem | Plunder palace | |
| Palacio del saqueo | Plunder palace |
Trivia[edit]
- Louie specifically mentions this cave (as "something-something Palace" and "'insert word here' Palace") in his fifth Fit for a Feast quest, when requesting a single Giant Breadbug.
- Unlike most of his other requests, this is the only cavern where Giant Breadbugs appear, meaning it cannot be completed elsewhere.
See also[edit]
![[icon]](/index.php?title=Special:Upload&wpDestFile=Crystal_nodule_P4_icon.png)
| Caves in Pikmin 4 | |
|---|---|
| Rescue Command Post | Burrow of Beginnings |
| Sun-Speckled Terrace | Last-Frost Cavern • Crackling Cauldron • Aquiferous Summit • Industrial Maze • Hectic Hollows |
| Blossoming Arcadia | Drafty Gallery • Secluded Courtyard • Sightless Passage • Kingdom of Beasts |
| Serene Shores | Seafloor Resort • Subzero Sauna • Below-Grade Discotheque • Engulfed Castle |
| Hero's Hideaway | Doppelgänger's Den • Frozen Inferno • Plunder Palace |
| Giant's Hearth | Ultimate Testing Range • Dream Home • Cradle of the Beast |
| Primordial Thicket | The Mud Pit • Subterranean Swarm • Cavern for a King |
| Dandori Challenges | Dandori Day Care • Hotshock Canyon • Rockaway Cellars • Test Tubs • Ice-Cross Course • Hefty Haulway • Aerial Incinerator • Strategic Freezeway • Planning Pools • Toggle Training • Cliff-Hanger's Hold • Oasis of Order • Trial of the Sage Leaf |
| Dandori Battles | Trial Run • Battle in a Box • Dandori Castle • Leafy Showdown • Hot Sandy Duel • Final Battle |