The Mud Pit: Difference between revisions
No edit summary Tag: Mobile edit |
m (Undo revision 328323 by AllPikminCollected (talk) Previous edit broke the infobox) Tag: Undo |
||
| (50 intermediate revisions by 30 users not shown) | |||
| Line 1: | Line 1: | ||
{{game icons|p4=y}} | {{game icons|p4=y}} | ||
{{infobox cave | {{infobox cave | ||
|image = | |image = P4 Voyage Log Louie 15.png | ||
|size = | |size = 256px | ||
|caption = | |caption = | ||
|location = Primordial Thicket | |location = Primordial Thicket | ||
| Line 9: | Line 9: | ||
|treasures = 11 | |treasures = 11 | ||
|onions = 1 | |onions = 1 | ||
|suggested = | |suggested = {{icon|Winged Pikmin|v=P4 HUD}} {{icon|Ice Pikmin|v=P4 HUD}} | ||
}} | }} | ||
{{guide}} | {{guide}} | ||
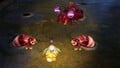
'''The Mud Pit''' is a [[cave]] in the [[Primordial Thicket]] in {{p4}}. As its name implies, it has a large amount of [[mud]] which | '''The Mud Pit''' is a [[cave]] in the [[Primordial Thicket]] in {{p4}}. As its name implies, it has a large amount of [[mud]] which makes traversing the cave tricky, especially when combined with the bottomless swamps that not even [[Blue Pikmin]] can swim through. [[Winged Pikmin]] are helpful here thanks to their ability to fly over most of the mud. At the bottom is an encounter with a [[Bug-Eyed Crawmad]]. This cave has {{sparklium|p4|960}} worth of treasure. | ||
== How to reach == | == How to reach == | ||
The cave is located just a few steps northwest of The Sylvan Gate landing site. There are two [[Moldy Dwarf Bulborb]]s near the entrance, but they are easy to run past because they patrol a relatively large area. | |||
== Notes == | == Notes == | ||
=== Louie's Voyage Log === | === Louie's Voyage Log === | ||
{{transcript|Got stuck in the | [[File:P4 Voyage Log Louie 15.png|left|200px]] | ||
{{transcript|Got stuck in the {{color|bottomless swamp|darkorange}}. Some parts of it were pitch-black. And now I'm covered in mud. Reminded me of the mountain behind Nana's house.|block=y}} | |||
{{clear}} | |||
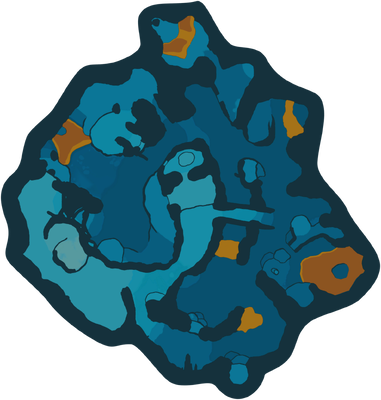
== Sublevel 1 == | == Sublevel 1 == | ||
[[File:P4 Map The Mud Pit 1.png|thumb|300px|Map of sublevel 1.]] | |||
* '''Treasures''': | * '''Treasures''': | ||
** | ** {{icon|Crunchy Deluge|y|v=P4}} × 1 (inside Mamuta) | ||
** {{icon|Gold Nugget|y|v=P4}} × 35 | |||
** {{icon|Hoop of Passion|y|v=P4}} × 1 | |||
** {{icon|Sphere of Good Fortune|y|v=P4}} × 1 | |||
* '''Enemies''': | * '''Enemies''': | ||
** {{icon|Aristocrab Offspring|y|v=P4}} × 2 | ** {{icon|Aristocrab Offspring|y|v=P4}} × 2 | ||
| Line 33: | Line 39: | ||
** {{icon|Yellow Spectralids|y|v=P4}} × 2 | ** {{icon|Yellow Spectralids|y|v=P4}} × 2 | ||
** {{icon|Mama Sheargrub|y|v=P4}} × 1 | ** {{icon|Mama Sheargrub|y|v=P4}} × 1 | ||
** {{icon|Mitite|y|v=P4}} | |||
* '''Obstacles''': | * '''Obstacles''': | ||
** | ** {{icon|Sticky mold|y|v=P4}} × 2 (one contains 5 [[Spotcap]]s and one contains 9 Spotcaps) | ||
** {{icon|Kingcap|y|v=P4}} × 5 | |||
* '''Tools''': | * '''Tools''': | ||
** | ** {{icon|Climbing wall incomplete|y|v=P4|l=Clay#Climbing Wall|n=Climbing Wall}} (requires 13 raw material) | ||
* '''Wild Pikmin''': | * '''Wild Pikmin''': | ||
** | ** {{icon|Winged Pikmin|v=P4|y}} × 5 (attacking an Aristocrab Offspring) | ||
** {{icon|Winged Pikmin|v=P4|y}} × 5 (sprouts) | |||
** {{icon|Candypop Bud|v=P4 winged|y}} (Winged) × 2 | |||
* '''Others''': | * '''Others''': | ||
** | ** {{icon|Tunnel|v=P4|y}} × 1 | ||
First head north and kill the [[Aristocrab Offspring]]. Then destroy the 2 [[Kingcap]]s and kill the 2 [[Miniature Snootwhacker]]s. Then dig up the tunnel leading to where the [[Mamuta]] is. Kill the Mamuta and then transport the [[Crunchy Deluge]] with [[Winged Pikmin]] back to the base. Head to east of the base and remove the sticky mold trying to not get the attention of the [[Mama Sheargrub]]. Then kill the Mama Sheargrub. Then build the Climbing Wall and ride on the rail. In the middle of the rail, throw 3 Winged Pikmin into the [[Hoop of Passion]] and get it back to the base. Head near the Climbing Wall and kill the Miniature Snootwhacker. Then transport the [[Sphere of Good Fortune]] to the base. Finally, kill the remaining Aristocrab Offspring and collect the 35 [[Gold Nugget]]s. Then destroy the 3 Kingcaps and enter the next sublevel. | |||
{{clear}} | |||
== Sublevel 2 == | == Sublevel 2 == | ||
{{game help|p4|List the objects in this sublevel, then write a guide on how to complete it | [[File:P4 Map The Mud Pit 2.png|thumb|300px|Map of sublevel 2.]] | ||
{{game help|p4|List the objects in this sublevel, then write a guide on how to complete it.}} | |||
* '''Treasures''': | * '''Treasures''': | ||
** | ** {{icon|Gold Nugget|y|v=P4}} × 5 (inside a vase) | ||
** {{icon|Skin of the Phoenix|y|v=P4}} × 1 | |||
** {{icon|Sweat-Soaked Blue Bird|y|v=P4}} × 1 | |||
** {{icon|Portable Sunset|y|v=P4}} × 1 (inside Bogswallow) | |||
** {{icon|Dawn Pustules|y|v=P4}} × 1 (inside Blizzarding Blowhog) | |||
** {{icon|Crush Nugget|y|v=P4}} × 1 (inside a hydro jelly) | |||
* '''Enemies''': | * '''Enemies''': | ||
** {{icon|Blizzarding Blowhog|y|v=P4}} × 1 | ** {{icon|Blizzarding Blowhog|y|v=P4}} × 1 | ||
** {{icon|Muckerskate|y|v=P4}} × 4 | ** {{icon|Muckerskate|y|v=P4}} × 4 | ||
** {{icon|Water Dumple|y|v=P4}} × 4 | ** {{icon|Water Dumple|y|v=P4}} × 4 | ||
** {{icon|Bogswallow|y|v=P4}} × 2 | ** {{icon|Bogswallow|y|v=P4}} × 2 (one is guarding a [[base]]) | ||
* '''Obstacles''': | * '''Obstacles''': | ||
**{{icon|Hydro jelly|v=P4|y}} × 2 | |||
** | ** | ||
* '''Tools''': | * '''Tools''': | ||
** | ** {{icon|Clay bridge incomplete|y|v=P4|n=Clay Bridge|l=Clay#Clay Bridge}} × 1 (requires 34 raw material) | ||
* '''Wild Pikmin''': | * '''Wild Pikmin''': | ||
** | ** {{icon|Winged Pikmin|y|v=P4}} × 5 (inside a vase) | ||
** {{icon|Winged Pikmin|y|v=P4}} × 5 (attacking a Water Dumple) | |||
** {{icon|Candypop Bud|v=P4 winged|y}} (Winged) × 1 | |||
* '''Others''': | * '''Others''': | ||
** | ** {{icon|Flarlic|y|v=P4}} | ||
** {{icon|egg|y|v=P4|n=Large Egg}} | |||
** {{icon|Raw material pile|y|v=P4|n=Pile of raw materials|l=raw material}} (20) | |||
See also: '''''[[Blizzarding Blowhog#Strategy]]''''' | |||
This sublevel is essentially a loop, so it doesn’t matter which way you go. It’s also the only other place in the game where you can find the [[Blizzarding Blowhog]] enemy, the other being the Cavern for a King. This sublevel is pretty tricky, and it’s recommended that you use [[Winged Pikmin]] for the majority of the area. | |||
{{clear}} | |||
== Sublevel 3 == | == Sublevel 3 == | ||
{{game help|p4|List the objects in this sublevel, then write a guide on how to complete it | [[File:P4 Map The Mud Pit 3.png|thumb|200px|Map of sublevel 3.]] | ||
{{game help|p4|List the objects in this sublevel, then write a guide on how to complete it.}} | |||
* '''Treasures''': | * '''Treasures''': | ||
** | ** {{icon|Life Station|y|v=P4}} × 1 | ||
* '''Enemies''': | * '''Enemies''': | ||
** {{icon|Bug-Eyed Crawmad|y|v=P4}} × 1 | ** {{icon|Bug-Eyed Crawmad|y|v=P4}} × 1 | ||
** {{icon|Hermit Crawmad|y|v=P4}} × 2 | ** {{icon|Hermit Crawmad|y|v=P4}} × 2 | ||
* '''Obstacles''': | * '''Obstacles''': | ||
** | ** [[Numbered gate]] (opens once 1 [[Bug-Eyed Crawmad]] and 2 [[Hermit Crawmad]]s are defeated) | ||
* '''Tools''': | * '''Tools''': | ||
** | ** | ||
| Line 74: | Line 104: | ||
** | ** | ||
* '''Others''': | * '''Others''': | ||
** | ** {{icon|Castaway|y|v=P4}} (inside the Bug-Eyed Crawmad) | ||
** {{icon|Egg|v=P4|y}} × 2 | |||
{{see also|Bug-Eyed Crawmad#Strategy}} | |||
Unlike prior sublevels, the mud on this floor only requires 30 Ice Pikmin to freeze. Freezing the floor has a useful benefit: the cave's boss, Bug-Eyed Crawmad will not come out of its hole while the floor is frozen, allowing you to deal with the Hermit Crawmads first - the Bug-Eyed Crawmad can also be permanently frozen via this method after emerging from its hole, essentially skipping the fight. The Life Station, however, cannot be moved while the floor is frozen. | |||
{{clear}} | |||
== Gallery == | == Gallery == | ||
{{image}} | {{image}} | ||
<gallery> | <gallery> | ||
Crawmad Pit P4.jpg|The final floor's boss fight against the [[Bug-Eyed Crawmad]] and two [[Hermit Crawmad]]s. | |||
</gallery> | </gallery> | ||
== Names in other languages == | == Names in other languages == | ||
{{foreignname | {{foreignname | ||
|Jap = | |Jap = ヘドロが池 | ||
|JapR = | |JapR = Hedoro-ga-Ike | ||
|JapM = | |JapM = Sludge Pond | ||
|ChiTrad = | |ChiTrad = 泥巴池 | ||
|ChiTradR = | |ChiTradR = Níbā Chí | ||
|ChiTradM = | |ChiTradM = Mud Pond | ||
|Dut = | |ChiSimp = 泥巴池 | ||
|DutM = | |ChiSimpR = Níbā Chí | ||
|ChiSimpM = Mud Pond | |||
|Dut = Gemoddermeer | |||
|DutM = Muddled lake | |||
|Fra = Bain de boue | |Fra = Bain de boue | ||
|FraM = | |FraM = Mud bath | ||
|Ger = | |Ger = Schlammgrube | ||
|GerM = | |GerM = Mud Pit | ||
|Ita = | |Ita = Lago di fango | ||
|ItaM = | |ItaM = Mud lake | ||
|Kor = | |Kor = 진흙탕 연못 | ||
|KorR = | |KorR = Jinheuktang Yeonmot | ||
|KorM = | |KorM = Mud Pond | ||
| | |Spa = Hoyo de lodo | ||
| | |SpaM = Mud pit | ||
| | |Por = Poço de lama | ||
| | |PorM = Mud pit | ||
}} | }} | ||
== See also == | == See also == | ||
*[[Primordial Thicket]] | |||
*[[Bug-Eyed Crawmad]] | |||
*[[Seafloor Resort]] | |||
*[[Mud]] | |||
{{DEFAULTSORT:Mud Pit, The}} | |||
{{Primordial Thicket}} | |||
{{p4 caves}} | {{p4 caves}} | ||
Latest revision as of 01:49, February 17, 2025
| The Mud Pit | |
|---|---|

| |
| Location | Primordial Thicket |
| Sublevels | 3 |
| Rescues | 1 |
| Treasures | 11 |
| Onions | 1 |
| Suggested Pikmin | |
|
The following article or section contains guides. |
The Mud Pit is a cave in the Primordial Thicket in Pikmin 4. As its name implies, it has a large amount of mud which makes traversing the cave tricky, especially when combined with the bottomless swamps that not even Blue Pikmin can swim through. Winged Pikmin are helpful here thanks to their ability to fly over most of the mud. At the bottom is an encounter with a Bug-Eyed Crawmad. This cave has ![]() × 960 worth of treasure.
× 960 worth of treasure.
How to reach[edit]
The cave is located just a few steps northwest of The Sylvan Gate landing site. There are two Moldy Dwarf Bulborbs near the entrance, but they are easy to run past because they patrol a relatively large area.
Notes[edit]
Louie's Voyage Log[edit]
Sublevel 1[edit]

- Treasures:
 Crunchy Deluge × 1 (inside Mamuta)
 Gold Nugget × 35
 Hoop of Passion × 1
 Sphere of Good Fortune × 1
- Enemies:
 Aristocrab Offspring × 2
 Miniature Snootwhacker × 3
 Mamuta × 1
 White Spectralids × 3
 Red Spectralids × 1
 Yellow Spectralids × 2
 Mama Sheargrub × 1
 Mitite
- Obstacles:
 Sticky mold × 2 (one contains 5 Spotcaps and one contains 9 Spotcaps)
 Kingcap × 5
- Tools:
 Climbing Wall (requires 13 raw material)
- Wild Pikmin:
 Winged Pikmin × 5 (attacking an Aristocrab Offspring)
- Winged Pikmin × 5 (sprouts)
 Candypop Bud (Winged) × 2
- Others:
 Tunnel × 1
First head north and kill the Aristocrab Offspring. Then destroy the 2 Kingcaps and kill the 2 Miniature Snootwhackers. Then dig up the tunnel leading to where the Mamuta is. Kill the Mamuta and then transport the Crunchy Deluge with Winged Pikmin back to the base. Head to east of the base and remove the sticky mold trying to not get the attention of the Mama Sheargrub. Then kill the Mama Sheargrub. Then build the Climbing Wall and ride on the rail. In the middle of the rail, throw 3 Winged Pikmin into the Hoop of Passion and get it back to the base. Head near the Climbing Wall and kill the Miniature Snootwhacker. Then transport the Sphere of Good Fortune to the base. Finally, kill the remaining Aristocrab Offspring and collect the 35 Gold Nuggets. Then destroy the 3 Kingcaps and enter the next sublevel.
Sublevel 2[edit]

|
The following article or section is in need of assistance from someone who plays Pikmin 4. |
- Treasures:
- Gold Nugget × 5 (inside a vase)
 Skin of the Phoenix × 1
 Sweat-Soaked Blue Bird × 1
 Portable Sunset × 1 (inside Bogswallow)
 Dawn Pustules × 1 (inside Blizzarding Blowhog)
 Crush Nugget × 1 (inside a hydro jelly)
- Enemies:
 Blizzarding Blowhog × 1
 Muckerskate × 4
 Water Dumple × 4
 Bogswallow × 2 (one is guarding a base)
- Obstacles:
 Hydro jelly × 2
- Tools:
 Clay Bridge × 1 (requires 34 raw material)
- Wild Pikmin:
- Winged Pikmin × 5 (inside a vase)
- Winged Pikmin × 5 (attacking a Water Dumple)
- Candypop Bud (Winged) × 1
- Others:
See also: Blizzarding Blowhog#Strategy
This sublevel is essentially a loop, so it doesn’t matter which way you go. It’s also the only other place in the game where you can find the Blizzarding Blowhog enemy, the other being the Cavern for a King. This sublevel is pretty tricky, and it’s recommended that you use Winged Pikmin for the majority of the area.
Sublevel 3[edit]

|
The following article or section is in need of assistance from someone who plays Pikmin 4. |
- Treasures:
 Life Station × 1
- Enemies:
 Bug-Eyed Crawmad × 1
 Hermit Crawmad × 2
- Obstacles:
- Numbered gate (opens once 1 Bug-Eyed Crawmad and 2 Hermit Crawmads are defeated)
- Tools:
- Wild Pikmin:
- Others:
- See also: Bug-Eyed Crawmad#Strategy.
Unlike prior sublevels, the mud on this floor only requires 30 Ice Pikmin to freeze. Freezing the floor has a useful benefit: the cave's boss, Bug-Eyed Crawmad will not come out of its hole while the floor is frozen, allowing you to deal with the Hermit Crawmads first - the Bug-Eyed Crawmad can also be permanently frozen via this method after emerging from its hole, essentially skipping the fight. The Life Station, however, cannot be moved while the floor is frozen.
Gallery[edit]
|
This article or section is in need of more images. |
The final floor's boss fight against the Bug-Eyed Crawmad and two Hermit Crawmads.

Names in other languages[edit]
| Language | Name | Meaning |
|---|---|---|
| ヘドロが池? Hedoro-ga-Ike |
Sludge Pond | |
(traditional) |
泥巴池 Níbā Chí |
Mud Pond |
(simplified) |
泥巴池 Níbā Chí |
Mud Pond |
| Gemoddermeer | Muddled lake | |
| Bain de boue | Mud bath | |
| Schlammgrube | Mud Pit | |
| Lago di fango | Mud lake | |
| 진흙탕 연못 Jinheuktang Yeonmot |
Mud Pond | |
| Poço de lama | Mud pit | |
| Hoyo de lodo | Mud pit |
See also[edit]
| Caves in Pikmin 4 | |
|---|---|
| Rescue Command Post | Burrow of Beginnings |
| Sun-Speckled Terrace | Last-Frost Cavern • Crackling Cauldron • Aquiferous Summit • Industrial Maze • Hectic Hollows |
| Blossoming Arcadia | Drafty Gallery • Secluded Courtyard • Sightless Passage • Kingdom of Beasts |
| Serene Shores | Seafloor Resort • Subzero Sauna • Below-Grade Discotheque • Engulfed Castle |
| Hero's Hideaway | Doppelgänger's Den • Frozen Inferno • Plunder Palace |
| Giant's Hearth | Ultimate Testing Range • Dream Home • Cradle of the Beast |
| Primordial Thicket | The Mud Pit • Subterranean Swarm • Cavern for a King |
| Dandori Challenges | Dandori Day Care • Hotshock Canyon • Rockaway Cellars • Test Tubs • Ice-Cross Course • Hefty Haulway • Aerial Incinerator • Strategic Freezeway • Planning Pools • Toggle Training • Cliff-Hanger's Hold • Oasis of Order • Trial of the Sage Leaf |
| Dandori Battles | Trial Run • Battle in a Box • Dandori Castle • Leafy Showdown • Hot Sandy Duel • Final Battle |