Fortress of Festivity: Difference between revisions
(Column sorting.) |
(Cleanup.) |
||
| Line 1: | Line 1: | ||
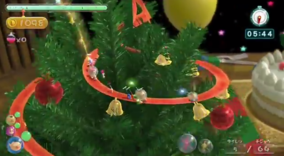
[[File:ChristmasPikmin.png|thumb|284px|The leaders sliding down the ribbon that runs around a decorated tree in the Fortress of Festivity.]] | [[File:ChristmasPikmin.png|thumb|284px|The leaders sliding down the ribbon that runs around a decorated tree in the Fortress of Festivity.]] | ||
'''Fortress of Festivity''' is the first map included in the third [[update]] for {{p3}}, released for free. Because this update and the associated [[downloadable content]] was launched on December, this stage is Christmas-themed, taking place on a table within an empty house, the table being covered in various festive decorations, fruits, plates, silverware, various food items, and candles. There is even a small Christmas tree situated next to the table with a spiraling ribbon attached to it, which the Pikmin can slide down. | |||
'''Fortress of Festivity''' is the first map included in the | |||
The only enemy who resides here in Collect Treasure! is a [[Bug-Eyed Crawmad]], which is somewhat weaker than the ones in story mode, and is hiding in a small pizza box at the end of a long, but linear obstacle puzzle. This Mission Mode level, along with the other four that got released at the same time, has a [[Music|song]] playing that is different from the track that is heard in the previous ten stages. | |||
{{stub|<br> | |||
*Add an Overview and Key sections sections, like on the area article policy. | |||
*Add guides. | |||
*List what maturity each Pikmin starts at on the infobox. | |||
*Add world records. | |||
}} | |||
==Collect Treasure!== | ==Collect Treasure!== | ||
{{Infobox mission | {{Infobox mission | ||
|map = | |map = Fortress of Festivity.jpg | ||
|time = 12:00 | |red = 11 | ||
|bronze=2000 | |rock = 10 | ||
|silver=3000 | |yellow = 15 | ||
|gold=4500 | |winged = 10 | ||
|blue = 5 | |||
|purple = 3 | |||
|white = 10 | |||
|time = 12:00 | |||
|bronze = 2000 | |||
|silver = 3000 | |||
|gold = 4500 | |||
|platinum = 5900 | |platinum = 5900 | ||
| | |music = [[Music in Pikmin 3#Fortress of Festivity|Fortress of Festivity]] | ||
| | |||
}} | }} | ||
=== | ===Layout=== | ||
The player starts in the middle of the stage with the [[SPERO]] and presents with various fruits on it. On the presents are 2 Cupid's Grenades, 2 Slapstick Crescents, and a total of 11 Red Pikmin. Nearby the start is a bamboo gate and a geyser blocked by a crystal, which leads to a patch of 10 Rock Pikmin. Further down this path is a Bug-Eyed Crawmad in the middle of a pepperoni pizza. To the west of the pizza is a plethora of fruits, with a Slapstick Crescent, Seed Hive, Insect Condo, and a Zest Bomb. There is a Zest Bomb further up on a high stack of presents that requires Yellow Pikmin to reach. | The player starts in the middle of the stage with the [[SPERO]] and presents with various fruits on it. On the presents are 2 Cupid's Grenades, 2 Slapstick Crescents, and a total of 11 Red Pikmin. Nearby the start is a bamboo gate and a geyser blocked by a crystal, which leads to a patch of 10 Rock Pikmin. Further down this path is a Bug-Eyed Crawmad in the middle of a pepperoni pizza. To the west of the pizza is a plethora of fruits, with a Slapstick Crescent, Seed Hive, Insect Condo, and a Zest Bomb. There is a Zest Bomb further up on a high stack of presents that requires Yellow Pikmin to reach. | ||
| Line 38: | Line 39: | ||
{{clear}} | {{clear}} | ||
===Objects=== | ===Objects=== | ||
{{game help|p3|Finish the obstacles.}} | {{game help|p3|Finish the obstacles.}} | ||
{{columns| | ;Pikmin | ||
{{columns|2| | |||
*{{icon|Red Pikmin|y}} × 11 | *{{icon|Red Pikmin|y}} × 11 | ||
*{{icon|Yellow Pikmin|y}} × 15 | *{{icon|Yellow Pikmin|y}} × 15 | ||
| Line 49: | Line 50: | ||
*{{icon|White Pikmin|y}} × 10 | *{{icon|White Pikmin|y}} × 10 | ||
*{{icon|Purple Pikmin|y}} × 3 | *{{icon|Purple Pikmin|y}} × 3 | ||
}} | |||
;Enemies | |||
*{{icon|Bug-Eyed Crawmad|y}} × 1 | *{{icon|Bug-Eyed Crawmad|y}} × 1 | ||
;Obstacle | |||
{{columns|2| | |||
*{{icon|Dirt wall|y}} × 1 | |||
*{{icon|Electric gate|v=P3|y}} × 1 | |||
*{{icon|Bamboo gate|y}} × 1 | |||
}} | }} | ||
{{columns| | |||
;Treasures | |||
{{columns|2| | |||
*{{icon|Dusk Pustules|y}} × 40 | *{{icon|Dusk Pustules|y}} × 40 | ||
*{{icon|Lesser Mock Bottom|y}} × 1 | *{{icon|Lesser Mock Bottom|y}} × 1 | ||
| Line 64: | Line 73: | ||
*{{icon|Slapstick Crescent|y}} × 4 | *{{icon|Slapstick Crescent|y}} × 4 | ||
*{{icon|Nugget|y}} × 300 (Piles of 20, 30, 40, 50, 60, and 100) | *{{icon|Nugget|y}} × 300 (Piles of 20, 30, 40, 50, 60, and 100) | ||
}} | |||
*{{icon| | ;Other | ||
{{columns|2| | |||
*{{icon|Burgeoning Spiderwort|v=spicy|y}} × 2 | |||
}} | }} | ||
==Battle Enemies!== | ==Battle Enemies!== | ||
{{ | {{infobox mission | ||
|be = y | |be = y | ||
|map = Fortress of Festivity BE map.jpg | |map = Fortress of Festivity BE map.jpg | ||
|blue = 8 | |red = 7 | ||
| | |rock = 10 | ||
|bronze=250 | |yellow = 10 | ||
|silver=400 | |winged = 10 | ||
|gold=550 | |blue = 8 | ||
|time = 7:30 | |||
|bronze = 250 | |||
|silver = 400 | |||
|gold = 550 | |||
|platinum = 690 | |platinum = 690 | ||
|noicons = y | |||
|noicons = y | |||
}} | }} | ||
=== | ===Layout=== | ||
The 3 leaders, [[Alph]], [[Brittany]], and [[Charlie]], start off below the cake, with the [[SPERO]] and the master [[Onion]]. There are 10 other [[Winged Pikmin]] nearby. South of them is a lone [[Puffy Blowhog]]. Even further south of it is a [[Burgeoning Spiderwort]] plant. Back nearby the Onion is a [[geyser]] that leads atop the presents. Right east of the Onion is a room with one [[Skutterchuck]] and a [[Burgeoning Spiderwort]]. The room is closed off by a [[Gate#Crystal wall|crystal wall]]. To the east of this wall is a present with a few [[Red Pikmin]]. Nearby the present is a [[Fiery Blowhog]] by a [[Gate#Dirt wall|dirt wall]] and a [[Watery Blowhog]] guarding a crystal wall. The larger present in the center has 8 [[Blue Pikmin]] on it. | The 3 leaders, [[Alph]], [[Brittany]], and [[Charlie]], start off below the cake, with the [[SPERO]] and the master [[Onion]]. There are 10 other [[Winged Pikmin]] nearby. South of them is a lone [[Puffy Blowhog]]. Even further south of it is a [[Burgeoning Spiderwort]] plant. Back nearby the Onion is a [[geyser]] that leads atop the presents. Right east of the Onion is a room with one [[Skutterchuck]] and a [[Burgeoning Spiderwort]]. The room is closed off by a [[Gate#Crystal wall|crystal wall]]. To the east of this wall is a present with a few [[Red Pikmin]]. Nearby the present is a [[Fiery Blowhog]] by a [[Gate#Dirt wall|dirt wall]] and a [[Watery Blowhog]] guarding a crystal wall. The larger present in the center has 8 [[Blue Pikmin]] on it. | ||
Past the crystal wall is another room with 3 more Watery Blowhogs. Past them is a geyser that leads atop the large presents. Atop the presents are 3 [[Dwarf Orange Bulborb]]s. Below and to the east of the presents is a small room with 3 Fiery Blowhogs. This room has another geyser leading up to the presents. The room is also closed off by a [[Gate#Bamboo gate|bamboo gate]]. Past the gate is another Fiery Blowhog next to an [[Gate#Electric gate|electric gate]]. South of this is a patch of planted [[Yellow Pikmin]] nearby a dirt wall. | Past the crystal wall is another room with 3 more Watery Blowhogs. Past them is a geyser that leads atop the large presents. Atop the presents are 3 [[Dwarf Orange Bulborb]]s. Below and to the east of the presents is a small room with 3 Fiery Blowhogs. This room has another geyser leading up to the presents. The room is also closed off by a [[Gate#Bamboo gate|bamboo gate]]. Past the gate is another Fiery Blowhog next to an [[Gate#Electric gate|electric gate]]. South of this is a patch of planted [[Yellow Pikmin]] nearby a dirt wall. | ||
Next to them is the plate filled with water. This time, it is filled with 7 [[Skeeterskate]]s. To the west of them are 2 [[Yellow Wollywog]]s. To the north of them on a present are 10 planted [[Rock Pikmin]]. Nearby them is a | Next to them is the plate filled with water. This time, it is filled with 7 [[Skeeterskate]]s. To the west of them are 2 [[Yellow Wollywog]]s. To the north of them on a present are 10 planted [[Rock Pikmin]]. Nearby them is a crystallized geyser which leads up to the cheese pizza. On the pizza, there are now 3 [[Waddlepus]]es. | ||
{{clear}} | {{clear}} | ||
===Objects=== | ===Objects=== | ||
;Pikmin | |||
{{columns| | {{columns|2| | ||
*{{icon|Red Pikmin|y}} × 7 | *{{icon|Red Pikmin|y}} × 7 | ||
*{{icon|Yellow Pikmin|y}} × 10 | *{{icon|Yellow Pikmin|y}} × 10 | ||
| Line 106: | Line 113: | ||
*{{icon|Rock Pikmin|y}} × 10 | *{{icon|Rock Pikmin|y}} × 10 | ||
*{{icon|Winged Pikmin|y}} × 10 | *{{icon|Winged Pikmin|y}} × 10 | ||
}} | |||
| | ;Enemies | ||
{{columns|2| | |||
*{{icon|Skutterchuck|y}} × 1 | *{{icon|Skutterchuck|y}} × 1 | ||
*{{icon|Skeeterskate|y}} × 7 | *{{icon|Skeeterskate|y}} × 7 | ||
| Line 120: | Line 128: | ||
*{{icon|Puffy Blowhog|v=P3|y}} × 1 | *{{icon|Puffy Blowhog|v=P3|y}} × 1 | ||
}} | }} | ||
;Others | |||
*{{icon|Burgeoning Spiderwort|v=spicy|y}} × 2 | |||
== Gallery== | == Gallery== | ||
| Line 133: | Line 144: | ||
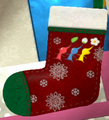
RYB Stocking.png|A stocking featuring a Red, Yellow, and Blue Pikmin found within the level. | RYB Stocking.png|A stocking featuring a Red, Yellow, and Blue Pikmin found within the level. | ||
WhitePurpleWingedStocking.png|A stocking featuring a Winged, a White, and a Purple Pikmin. | WhitePurpleWingedStocking.png|A stocking featuring a Winged, a White, and a Purple Pikmin. | ||
ForestOfFestivityBugEyedCrawmad.jpeg|The Bug- | ForestOfFestivityBugEyedCrawmad.jpeg|The Bug-Eyed Crawmad found in the Fortress of Festivity. | ||
Fortress of Festivity map.png|A full map of the Fortress of Festivity. | Fortress of Festivity map.png|A full map of the Fortress of Festivity. | ||
</gallery> | </gallery> | ||
| Line 139: | Line 150: | ||
==Trivia== | ==Trivia== | ||
* This is the only map that features all seven main species of [[Pikmin family|Pikmin]]. | * This is the only map that features all seven main species of [[Pikmin family|Pikmin]]. | ||
* This level has the most fruit out of any map in the game, both in story mode and mission mode, with a total of '''90''' individual | * This level has the most fruit out of any map in the game, both in story mode and mission mode, with a total of '''90''' individual pieces of fruit. | ||
{{missions}} | {{missions}} | ||
Revision as of 11:19, December 3, 2015
Fortress of Festivity is the first map included in the third update for Pikmin 3, released for free. Because this update and the associated downloadable content was launched on December, this stage is Christmas-themed, taking place on a table within an empty house, the table being covered in various festive decorations, fruits, plates, silverware, various food items, and candles. There is even a small Christmas tree situated next to the table with a spiraling ribbon attached to it, which the Pikmin can slide down.
The only enemy who resides here in Collect Treasure! is a Bug-Eyed Crawmad, which is somewhat weaker than the ones in story mode, and is hiding in a small pizza box at the end of a long, but linear obstacle puzzle. This Mission Mode level, along with the other four that got released at the same time, has a song playing that is different from the track that is heard in the previous ten stages.
|
This article is a stub. You can help Pikipedia by expanding it.
|
Collect Treasure!
| Fortress of Festivity Collect Treasure! | |||||||||||||||
|---|---|---|---|---|---|---|---|---|---|---|---|---|---|---|---|
| |||||||||||||||
| Starting Pikmin | |||||||||||||||
| |||||||||||||||
| Requirements | |||||||||||||||
| |||||||||||||||
| Time limit | 12:00 | ||||||||||||||
| Music | Fortress of Festivity | ||||||||||||||
Layout
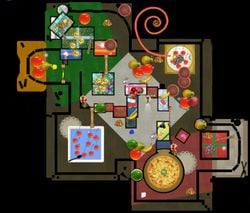
The player starts in the middle of the stage with the SPERO and presents with various fruits on it. On the presents are 2 Cupid's Grenades, 2 Slapstick Crescents, and a total of 11 Red Pikmin. Nearby the start is a bamboo gate and a geyser blocked by a crystal, which leads to a patch of 10 Rock Pikmin. Further down this path is a Bug-Eyed Crawmad in the middle of a pepperoni pizza. To the west of the pizza is a plethora of fruits, with a Slapstick Crescent, Seed Hive, Insect Condo, and a Zest Bomb. There is a Zest Bomb further up on a high stack of presents that requires Yellow Pikmin to reach.
Nearby are 5 Blue Pikmin. Next to them is a pile of 50 Nuggets, with a Zest Bomb laying on a present. West of that is a huge plate filled with water. In this plate are 10 Cupid's Grenades. There is a dirt wall nearby, which leads to a path further north of the area. Eventually, players will reach a split path. To the west is an room fenced off by an electric fence. Inside the room are 2 Insect Condos and 1 Seed Hive along with 4 Yellow Pikmin. There is a geyser nearby, which leads to atop of some presents. Here, there are 4 Golden Grenades and a pile of 20 Nuggets along with 5 planted White Pikmin. Also nearby is a geyser, which, in a convoluted series of bouncy mushrooms and sliding around the Christmas tree, leads atop of a cake in the northeast corner of the room. This cake has 5 Cupid's Grenades and a bunch of Dusk Pustules. There is also a series of Bouncy Mushrooms here which can lead to obtaining the Rock Pikmin.
Back at the crossroads, going east will reveal a giant blue present. Atop the present are 3 Purple Pikmin along with 3 Golden Grenades, with a Burgeoning Spiderwort nearby. To the north of the present is a dirt wall. Past it is quite a lot to explore. To the north is a small path, with a pile of Nuggets and an Insect Condo. But directly ahead are two Seed Hives, two Insect Condos, and a Slapstick Crescent. Before that is a crystallized geyser that leads back to the starting area. Beyond all that is a large pile of Nuggets nearby the cake.
Curving around south now, we see yet another Seed Hive and Insect Condo, along with a slightly out of place Lesser Mock Bottom. Further south of that are 10 planted Winged Pikmin. To the east of that is a Seed Hive and a clump of Dusk Pustules, all of which are fairly high up, requiring Yellow or Winged Pikmin. Going even further south, we see a pile of Nuggets. To the east of it in a small corner of the stage are the final 5 White Pikmin.
Objects
|
The following article or section is in need of assistance from someone who plays Pikmin 3. |
- Pikmin
 Red Pikmin × 11
 Yellow Pikmin × 15
 Blue Pikmin × 5
 Rock Pikmin × 10
 Winged Pikmin × 10
 White Pikmin × 10
 Purple Pikmin × 3
- Enemies
 Bug-Eyed Crawmad × 1
- Obstacle
 Dirt wall × 1
 Electric gate × 1
 Bamboo gate × 1
- Treasures
 Dusk Pustules × 40
 Lesser Mock Bottom × 1
 Golden Grenade × 7
 Seed Hive × 6
 Cupid's Grenade × 22
 Insect Condo × 7
 Zest Bomb × 3
 Slapstick Crescent × 4
 Nugget × 300 (Piles of 20, 30, 40, 50, 60, and 100)
- Other
Battle Enemies!
| Fortress of Festivity Battle Enemies! | |||||||||||
|---|---|---|---|---|---|---|---|---|---|---|---|
| |||||||||||
| Starting Pikmin | |||||||||||
| |||||||||||
| Requirements | |||||||||||
| |||||||||||
| Time limit | 7:30 | ||||||||||
| Music | {{{music}}} | ||||||||||
Layout
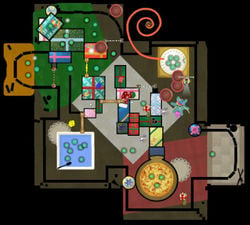
The 3 leaders, Alph, Brittany, and Charlie, start off below the cake, with the SPERO and the master Onion. There are 10 other Winged Pikmin nearby. South of them is a lone Puffy Blowhog. Even further south of it is a Burgeoning Spiderwort plant. Back nearby the Onion is a geyser that leads atop the presents. Right east of the Onion is a room with one Skutterchuck and a Burgeoning Spiderwort. The room is closed off by a crystal wall. To the east of this wall is a present with a few Red Pikmin. Nearby the present is a Fiery Blowhog by a dirt wall and a Watery Blowhog guarding a crystal wall. The larger present in the center has 8 Blue Pikmin on it.
Past the crystal wall is another room with 3 more Watery Blowhogs. Past them is a geyser that leads atop the large presents. Atop the presents are 3 Dwarf Orange Bulborbs. Below and to the east of the presents is a small room with 3 Fiery Blowhogs. This room has another geyser leading up to the presents. The room is also closed off by a bamboo gate. Past the gate is another Fiery Blowhog next to an electric gate. South of this is a patch of planted Yellow Pikmin nearby a dirt wall.
Next to them is the plate filled with water. This time, it is filled with 7 Skeeterskates. To the west of them are 2 Yellow Wollywogs. To the north of them on a present are 10 planted Rock Pikmin. Nearby them is a crystallized geyser which leads up to the cheese pizza. On the pizza, there are now 3 Waddlepuses.
Objects
- Pikmin
 Red Pikmin × 7
 Yellow Pikmin × 10
 Blue Pikmin × 8
 Rock Pikmin × 10
 Winged Pikmin × 10
- Enemies
 Skutterchuck × 1
 Skeeterskate × 7
- [icon] Dwarf Bulborb × 5
 Dwarf Orange Bulborb × 3
 Dwarf Bulbear × 3
 Yellow Wollywog × 2
 Fiery Blowhog × 5
 Watery Blowhog × 4
 Waddlepus × 3
 Puffy Blowhog × 1
- Others
Gallery
- ForestOfFestivityBugEyedCrawmad.jpeg
The Bug-Eyed Crawmad found in the Fortress of Festivity.
Trivia
- This is the only map that features all seven main species of Pikmin.
- This level has the most fruit out of any map in the game, both in story mode and mission mode, with a total of 90 individual pieces of fruit.
