Blossoming Arcadia: Difference between revisions
m (Added some extra info into the object lists by using the game's files (the description for the cracked pots may need more work done in the future)) |
(Changed the order of the Wild Pikmin to match the order in the game.) |
||
| (12 intermediate revisions by 7 users not shown) | |||
| Line 1: | Line 1: | ||
{{game icons|p4=y}} | {{game icons|p4=y}} | ||
{{infobox area | {{infobox area | ||
|screenshot | |screenshot = P4 Blossoming Arcadia Introduction 1.jpg | ||
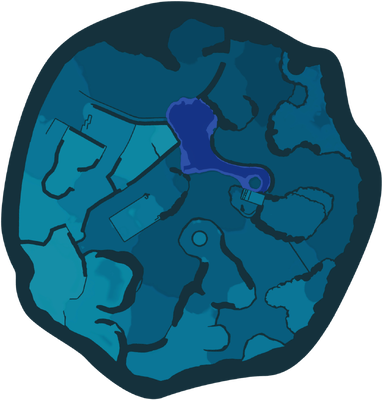
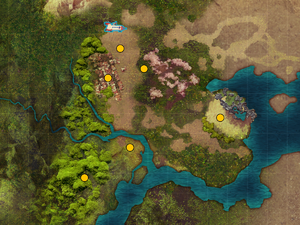
|map | |map = Blossoming Arcadia map.png | ||
|rescues | |rescues = 9 | ||
|treasures | |treasures = 60 | ||
|onions | |onions = 3 | ||
|caves | |caves = 4 | ||
|dandori_c | |dandori_c = 2 | ||
|dandori_b | |dandori_b = 1 | ||
|wild | |wild = {{icon|Red Pikmin|v=P4 HUD}} {{icon|Yellow Pikmin|v=P4 HUD}} {{icon|Blue Pikmin|v=P4 HUD}} {{icon|Ice Pikmin|v=P4 HUD}} {{icon|Rock Pikmin|v=P4 HUD}} | ||
|suggested | |suggested = {{icon|Yellow Pikmin|v=P4 HUD}} {{icon|Blue Pikmin|v=P4 HUD}} {{icon|Ice Pikmin|v=P4 HUD}} | ||
|requirements | |requirements = {{sparklium|p4|1,500}} | ||
|next | |next = [[Serene Shores]] | ||
|music | |music = [[Music in Pikmin 4#Blossoming Arcadia|''Blossoming Arcadia'']] | ||
}} | }} | ||
The '''Blossoming Arcadia''' ({{j|花ふぶきの楽園|Hanafubuki no Rakuen|Paradise of Falling Flower Petals}}) is the second main [[area]] in {{p4}}. It | The '''Blossoming Arcadia''' ({{j|花ふぶきの楽園|Hanafubuki no Rakuen|Paradise of Falling Flower Petals}}) is the second main [[area]] in {{p4}}. It is set in a kindergarten playground, with a slide visible in the background. This area has {{sparklium|p4|4,878}} worth of treasure, of which {{sparklium|p4|1,580}} is above ground. | ||
== Plot == | == Plot == | ||
{{stub|section=y}} | |||
In the story, the Rescue Corps spread out to this area in search of Captain Olimar, and the Red Leafling. | In the story, the Rescue Corps spread out to this area in search of Captain Olimar, and the Red Leafling. | ||
| Line 50: | Line 51: | ||
![[Treasure]]s | ![[Treasure]]s | ||
![[Onion]]s | ![[Onion]]s | ||
!Suggested [[Pikmin]] | !Suggested [[Pikmin family|Pikmin]] | ||
!Wild Pikmin | ![[Wild Pikmin]] | ||
|- | |- | ||
|[[File:P4 Voyage Log Olimar 45.png|100px]] | |[[File:P4 Voyage Log Olimar 45.png|100px]] | ||
| Line 69: | Line 70: | ||
|1 | |1 | ||
|{{icon|Yellow Pikmin|v=P4 HUD}} {{icon|Ice Pikmin|v=P4 HUD}} | |{{icon|Yellow Pikmin|v=P4 HUD}} {{icon|Ice Pikmin|v=P4 HUD}} | ||
|{{icon| | |{{icon|Yellow Pikmin|v=P4 HUD}} {{icon|Blue Pikmin|v=P4 HUD}} | ||
|- | |- | ||
|[[File:P4 Voyage Log Olimar 47.png|100px]] | |[[File:P4 Voyage Log Olimar 47.png|100px]] | ||
| Line 91: | Line 92: | ||
=== Dandori Challenge 1 === | === Dandori Challenge 1 === | ||
The entrance is found at the top of the | The entrance is found at the top of the [[climbing wall]] past the Misshapen Pond base (on the way to the [[Kingdom of Beasts]]), with the only other obstacle being the nearby [[Waddlequaff]]. | ||
=== Dandori Challenge 2 === | === Dandori Challenge 2 === | ||
This cave is found near the back of the area accessed from across the buildable bridge near the Sunwashed Plateau. Next to the potted plant, it can be found behind a stone wall, requiring 3 [[ | This cave is found near the back of the area accessed from across the buildable bridge near the Sunwashed Plateau. Next to the potted plant, it can be found behind a stone wall, requiring 3 [[Bomb rock|Bomb Rocks]] to destroy it. These can be bought from [[Russ]], though Bomb Rocks can also be found in multiple dirt-mounds around the area. | ||
=== Dandori Battle === | === Dandori Battle === | ||
A [[Dandori Battle]] cave can be found near the first base, Fragrant Ravine. It is found toward the center river, on top of a large box. There are no obstacles obstructing its entrance. The player can find the same leafy individual that was in [[Sun-Speckled Terrace]] | A [[Dandori Battle]] cave can be found near the first base, Fragrant Ravine. It is found toward the center river, on top of a large box. There are no obstacles obstructing its entrance. The player can find the same leafy individual that was in [[Sun-Speckled Terrace]], with another [[castaway]]. | ||
== Objects == | == Objects == | ||
| Line 110: | Line 111: | ||
* {{icon|Mooching Vase|v=P4|y}} × 1 (fully buried) | * {{icon|Mooching Vase|v=P4|y}} × 1 (fully buried) | ||
* {{icon|Octoplus|v=P4|y}} × 1 (may be inside Waddlequaff) | * {{icon|Octoplus|v=P4|y}} × 1 (may be inside Waddlequaff) | ||
* {{icon|Orbital Communication Sphere|v=P4|y}} × 1 (in dirt mound) | * {{icon|Orbital Communication Sphere|v=P4|y}} × 1 (in dirt-mound) | ||
* {{icon|Searing Acidshock|v=P4|y}} × 1 (may be inside Waddlequaff) | * {{icon|Searing Acidshock|v=P4|y}} × 1 (may be inside Waddlequaff) | ||
* {{icon|Shake-a-Smile|v=P4|y}} × 1 (inside Mamuta) | * {{icon|Shake-a-Smile|v=P4|y}} × 1 (inside Mamuta) | ||
| Line 123: | Line 124: | ||
=== Onions === | === Onions === | ||
* {{icon|Flarlic|v=P4|y}} × 1 | * {{icon|Flarlic|v=P4|y}} × 1 (partially buried) | ||
* {{icon|Yellow Onion|v=P4|y}} × 1 | * {{icon|Yellow Onion|v=P4|y}} × 1 (partially buried) | ||
=== Enemies === | === Enemies === | ||
{{columns|2| | {{columns|2| | ||
* {{icon|Bearded Amprat|v=P4|y}} × 2 ( | * {{icon|Bearded Amprat|v=P4|y}} × 2 (drops 1 raw material each) | ||
* {{icon|Burrowing Snagret|v=P4|y}} × 1 ( | * {{icon|Burrowing Snagret|v=P4|y}} × 1 (drops 1 treasure) | ||
* {{icon|Creeping Chrysanthemum|v=P4|y}} × 2 ( | * {{icon|Creeping Chrysanthemum|v=P4|y}} × 2 (drops 1 raw material each) | ||
* {{icon|Downy Snagret|v=P4|y}} × 8 (1 inside an egg) | * {{icon|Downy Snagret|v=P4|y}} × 8 (1 inside an egg) | ||
* {{icon|Iridescent Flint Beetle|v=P4|y}} × 1 ( | * {{icon|Iridescent Flint Beetle|v=P4|y}} × 1 (drops 2 × 1 pellet, 3 × nectar, 2 × 5 pellet) | ||
* {{icon|Joustmite|v=P4|y}} × 3 ( | * {{icon|Joustmite|v=P4|y}} × 3 (drops 1 raw material each) | ||
* {{icon|Mamuta|v=P4|y}} × 1 ( | * {{icon|Mamuta|v=P4|y}} × 1 (drops 1 treasure) | ||
* {{icon|Mitite|v=P4|y}} × 20 (1 group of 10 that drop 1 raw material each | * {{icon|Mitite|v=P4|y}} × 20 (1 group of 10 that drop 1 raw material each beneath some pots, 1 group of 10 that has a 80% chance of dropping nectar and a 20% chance of dropping Ultra-Spicy Spray each beneath the Harmonic Synthesizer) | ||
* {{icon|Skitter Leaf|v=P4|y}} × 5 | * {{icon|Skitter Leaf|v=P4|y}} × 5 | ||
* {{icon|Swooping Snitchbug|v=P4|y}} × 2 ( | * {{icon|Swooping Snitchbug|v=P4|y}} × 2 (drops 1 raw material each) | ||
* {{icon|Waddlequaff|v=P4|y}} × 4 ( | * {{icon|Waddlequaff|v=P4|y}} × 4 (drops 1 raw material each) | ||
* {{icon|White Spectralids|v=P4|y}} × 3 (51% chance to drop 1 raw material each) | * {{icon|White Spectralids|v=P4|y}} × 3 (51% chance to drop 1 raw material each) | ||
* {{icon|Yellow Spectralids|v=P4|y}} × 6 ( | * {{icon|Yellow Spectralids|v=P4|y}} × 6 (drops 1 nectar each) | ||
* {{icon|Yellow Wollyhop|v=P4|y}} × 4 ( | * {{icon|Yellow Wollyhop|v=P4|y}} × 4 (drops 1 raw material each) | ||
}} | }} | ||
=== Obstacles === | === Obstacles === | ||
* {{icon|Dirt wall|v=P4|y}} × 1 ( | * {{icon|Breakable pot|v=P4|y}} × 19 (1 group of 3 in which 1 has 1 raw material, 1 group of 4 in which 2 have 1 raw material each, 1 group of 4 that holds nothing, 1 group of 8 blocking a cave entrance) | ||
* {{icon|Electric gate|v=P4|y}} × 2 ( | * {{icon|Dirt wall|v=P4|y}} × 1 (drops 2 raw material per phase, has 8000 HP) | ||
* {{icon|Reinforced wall|v=P4|y}} × 1 ( | * {{icon|Electric gate|v=P4|y}} × 2 (drops 2 raw material per phase, has 8000 HP each) | ||
* {{icon|Ice wall|v=P4|y}} × 2 ( | * {{icon|Reinforced wall|v=P4|y}} × 1 (requires 3 Bomb Rocks, drops 2 raw material per phase, has 30000 HP) | ||
* {{icon|Ice wall|v=P4|y}} × 2 (drops 2 raw material per phase, has 4000 HP each) | |||
* {{icon|Sprinkler|v=P4|y}} × 1 | * {{icon|Sprinkler|v=P4|y}} × 1 | ||
| Line 156: | Line 158: | ||
* {{icon|Clay valve incomplete|v=P4|y|l=Clay#Clay valve|n=Clay valve}} × 1 (requires 16 raw material) | * {{icon|Clay valve incomplete|v=P4|y|l=Clay#Clay valve|n=Clay valve}} × 1 (requires 16 raw material) | ||
* {{icon|Climbing wall incomplete|y|v=P4|l=Clay#Climbing wall|n=Climbing wall}} × 1 (requires 11 raw material) | * {{icon|Climbing wall incomplete|y|v=P4|l=Clay#Climbing wall|n=Climbing wall}} × 1 (requires 11 raw material) | ||
* {{icon|Dirt mound|y}} × 8 (10 raw material × 4, | * {{icon|Dirt-mound|y|v=P4}} × 8 (10 raw material × 4, Bomb Rock × 3, Orbital Communication Sphere × 1) | ||
* {{icon|Potted mushroom|v=P4|y}} × 4 | * {{icon|Potted mushroom|v=P4|y}} × 4 | ||
}} | }} | ||
=== Others === | === Others === | ||
* {{icon|Egg|v=P4|y}} × 3 (1 contains a Downy Snagret) | |||
* {{icon|Raw material pile|v=P4|n=Pile of raw material|l=Raw material|y}} × 7 (piles of 12, 15, 20, 24, and 3 piles of 30) | * {{icon|Raw material pile|v=P4|n=Pile of raw material|l=Raw material|y}} × 7 (piles of 12, 15, 20, 24, and 3 piles of 30) | ||
== Guide == | |||
{{guide}} | |||
{{game help|p4|Write a guide for completing the area.}} | |||
== Night expeditions == | == Night expeditions == | ||
| Line 249: | Line 256: | ||
{{clear}} | {{clear}} | ||
== Olimar's Shipwreck Tale == | == Olimar's Shipwreck Tale == | ||
| Line 265: | Line 269: | ||
===Plot=== | ===Plot=== | ||
Captain Olimar lands in the Blossoming Arcadia to continue his search for any missing parts for his ship, the [[S.S. Dolphin]]. He manages to find eight of his missing pieces along with the discovery of Blue Pikmin and a space dog called [[Moss]]. He finds Moss lying on the ground and feeds her a [[ | Captain Olimar lands in the Blossoming Arcadia to continue his search for any missing parts for his ship, the [[S.S. Dolphin]]. He manages to find eight of his missing pieces along with the discovery of Blue Pikmin and a space dog called [[Moss]]. He finds Moss lying on the ground and feeds her a [[Scrummy Bone]], which revitalizes her. She then chooses to help Olimar in his search to recover his lost ship parts. | ||
=== Layout === | === Layout === | ||
The layout of the Blossoming Arcadia in Olimar's Shipwreck Tale is almost identical to that of the | The layout of the Blossoming Arcadia in Olimar's Shipwreck Tale is almost identical to that of the area in the main story. The major differences are the objects and enemies present, along with the cave entrances not being present. The body of water that is usually in the centre of the map is now a body of [[mud]]. Unlike water, the mud does not prohibit non-Blue Pikmin from crossing it, but it slows down anything that wades through it. | ||
==== Bases ==== | ==== Bases ==== | ||
* Fragrant Ravine: unguarded. | * Fragrant Ravine: unguarded. | ||
* Sunwashed Plateau: the default landing site | * Sunwashed Plateau: the default landing site. | ||
* Misshapen Pond: unguarded. | * Misshapen Pond: unguarded. | ||
| Line 280: | Line 284: | ||
* {{icon|Automatic Gear|v=P4|y}} × 1 | * {{icon|Automatic Gear|v=P4|y}} × 1 | ||
* {{icon|Extraordinary Bolt|v=P4|y}} × 3 (1 inside Burrowing Snagret) | * {{icon|Extraordinary Bolt|v=P4|y}} × 3 (1 inside Burrowing Snagret) | ||
* {{icon|Ionium Jet|v=P4|y}} × 1 | * {{icon|Ionium Jet|v=P4|y}} × 1 | ||
* {{icon|Omega Stabilizer|v=P4|y}} × 1 | * {{icon|Omega Stabilizer|v=P4|y}} × 1 | ||
* {{icon|Radiation Canopy|v=P4|y}} × 1 (inside Baldy Long Legs) | * {{icon|Radiation Canopy|v=P4|y}} × 1 (inside Baldy Long Legs) | ||
* {{icon|Repair-Type Bolt|v=P4|y}} × 1 | * {{icon|Repair-Type Bolt|v=P4|y}} × 1 | ||
| Line 287: | Line 291: | ||
==== Onions ==== | ==== Onions ==== | ||
* {{icon|Blue Onion|v=P4|y}} × 1 (surrounded by | * {{icon|Blue Onion|v=P4|y}} × 1 (surrounded by dried plants) | ||
* {{icon|Flarlic|v=P4|y}} × 2 | * {{icon|Flarlic|v=P4|y}} × 2 | ||
* {{icon|Yellow Onion|v=P4|y}} × 1 | * {{icon|Yellow Onion|v=P4|y}} × 1 | ||
==== Enemies ==== | ==== Enemies ==== | ||
{{columns|2| | {{columns|2| | ||
* {{icon|Baldy Long Legs|v=P4|y}} × 1 ( | * {{icon|Baldy Long Legs|v=P4|y}} × 1 (drops 10 mitites and 1 ship part) | ||
* {{icon|Burrowing Snagret|v=P4|y}} × 1 ( | * {{icon|Burrowing Snagret|v=P4|y}} × 1 (drops 1 ship part) | ||
* {{icon|Creeping Chrysanthemum|v=P4|y}} × 2 | * {{icon|Creeping Chrysanthemum|v=P4|y}} × 2 | ||
* {{icon|Desiccated Skitter Leaf|v=P4|y}} × 6 | * {{icon|Desiccated Skitter Leaf|v=P4|y}} × 6 | ||
* {{icon|Downy Snagret|v=P4|y}} × 3 (2 are in eggs) | * {{icon|Downy Snagret|v=P4|y}} × 3 (2 are in eggs) | ||
* {{icon|Honeywisp|v=P4|y}} × 1 (50% chance of dropping 1 nectar, 50% chance of dropping 1 | * {{icon|Honeywisp|v=P4|y}} × 1 (50% chance of dropping 1 nectar, 50% chance of dropping 1 Ultra-Spicy Spray) | ||
* {{icon|Iridescent Flint Beetle|v=P4|y}} × 1 ( | * {{icon|Iridescent Flint Beetle|v=P4|y}} × 1 (drops 2 × 1 pellet, 3 × nectar, 2 × 5 pellet) | ||
* {{icon|Mitite|v=P4|y}} × 10 ( | * {{icon|Mitite|v=P4|y}} × 10 (drops from the Baldy Long Legs) | ||
* {{icon|Pyroclasmic Slooch|v=P4|y}} × 3 | * {{icon|Pyroclasmic Slooch|v=P4|y}} × 3 | ||
* {{icon|Red Spectralids|v=P4|y}} × 1 ( | * {{icon|Red Spectralids|v=P4|y}} × 1 (drops 1 Ultra-Spicy Spray) | ||
* {{icon|Skitter Leaf|v=P4|y}} × 4 | * {{icon|Skitter Leaf|v=P4|y}} × 4 | ||
* {{icon|Skutterchuck|v=P4|y}} × 4 (2 carry | * {{icon|Skutterchuck|v=P4|y}} × 4 (2 carry crystal nodules, 2 carry Bomb Rocks) | ||
* {{icon|Swooping Snitchbug|v=P4|y}} × 3 | * {{icon|Swooping Snitchbug|v=P4|y}} × 3 | ||
* {{icon|Waddlequaff|v=P4|y}} × 3 | * {{icon|Waddlequaff|v=P4|y}} × 3 | ||
* {{icon|Yellow Spectralids|v=P4|y}} × 2 ( | * {{icon|Yellow Spectralids|v=P4|y}} × 2 (drop 1 nectar each) | ||
}} | }} | ||
==== Obstacles ==== | ==== Obstacles ==== | ||
{{columns|2| | {{columns|2| | ||
* {{icon|Clay bridge|v=P4|y}} × 1 ( | * {{icon|Breakable pot|v=P4|y}} × 4 (1 group of 4 that holds nothing) | ||
* {{icon|Clay mound|v=P4|y}} × 1 ( | * {{icon|Clay bridge|v=incomplete P4|y}} × 1 (requires 21 raw material) | ||
* {{icon|Climbing wall|v=P4|y}} × 1 ( | * {{icon|Clay mound|v=incomplete P4|y}} × 1 (requires 24 raw material) | ||
* {{icon|Climbing wall|v=incomplete P4|y}} × 1 (requires 7 raw material) | |||
* {{icon|Dried plant|v=P4|y}} × 23 | * {{icon|Dried plant|v=P4|y}} × 23 | ||
* {{icon|Electric gate|v=P4|y}} × 1 ( | * {{icon|Electric gate|v=P4|y}} × 1 (has 8000 HP) | ||
* {{icon|Iron fence|v=P4|y}} × 2 | * {{icon|Iron fence|v=P4|y}} × 2 | ||
* {{icon|Mud pool|y|v=P4}} × 1 | * {{icon|Mud pool|y|v=P4}} × 1 | ||
* {{icon|Reinforced wall|v=P4|y}} × 1 (requires 3 Bomb Rocks, has 30000 HP) | |||
* {{icon|Reinforced wall|v=P4|y}} × 1 ( | |||
* {{icon|Sprinkler|v=P4|y}} × 1 (cannot be turned off) | * {{icon|Sprinkler|v=P4|y}} × 1 (cannot be turned off) | ||
}} | }} | ||
| Line 326: | Line 330: | ||
==== Tools ==== | ==== Tools ==== | ||
* {{icon|Dirt-mound|v=P4|y}} × 4 (2 × 1 Bomb Rock, 1 × 2 Bomb Rocks, 1 × 1 Ice Blast) | * {{icon|Dirt-mound|v=P4|y}} × 4 (2 × 1 Bomb Rock, 1 × 2 Bomb Rocks, 1 × 1 Ice Blast) | ||
* {{icon|Bomb rock|n=Bomb Rock|v=P4|y}} × 2 ( | * {{icon|Bomb rock|n=Bomb Rock|v=P4|y}} × 2 (held by Skutterchucks) | ||
* {{icon|Bonfire altar|v=P4|y}} × 7 (1 starts lit) | * {{icon|Bonfire altar|v=P4|y}} × 7 (1 starts lit) | ||
* {{icon|Bouncy Mushroom|v=P4|y}} × 2 | * {{icon|Bouncy Mushroom|v=P4|y}} × 2 | ||
| Line 345: | Line 349: | ||
{{image}} | {{image}} | ||
<gallery> | <gallery> | ||
P4 Blossoming Arcadia Introduction 1.jpg|The first scene in the area's introduction cutscene. | |||
P4 Blossoming Arcadia Introduction 2.jpg|The second scene in the area's introduction cutscene. | |||
P4 Blossoming Arcadia Introduction 3.jpg|The third scene in the area's introduction cutscene. | |||
Fragrant Ravine.jpg|The Fragrant Ravine base location. | Fragrant Ravine.jpg|The Fragrant Ravine base location. | ||
Misshapen Pond.jpg|The Misshapen Pond base location. | Misshapen Pond.jpg|The Misshapen Pond base location. | ||
Sunwashed Plateau.jpg|The Sunwashed Plateau base location. | Sunwashed Plateau.jpg|The Sunwashed Plateau base location. | ||
Blossoming Arcadia dandelions.jpg|A cluster of [[ | Mamuta laying down in Blossoming Arcadia.png|A [[Mamuta]] laying down in the Blossoming Arcadia. | ||
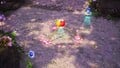
Blossoming Arcadia dandelions.jpg|A cluster of [[dandelion]]s around a handcart by the Misshapen Pond. | |||
</gallery> | </gallery> | ||
Latest revision as of 21:18, February 21, 2025
| Blossoming Arcadia | |
|---|---|
| |
| Rescues | 9 |
| Treasures | 60 |
| Onions | 3 |
| Caves | 4 |
| Dandori Challenges | 2 |
| Dandori Battles | 1 |
| Suggested Pikmin | |
| Wild Pikmin | |
| Requirements | |
| Next area | Serene Shores |
| Music | Blossoming Arcadia |


The Blossoming Arcadia (花ふぶきの楽園?, lit.: "Paradise of Falling Flower Petals") is the second main area in Pikmin 4. It is set in a kindergarten playground, with a slide visible in the background. This area has ![]() × 4,878 worth of treasure, of which
× 4,878 worth of treasure, of which ![]() × 1,580 is above ground.
× 1,580 is above ground.
Plot[edit]
|
This section is a stub. You can help Pikipedia by expanding it. |
In the story, the Rescue Corps spread out to this area in search of Captain Olimar, and the Red Leafling.
Layout[edit]
|
The following article or section is in need of assistance from someone who plays Pikmin 4. |
The following notable features can be found in this area.
- As part of the playable terrain:
- Various sandy and dirt terrain.
- Blue fences, some of them with drawings of colored fish and algae.
- Azure tubes or a hose along the floor.
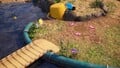
- An upturned yellow bucket.
- A small wooden model house.
- A landing spot identified as "Fragrant Ravine".
- As part of the background:
- A very large house, with a pink roof and a front porch awning.
- Large car tires, in red, yellow, and blue colors.
- A cyan playground slide styled like an elephant.
- Playground castles.
- Cherry blossom trees.
Bases[edit]
- Fragrant Ravine: the default landing site.
- Sunwashed Plateau: guarded by a Creeping Chrysanthemum.
- Misshapen Pond: unguarded.
Caves[edit]
| Image | Name | Sublevels | Castaways | Treasures | Onions | Suggested Pikmin | Wild Pikmin |
|---|---|---|---|---|---|---|---|

|
Drafty Gallery | 4 | 1 | 10 | 0 | ||

|
Secluded Courtyard | 4 | 2 | 10 | 1 | ||

|
Sightless Passage | 1 | 1 | 4 | 0 | ||

|
Kingdom of Beasts | 6 | 2 | 16 | 0 |
Dandori Challenge 1[edit]
The entrance is found at the top of the climbing wall past the Misshapen Pond base (on the way to the Kingdom of Beasts), with the only other obstacle being the nearby Waddlequaff.
Dandori Challenge 2[edit]
This cave is found near the back of the area accessed from across the buildable bridge near the Sunwashed Plateau. Next to the potted plant, it can be found behind a stone wall, requiring 3 Bomb Rocks to destroy it. These can be bought from Russ, though Bomb Rocks can also be found in multiple dirt-mounds around the area.
Dandori Battle[edit]
A Dandori Battle cave can be found near the first base, Fragrant Ravine. It is found toward the center river, on top of a large box. There are no obstacles obstructing its entrance. The player can find the same leafy individual that was in Sun-Speckled Terrace, with another castaway.
Objects[edit]
Treasures[edit]
 Brush of Wisdom × 1 (inside Burrowing Snagret)
 Cupid's Grenade × 3 (may be inside Waddlequaff)
 Daughter Doll Head × 1
 Floral Instigator × 1
 Harmonic Synthesizer × 1
 Mechanical Harp (Memory Song) × 1
 Mooching Vase × 1 (fully buried)
 Octoplus × 1 (may be inside Waddlequaff)
 Orbital Communication Sphere × 1 (in dirt-mound)
 Searing Acidshock × 1 (may be inside Waddlequaff)
 Shake-a-Smile × 1 (inside Mamuta)
 Sphere of Fuzzy Feelings × 1 (completely buried)
 Sticky Jewel × 1
 Sweat-Soaked Blue Bird × 1
 Unfloatable Boat × 1
 Velvety Dreamdrop × 1 (partially buried)
 Wayward Moon × 1
 Wind Detector × 1 (partially buried)
Onions[edit]
 Flarlic × 1 (partially buried)
 Yellow Onion × 1 (partially buried)
Enemies[edit]
 Bearded Amprat × 2 (drops 1 raw material each)
 Burrowing Snagret × 1 (drops 1 treasure)
 Creeping Chrysanthemum × 2 (drops 1 raw material each)
 Downy Snagret × 8 (1 inside an egg)
 Iridescent Flint Beetle × 1 (drops 2 × 1 pellet, 3 × nectar, 2 × 5 pellet)
 Joustmite × 3 (drops 1 raw material each)
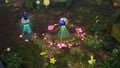
 Mamuta × 1 (drops 1 treasure)
 Mitite × 20 (1 group of 10 that drop 1 raw material each beneath some pots, 1 group of 10 that has a 80% chance of dropping nectar and a 20% chance of dropping Ultra-Spicy Spray each beneath the Harmonic Synthesizer)
 Skitter Leaf × 5
 Swooping Snitchbug × 2 (drops 1 raw material each)
 Waddlequaff × 4 (drops 1 raw material each)
 White Spectralids × 3 (51% chance to drop 1 raw material each)
 Yellow Spectralids × 6 (drops 1 nectar each)
 Yellow Wollyhop × 4 (drops 1 raw material each)
Obstacles[edit]
 Breakable pot × 19 (1 group of 3 in which 1 has 1 raw material, 1 group of 4 in which 2 have 1 raw material each, 1 group of 4 that holds nothing, 1 group of 8 blocking a cave entrance)
 Dirt wall × 1 (drops 2 raw material per phase, has 8000 HP)
 Electric gate × 2 (drops 2 raw material per phase, has 8000 HP each)
 Reinforced wall × 1 (requires 3 Bomb Rocks, drops 2 raw material per phase, has 30000 HP)
 Ice wall × 2 (drops 2 raw material per phase, has 4000 HP each)
 Sprinkler × 1
Tools[edit]
 Clay bridge × 3 (requires 29, 33, and 40 raw material)
 Clay valve × 1 (requires 16 raw material)
 Climbing wall × 1 (requires 11 raw material)
 Dirt-mound × 8 (10 raw material × 4, Bomb Rock × 3, Orbital Communication Sphere × 1)
 Potted mushroom × 4
Others[edit]
 Egg × 3 (1 contains a Downy Snagret)
 Pile of raw material × 7 (piles of 12, 15, 20, 24, and 3 piles of 30)
Guide[edit]
|
The following article or section contains guides. |
|
The following article or section is in need of assistance from someone who plays Pikmin 4. |
Night expeditions[edit]
All 3 bases in the Blossoming Arcadia have night expeditions.
Fragrant Ravine[edit]
| Fragrant Ravine | |
|---|---|

| |
| Danger level | |
| Lumiknolls | 1 |
| Enemies | 20 |
| Starting Glow Pikmin | 10 |
There is one Lumiknoll located directly at the base. This location has a danger level of 1 and starts the player off with 10 Glow Pikmin.
Enemies[edit]
 Desiccated Skitter Leaf × 16
- Joustmite × 4
Objects[edit]
 Glow pellet × 395
- Pile of 5 × 2
- Pile of 10 × 15
- Pile of 15 × 7
- Pile of 20 × 5
- Pile of 30 × 1
Sunwashed Plateau[edit]
| Sunwashed Plateau | |
|---|---|

| |
| Danger level | |
| Lumiknolls | 1 |
| Enemies | 18 |
| Starting Glow Pikmin | 15 |
There is one Lumiknoll located just north of the base and west of where the Velvety Dreamdrop is located. This location has a danger level of 1 and starts the player off with 15 Glow Pikmin.
Enemies[edit]
- Desiccated Skitter Leaf × 12
- Joustmite × 4
 Puffy Blowhog × 2
Objects[edit]
- Glow pellet × 285
- Pile of 5 × 2 (Puffy Blowhogs drop 1 pile each)
- Pile of 10 × 9
- Pile of 15 × 5
- Pile of 20 × 4
- Pile of 30 × 1
Misshapen Pond[edit]
| Misshapen Pond | |
|---|---|

| |
| Danger level | |
| Lumiknolls | 2 |
| Enemies | 10 |
| Starting Glow Pikmin | 10 |
There are two Lumiknolls, the orange one located at the base and the blue one located just east of it. This location has a danger level of 2 and starts the player off with 10 Glow Pikmin.
Enemies[edit]
 Bulborb Larva × infinite (2 nests)
- Joustmite × 5
 Tusked Blowhog × 3
Objects[edit]
- Glow pellet × 175
- Pile of 10 × 6
- Pile of 15 × 5
- Pile of 20 × 2
Olimar's Shipwreck Tale[edit]
| Blossoming Arcadia | |
|---|---|

| |
| Ship parts | 8 |
| Onions | 4 |
| Requirements | Recover 2 ship parts |
| Next area | Serene Shores |
| Music | Olimar's Shipwreck Tale: Blossoming Arcadia |
The Blossoming Arcadia is the second area Captain Olimar explores in his Shipwreck Tale.
Plot[edit]
Captain Olimar lands in the Blossoming Arcadia to continue his search for any missing parts for his ship, the S.S. Dolphin. He manages to find eight of his missing pieces along with the discovery of Blue Pikmin and a space dog called Moss. He finds Moss lying on the ground and feeds her a Scrummy Bone, which revitalizes her. She then chooses to help Olimar in his search to recover his lost ship parts.
Layout[edit]
The layout of the Blossoming Arcadia in Olimar's Shipwreck Tale is almost identical to that of the area in the main story. The major differences are the objects and enemies present, along with the cave entrances not being present. The body of water that is usually in the centre of the map is now a body of mud. Unlike water, the mud does not prohibit non-Blue Pikmin from crossing it, but it slows down anything that wades through it.
Bases[edit]
- Fragrant Ravine: unguarded.
- Sunwashed Plateau: the default landing site.
- Misshapen Pond: unguarded.
Objects[edit]
Ship parts[edit]
 Automatic Gear × 1
 Extraordinary Bolt × 3 (1 inside Burrowing Snagret)
 Ionium Jet × 1
 Omega Stabilizer × 1
 Radiation Canopy × 1 (inside Baldy Long Legs)
 Repair-Type Bolt × 1
Onions[edit]
 Blue Onion × 1 (surrounded by dried plants)
- Flarlic × 2
- Yellow Onion × 1
Enemies[edit]
 Baldy Long Legs × 1 (drops 10 mitites and 1 ship part)
- Burrowing Snagret × 1 (drops 1 ship part)
- Creeping Chrysanthemum × 2
- Desiccated Skitter Leaf × 6
- Downy Snagret × 3 (2 are in eggs)
 Honeywisp × 1 (50% chance of dropping 1 nectar, 50% chance of dropping 1 Ultra-Spicy Spray)
- Iridescent Flint Beetle × 1 (drops 2 × 1 pellet, 3 × nectar, 2 × 5 pellet)
- Mitite × 10 (drops from the Baldy Long Legs)
 Pyroclasmic Slooch × 3
 Red Spectralids × 1 (drops 1 Ultra-Spicy Spray)
- Skitter Leaf × 4
 Skutterchuck × 4 (2 carry crystal nodules, 2 carry Bomb Rocks)
- Swooping Snitchbug × 3
- Waddlequaff × 3
- Yellow Spectralids × 2 (drop 1 nectar each)
Obstacles[edit]
- Breakable pot × 4 (1 group of 4 that holds nothing)
- Clay bridge × 1 (requires 21 raw material)
 Clay mound × 1 (requires 24 raw material)
- Climbing wall × 1 (requires 7 raw material)
 Dried plant × 23
- Electric gate × 1 (has 8000 HP)
 Iron fence × 2
 Mud pool × 1
- Reinforced wall × 1 (requires 3 Bomb Rocks, has 30000 HP)
- Sprinkler × 1 (cannot be turned off)
Tools[edit]
- Dirt-mound × 4 (2 × 1 Bomb Rock, 1 × 2 Bomb Rocks, 1 × 1 Ice Blast)
 Bomb Rock × 2 (held by Skutterchucks)
 Bonfire altar × 7 (1 starts lit)
 Bouncy Mushroom × 2
 Fire starter (provided by bonfire altars)
Other[edit]
 Burgeoning Spiderwort × 1
- Egg × 6 (4 contain 1 nectar each, 2 contain 1 Downy Snagret each)
 Moss × 1
 Pellet Posy × 13 (1 pellet × 10, 5 pellet × 2, 10 pellet × 1)
- Raw material pile × 5 (piles of 6, 10, 10, 10, and 12)
Guide[edit]
|
The following article or section contains guides. |
|
The following article or section is in need of assistance from someone who plays Pikmin 4. |
Gallery[edit]
|
This article or section is in need of more images. |
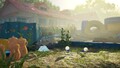
The first scene in the area's introduction cutscene.
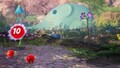
The second scene in the area's introduction cutscene.
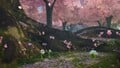
The third scene in the area's introduction cutscene.
The Fragrant Ravine base location.
The Misshapen Pond base location.
The Sunwashed Plateau base location.
A Mamuta laying down in the Blossoming Arcadia.
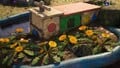
A cluster of dandelions around a handcart by the Misshapen Pond.


Trivia[edit]
- The Oasis of Order Dandori Challenge and the nineteenth sublevel of the Cavern for a King have the same skybox as the Blossoming Arcadia at night.
Names in other languages[edit]
Blossoming Arcadia
| Language | Name | Meaning |
|---|---|---|
| 花ふぶきの楽園? Hanafubuki no Rakuen |
Paradise of Falling Flower Petals | |
(traditional) |
花瓣雨樂園 Huābàn Yǔ Lèyuán |
Petal Rain Paradise |
(simplified) |
花瓣雨乐园 Huābàn Yǔ Lèyuán |
Petal Rain Paradise |
| Bloesemparadijs | Blossom paradise | |
| Paradis des pétales | Petal paradise | |
| Erblühender Park | Blossoming Park | |
| Paradiso in fiore | Blossoming paradise | |
| 꽃바람 낙원 Kkotbaram Nagwon |
Flower Wind Paradise | |
| Área de recreio | Recess area | |
| Jardín de recreo | Recess garden |
|
The following article or section needs help from someone who can translate Chinese/Dutch/Korean text. |
Fragrant Ravine
| Language | Name | Meaning |
|---|---|---|
| 花びら渓谷? Hanabira Keikoku |
Petal Ravine | |
| 花瓣溪谷 | ||
| Geurige greppel | ||
| Ravin parfumé | Fragrant ravine | |
| Blütenklamm | Blossom ravine | |
| Canyon di petali | Petal canyon | |
| 꽃잎 계곡 | ||
| Barranco balsâmico | Balsamic ravine | |
| Barranco fragante | Fragrant ravine |
Sunwashed Plateau
| Language | Name | Meaning |
|---|---|---|
| こもれび台地? Komorebi Daichi |
Plateau of Sunlight Through the Trees | |
| 沐光高台 | ||
| Zonneplateau | ||
| Plateau du soleil | Plateau of the sun | |
| Sonniges Plateau | Sunny Plateau | |
| Pianura assolata | Sunny plain | |
| 햇살 비치는 대지 | ||
| Platô quarado | Bleached plateau | |
| Meseta soleada | Sunny pleateau |
Misshapen Pond
| Language | Name | Meaning |
|---|---|---|
| ひょうたん池? Hyōtan Ike |
Gourd Pond | |
(traditional) |
葫蘆池 | |
(simplified) |
葫芦池 | |
| Vreemde vijver | ||
| Étang étrange | Strange pond | |
| Seltsamer Teich | Strange Pond | |
| Stagno bizzarro | Bizarre pond | |
| 호리병 연못 | ||
| Lago estranho | Strange lake | |
| Estanque extraño | Strange pond |
See also[edit]
| Pikmin 4 areas |
|---|
 Click an area on the image Rescue Command Post • Sun-Speckled Terrace • Blossoming Arcadia • Serene Shores • Hero's Hideaway • Giant's Hearth • Primordial Thicket |