Forgotten Cove: Difference between revisions
m (Cat.) |
No edit summary |
||
| (60 intermediate revisions by 24 users not shown) | |||
| Line 1: | Line 1: | ||
{{ | '''Forgotten Cove''' is a [[Mission Mode]] stage in {{p3}}. It is a beach-like area that is based on [[The Forest Navel]], the third [[area]] in the original ''[[Pikmin (game)|Pikmin]]'' game. [[Louie]] can be found within a [[Medusal Slurker]], and once rescued, he can be used as a third [[leader]]. The stage is playable in the Collect Treasure! and Battle Enemies! modes. In the original ''Pikmin 3'', it was released as [[downloadable content]] on {{date|2|December|2013}}, while in {{p3d}}, it is part of the base game and can be unlocked in each of the 2 modes by completing the first 10 stages in that mode. | ||
{{ | {{stub|<br> | ||
*Add an Overview and Key sections sections, as per the area article policy. | |||
*Add guides. | |||
*Add sections for the layout, like other Mission Mode stages. | |||
}} | |||
==Collect Treasure!== | |||
{{infobox mission | |||
|map = ForgottenCoveCollectFruitMap.jpg | |||
|red = {{tt|20|20 leaf}} | |||
|yellow = {{tt|40|40 leaf}} | |||
|blue = {{tt|40|40 leaf}} | |||
|time = 11:00 | |||
|bronze = 900 | |||
|silver = 1800 | |||
|gold = 2700 | |||
|platinum = 3480 | |||
|music = [[Music in Pikmin 3#Mission Mode (Levels 12-15)|Mission Mode (Levels 12-15)]] | |||
}} | |||
'' | ===Objects=== | ||
;Leaders | |||
*{{icon|Alph|y|v=neutral}} (player 2's starting leader) | |||
*{{icon|Olimar|y|v=neutral}} (player 1's starting leader) | |||
*{{icon|Louie|y|v=neutral}} (after being freed) | |||
The order in ''Pikmin 3'' is Olimar, Alph, Louie. The [[action menu|order]] in ''Pikmin 3 Deluxe'' is Olimar, Alph, Louie. | |||
== | ;Pikmin | ||
= | {| class="wikitable sortable" | ||
! class="unsortable" | Icon | |||
!Type | |||
!Amount | |||
! class="unsortable" | Location(s) | |||
|- | |||
|[[File:Red Pikmin P3 icon.png|32px]] | |||
|[[Red Pikmin]] | |||
|20 | |||
|10 leaf Pikmin standing under the [[SPERO]].<br>10 leaf Pikmin buried near [[Louie]]. | |||
|- | |||
|[[File:Yellow Pikmin P3 icon.png|32px]] | |||
|[[Yellow Pikmin]] | |||
|40 | |||
|10 leaf Pikmin standing under the SPERO.<br>10 leaf Pikmin buried near the [[Fire-Breathing Feast]].<br>7 leaf Pikmin standing on top of a rock near Louie.<br>13 leaf Pikmin buried on top of the northern pond. | |||
|- | |||
|[[File:Blue Pikmin P3 icon.png|32px]] | |||
|[[Blue Pikmin]] | |||
|40 | |||
|20 leaf Pikmin buried in the northern pond.<br>10 leaf Pikmin buried inside the eastern pond.<br>10 leaf Pikmin buried on the edge of the big pond. | |||
|} | |||
== | ;Treasures and Enemies | ||
{| class="wikitable sortable" | |||
! class="unsortable" | Icon | |||
!Name | |||
!Amount | |||
!Value | |||
!Total value | |||
|- | |||
|[[File:Fire-Breathing Feast icon.png|32px]] | |||
|[[Fire-Breathing Feast]] | |||
|1 | |||
|[[File:Poko P3 icon.png|12px]] × 500 | |||
|[[File:Poko P3 icon.png|12px]] × 500 | |||
|- | |||
|[[File:Dawn Pustules icon.png|32px]] | |||
=== | |[[Dawn Pustules]] | ||
|20 | |||
|[[File:Poko P3 icon.png|12px]] × 200 <small>(Whole fruit)</small><br>[[File:Poko P3 icon.png|12px]] × 10 <small>(Each part)</small> | |||
|[[File:Poko P3 icon.png|12px]] × 200 | |||
|- | |||
|[[File:Seed Hive icon.png|32px]] | |||
|[[Seed Hive]] | |||
|1 | |||
|[[File:Poko P3 icon.png|12px]] × 200 | |||
|[[File:Poko P3 icon.png|12px]] × 200 | |||
|- | |||
|[[File:Juicy Gaggle icon.png|32px]] | |||
|[[Juicy Gaggle]] | |||
|6 | |||
|[[File:Poko P3 icon.png|12px]] × 20 | |||
|[[File:Poko P3 icon.png|12px]] × 120 | |||
|- | |||
|[[File:Heroine's Tear icon.png|32px]] | |||
|[[Heroine's Tear]] | |||
|1 | |||
|[[File:Poko P3 icon.png|12px]] × 500 | |||
|[[File:Poko P3 icon.png|12px]] × 500 | |||
|- | |||
|[[File:Scaly Custard icon.png|32px]] | |||
|[[Scaly Custard]] | |||
|1 | |||
|[[File:Poko P3 icon.png|12px]] × 80 | |||
|[[File:Poko P3 icon.png|12px]] × 80 | |||
|- | |||
|[[File:Dapper Blob icon.png|32px]] | |||
|[[Dapper Blob]] | |||
|1 | |||
|[[File:Poko P3 icon.png|12px]] × 50 | |||
|[[File:Poko P3 icon.png|12px]] × 50 | |||
|- | |||
|[[File:Crimson Banquet icon.png|32px]] | |||
|[[Crimson Banquet]] | |||
|6 | |||
|[[File:Poko P3 icon.png|12px]] × 1000 <small>(Whole fruit)</small><br>[[File:Poko P3 icon.png|12px]] × 20, 80, 80, 160, 160, 500 <small>(Each part)</small> | |||
|[[File:Poko P3 icon.png|12px]] × 1000 | |||
|- | |||
|[[File:Nugget icon.png|32px]] | |||
|[[Nugget]] | |||
|70 <small>(Piles of 30 and 40)</small> | |||
|[[File:Poko P3 icon.png|12px]] × 3 | |||
|[[File:Poko P3 icon.png|12px]] × 210 | |||
|- | |||
|[[File:Spirit BE enemy icon.png|32px]] | |||
|[[Enemy]] | |||
|1 <small>({{icon|Baldy Long Legs|y}})</small><br>1 <small>({{icon|Bearded Amprat|y}})</small><br>1 <small>({{icon|Fiery Blowhog|v=P3|y}})</small><br>1 <small>({{icon|Hermit Crawmad|v=P3|y}})</small><br>2 <small>({{icon|Medusal Slurker|y}})</small><br>4 <small>({{icon|Puckering Blinnow|y}})</small><br>2 <small>({{icon|Skeeterskate|y}})</small><br>1 <small>({{icon|Sputtlefish|y}})</small><br>1 <small>({{icon|Toady Bloyster|v=P3|y}})</small><br>1 <small>({{icon|Waddlepus|y}})</small><br>2 <small>({{icon|Water Dumple|v=P3|y}})</small><br>2 <small>({{icon|Wogpole|v=P3|y}})</small><br>1 <small>({{icon|Yellow Wollywog|v=P3|y}})</small> | |||
|[[File:Poko P3 icon.png|12px]] × 100 <small>([[Baldy Long Legs]])</small><br>[[File:Poko P3 icon.png|12px]] × 50 <small>([[Bearded Amprat]])</small><br>[[File:Poko P3 icon.png|12px]] × 30 <small>([[Fiery Blowhog]])</small><br>[[File:Poko P3 icon.png|12px]] × 30 <small>([[Hermit Crawmad]])</small><br>[[File:Poko P3 icon.png|12px]] × 15 <small>([[Medusal Slurker]])</small><br>[[File:Poko P3 icon.png|12px]] × 15 <small>([[Puckering Blinnow]])</small><br>[[File:Poko P3 icon.png|12px]] × 5 <small>([[Skeeterskate]])</small><br>[[File:Poko P3 icon.png|12px]] × 30 <small>([[Sputtlefish]])</small><br>[[File:Poko P3 icon.png|12px]] × 50 <small>([[Toady Bloyster]])</small><br>[[File:Poko P3 icon.png|12px]] × 30 <small>([[Waddlepus]])</small><br>[[File:Poko P3 icon.png|12px]] × 30 <small>([[Water Dumple]])</small><br>[[File:Poko P3 icon.png|12px]] × 5 <small>([[Wogpole]])</small><br>[[File:Poko P3 icon.png|12px]] × 30 <small>([[Yellow Wollywog]])</small> | |||
|[[File:Poko P3 icon.png|12px]] × 420 | |||
|} | |||
;Obstacles | |||
* Dirt | *{{icon|Dirt wall|y}} × 2 | ||
*{{icon|Electric gate|v=P3|y}} × 1 | |||
* Electric | *{{icon|Reinforced wall|v=P3|y}} × 3 | ||
* | |||
;Tools | |||
*{{icon|Climbing stick|y}} × 1 | |||
* | *{{icon|Dirt mound|y}} × 3 (each has one [[bomb rock]] near them, and two more inside) | ||
*{{icon|Geyser|y}} × 2 | |||
* | *{{icon|Hay|y}} × 2 (separate piles of 20) | ||
* | |||
* | |||
=== | ;Plants and Fungi | ||
* | *{{icon|Burgeoning Spiderwort|v=P3|y}} × 2 | ||
* | |||
* | ==Battle Enemies!== | ||
* | {{infobox mission | ||
* Large | |be = y | ||
* Geyser ( | |map = Forgotten Cove.png | ||
|red = {{tt|7|7 leaf}} | |||
|rock = {{tt|10|10 leaf}} | |||
|blue = {{tt|7|7 leaf}} | |||
|time = 9:00 | |||
|bronze = 330 | |||
|silver = 500 | |||
|gold = 670 | |||
|platinum = 840 | |||
|music = [[Music in Pikmin 3#Mission Mode (Levels 12-15)|Mission Mode (Levels 12-15)]] | |||
|noicons = y | |||
}} | |||
===Objects=== | |||
;Leaders | |||
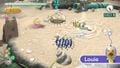
*{{icon|Brittany|y|v=neutral}} (player 2's starting leader) | |||
*{{icon|Olimar|y|v=neutral}} (player 1's starting leader) | |||
*{{icon|Louie|y|v=neutral}} (after being freed) | |||
The order in ''Pikmin 3'' is Olimar, Brittany, Louie. The [[action menu|order]] in ''Pikmin 3 Deluxe'' is Olimar, Brittany, Louie. | |||
;Starting Pikmin | |||
{| class="wikitable sortable" | |||
! class="unsortable" | Icon | |||
!Type | |||
!Amount | |||
! class="unsortable" | Location(s) | |||
|- | |||
|[[File:Red Pikmin P3 icon.png|32px]] | |||
|[[Red Pikmin]] | |||
|7 | |||
|7 leaf Pikmin standing under the [[Master Onion]]. | |||
|- | |||
|[[File:Rock Pikmin P3 icon.png|32px]] | |||
|[[Rock Pikmin]] | |||
|10 | |||
|10 leaf Pikmin buried left to the eastern pond. | |||
|- | |||
|[[File:Blue Pikmin P3 icon.png|32px]] | |||
|[[Blue Pikmin]] | |||
|7 | |||
|7 leaf Pikmin buried under the [[Blue Onion]]. | |||
|} | |||
;Enemies | |||
{| class="wikitable sortable" | |||
! class="unsortable" | Icon | |||
!Name | |||
!Amount | |||
!Value | |||
!Total value | |||
|- | |||
|[[File:Dwarf Orange Bulborb P3 icon.png|32px]] | |||
|[[Dwarf Orange Bulborb]] | |||
|11 | |||
|[[File:Spirit BE enemy icon.png|12px]] × 15 | |||
|[[File:Spirit BE enemy icon.png|12px]] × 165 | |||
|- | |||
|[[File:Medusal Slurker icon.png|32px]] | |||
|[[Medusal Slurker]] | |||
|1 | |||
|[[File:Spirit BE enemy icon.png|12px]] × 15 | |||
|[[File:Spirit BE enemy icon.png|12px]] × 15 | |||
|- | |||
|[[File:Puckering Blinnow icon.png|32px]] | |||
|[[Puckering Blinnow]] | |||
|4 | |||
|[[File:Spirit BE enemy icon.png|12px]] × 15 | |||
|[[File:Spirit BE enemy icon.png|12px]] × 60 | |||
|- | |||
|[[File:Yellow Wollywog P3 icon.png|32px]] | |||
|[[Yellow Wollywog]] | |||
|4 | |||
|[[File:Spirit BE enemy icon.png|12px]] × 30 | |||
|[[File:Spirit BE enemy icon.png|12px]] × 120 | |||
|- | |||
|[[File:Fiery Blowhog P3 icon.png|32px]] | |||
|[[Fiery Blowhog]] | |||
|3 | |||
|[[File:Spirit BE enemy icon.png|12px]] × 30 | |||
|[[File:Spirit BE enemy icon.png|12px]] × 90 | |||
|- | |||
|[[File:Watery Blowhog P3 icon.png|32px]] | |||
|[[Watery Blowhog]] | |||
|1 | |||
|[[File:Spirit BE enemy icon.png|12px]] × 30 | |||
|[[File:Spirit BE enemy icon.png|12px]] × 30 | |||
|- | |||
|[[File:Waddlepus icon.png|32px]] | |||
|[[Waddlepus]] | |||
|2 | |||
|[[File:Spirit BE enemy icon.png|12px]] × 30 | |||
|[[File:Spirit BE enemy icon.png|12px]] × 60 | |||
|- | |||
|[[File:Orange Bulborb P3 icon.png|32px]] | |||
|[[Orange Bulborb]] | |||
|2 | |||
|[[File:Spirit BE enemy icon.png|12px]] × 50 | |||
|[[File:Spirit BE enemy icon.png|12px]] × 100 | |||
|- | |||
|[[File:Peckish Aristocrab icon.png|32px]] | |||
|[[Peckish Aristocrab]] | |||
|1 | |||
|[[File:Spirit BE enemy icon.png|12px]] × 100 | |||
|[[File:Spirit BE enemy icon.png|12px]] × 100 | |||
|- | |||
|[[File:Bug-Eyed Crawmad icon.png|32px]] | |||
|[[Bug-Eyed Crawmad]] | |||
|1 | |||
|[[File:Spirit BE enemy icon.png|12px]] × 100 | |||
|[[File:Spirit BE enemy icon.png|12px]] × 100 | |||
|} | |||
;Obstacles | |||
{{columns|2| | |||
*{{icon|Dirt wall|y}} × 2 | |||
*{{icon|Hay|y}} × 2 (separate piles of 20) | |||
*{{icon|Large crystal|y}} × 3 (each contain three [[bomb rock]]s inside) | |||
*{{icon|Reinforced wall|v=P3|y}} × 3 | |||
*{{icon|Small crystal|y}} × 1 | |||
}} | |||
;Tools | |||
*{{icon|Climbing stick|y}} × 1 | |||
*{{icon|Geyser|y}} × 2 | |||
;Plants and Fungi | |||
*{{icon|Burgeoning Spiderwort|v=P3|y}} × 2 | |||
*{{icon|Pellet Posy|v=P3|y}} × 6 (four are 1 Pellets, two are 5 Pellets) | |||
==World records== | |||
{{world records | date = {{date|20|June|2016}} | cts = 15150 | ctc = 13170 | bes = 4930 | bec = 4810 | p3 = y}} | |||
{{world records | date = {{date|27|June|2022}} | cts = 15600 | ctc = 14550 | bes = 5440 | bec = 5250 | p3d = y}} | |||
==Gallery== | ==Gallery== | ||
<gallery | <gallery> | ||
ForgottenCoveTitle.jpg|Alph starts near the Blue Pikmin | Forgotten Cove CT icon.png|Collect Treasure! icon. | ||
Forgotten Cove BE icon.png|Battle Enemies! icon. | |||
ForgottenCoveTitle.jpg|Alph starts near the Blue Pikmin. | |||
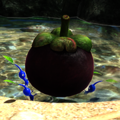
ForgottenCoveSlurker.jpg|A [[Medusal Slurker]] holding [[Louie]] captive. | ForgottenCoveSlurker.jpg|A [[Medusal Slurker]] holding [[Louie]] captive. | ||
ForgottenCoveBase.jpg|The base of Forgotten Cove's | ForgottenCoveBase.jpg|The base of Forgotten Cove's Collect Treasure! mission. Take note that this is the exact spot that Olimar landed in The Forest Navel in ''Pikmin''. | ||
ForgottenCoveSnorkel.jpg|The snorkel tube can be used as a shortcut back to base | ForgottenCoveSnorkel.jpg|The snorkel tube can be used as a shortcut back to base. | ||
Red Sand.png|A sand drawing of a Red Pikmin, found in the level. | Red Sand.png|A sand drawing of a Red Pikmin, found in the level. | ||
FCFNCompare.png|A map comparing The Forest Navel to the Forgotten Cove. The Forest Navel is in white. | FCFNCompare.png|A map comparing The Forest Navel to the Forgotten Cove. The Forest Navel is in white. | ||
</gallery> | </gallery> | ||
{{ | ==Trivia== | ||
[[ | *To strengthen the map's connection to The Forest Navel, several references to the original map are apparent. The area where [[Beady Long Legs]] would have been fought is replaced with [[Baldy Long Legs]], and the [[Onion#Blue|Blue Onion]] is in the same location as the original. Despite these similarities, this area is drastically different from The Forest Navel, as well as being considered [[canon|non-canon]] for its exclusivity to [[Mission Mode]]. | ||
==Names in other languages== | |||
{{Foreignname | |||
|Jap=思い出の砂浜 | |||
|JapM=Throwback Beach | |||
|Fra=Plage des souvenirs | |||
|FraM=Beach of Memories | |||
|SpaE=Playa de los Recuerdos | |||
|SpaEM=Beach of Memories | |||
|Ger=Strand der Erinnerung | |||
|GerM=Beach of Memory}} | |||
==See also== | |||
*[[The Forest Navel]] | |||
{{missions}} | |||
[[Category:Downloadable content]] | [[Category:Downloadable content]] | ||
Latest revision as of 09:10, June 25, 2024
Forgotten Cove is a Mission Mode stage in Pikmin 3. It is a beach-like area that is based on The Forest Navel, the third area in the original Pikmin game. Louie can be found within a Medusal Slurker, and once rescued, he can be used as a third leader. The stage is playable in the Collect Treasure! and Battle Enemies! modes. In the original Pikmin 3, it was released as downloadable content on December 2nd, 2013, while in Pikmin 3 Deluxe, it is part of the base game and can be unlocked in each of the 2 modes by completing the first 10 stages in that mode.
|
This article is a stub. You can help Pikipedia by expanding it.
|
Collect Treasure![edit]
| Forgotten Cove Collect Treasure! | |||||||||
|---|---|---|---|---|---|---|---|---|---|

| |||||||||
| Starting Pikmin | |||||||||
| |||||||||
| Requirements | |||||||||
| |||||||||
| Time limit | 11:00 | ||||||||
| Music | Mission Mode (Levels 12-15) | ||||||||
Objects[edit]
- Leaders
The order in Pikmin 3 is Olimar, Alph, Louie. The order in Pikmin 3 Deluxe is Olimar, Alph, Louie.
- Pikmin
| Icon | Type | Amount | Location(s) |
|---|---|---|---|
| Red Pikmin | 20 | 10 leaf Pikmin standing under the SPERO. 10 leaf Pikmin buried near Louie. | |
| Yellow Pikmin | 40 | 10 leaf Pikmin standing under the SPERO. 10 leaf Pikmin buried near the Fire-Breathing Feast. 7 leaf Pikmin standing on top of a rock near Louie. 13 leaf Pikmin buried on top of the northern pond. | |
| Blue Pikmin | 40 | 20 leaf Pikmin buried in the northern pond. 10 leaf Pikmin buried inside the eastern pond. 10 leaf Pikmin buried on the edge of the big pond. |
- Treasures and Enemies
| Icon | Name | Amount | Value | Total value |
|---|---|---|---|---|
| Fire-Breathing Feast | 1 | |||
| Dawn Pustules | 20 | |||
| Seed Hive | 1 | |||
| Juicy Gaggle | 6 | |||
| Heroine's Tear | 1 | |||
| Scaly Custard | 1 | |||
| Dapper Blob | 1 | |||
| Crimson Banquet | 6 | |||
| Nugget | 70 (Piles of 30 and 40) | |||
| Enemy | 1 ( 1 ( 1 ( 1 ( 2 ( 4 ( 2 ( 1 ( 1 ( 1 ( 2 ( 2 ( 1 ( |
- Obstacles
 Dirt wall × 2
 Electric gate × 1
 Reinforced wall × 3
- Tools
 Climbing stick × 1
 Dirt mound × 3 (each has one bomb rock near them, and two more inside)
 Geyser × 2
 Hay × 2 (separate piles of 20)
- Plants and Fungi
Battle Enemies![edit]
| Forgotten Cove Battle Enemies! | |||||||||
|---|---|---|---|---|---|---|---|---|---|

| |||||||||
| Starting Pikmin | |||||||||
| |||||||||
| Requirements | |||||||||
| |||||||||
| Time limit | 9:00 | ||||||||
| Music | Mission Mode (Levels 12-15) | ||||||||
Objects[edit]
- Leaders
The order in Pikmin 3 is Olimar, Brittany, Louie. The order in Pikmin 3 Deluxe is Olimar, Brittany, Louie.
- Starting Pikmin
| Icon | Type | Amount | Location(s) |
|---|---|---|---|
| Red Pikmin | 7 | 7 leaf Pikmin standing under the Master Onion. | |
| Rock Pikmin | 10 | 10 leaf Pikmin buried left to the eastern pond. | |
| Blue Pikmin | 7 | 7 leaf Pikmin buried under the Blue Onion. |
- Enemies
| Icon | Name | Amount | Value | Total value |
|---|---|---|---|---|
| Dwarf Orange Bulborb | 11 | |||
| Medusal Slurker | 1 | |||
| Puckering Blinnow | 4 | |||
| Yellow Wollywog | 4 | |||
| Fiery Blowhog | 3 | |||
| Watery Blowhog | 1 | |||
| Waddlepus | 2 | |||
| Orange Bulborb | 2 | |||
| Peckish Aristocrab | 1 | |||
| Bug-Eyed Crawmad | 1 |
- Obstacles
- Dirt wall × 2
- Hay × 2 (separate piles of 20)
 Large crystal × 3 (each contain three bomb rocks inside)
- Reinforced wall × 3
 Small crystal × 1
- Tools
- Climbing stick × 1
- Geyser × 2
- Plants and Fungi
 Burgeoning Spiderwort × 2
 Pellet Posy × 6 (four are 1 Pellets, two are 5 Pellets)
World records[edit]
In Pikmin 3, these are the world records for the challenge, as obtained from the in-game global rankings feature. The following scores were retrieved on June 20th, 2016. Since the in-game leaderboards have been compromised, it is impossible to obtain more up-to-date legitimate records from the game, though players may have obtained higher scores since.
- Collect Treasure!
- Solo:
 × 15150
 - Co-op: × 13170
- Solo:
- Battle Enemies!
- Solo:
 × 4930
 - Co-op: × 4810
- Solo:
In Pikmin 3 Deluxe, these are the world records for the challenge, as obtained from the in-game global rankings feature. The following scores were retrieved on June 27th, 2022.
- Collect Treasure!
- Solo: × 15600
- Co-op: × 14550
- Solo:
- Battle Enemies!
- Solo: × 5440
- Co-op: × 5250
- Solo:
Gallery[edit]
Collect Treasure! icon.

Battle Enemies! icon.
Alph starts near the Blue Pikmin.
A Medusal Slurker holding Louie captive.
The base of Forgotten Cove's Collect Treasure! mission. Take note that this is the exact spot that Olimar landed in The Forest Navel in Pikmin.
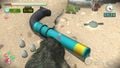
The snorkel tube can be used as a shortcut back to base.
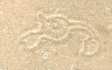
A sand drawing of a Red Pikmin, found in the level.
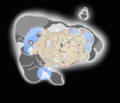
A map comparing The Forest Navel to the Forgotten Cove. The Forest Navel is in white.


Trivia[edit]
- To strengthen the map's connection to The Forest Navel, several references to the original map are apparent. The area where Beady Long Legs would have been fought is replaced with Baldy Long Legs, and the Blue Onion is in the same location as the original. Despite these similarities, this area is drastically different from The Forest Navel, as well as being considered non-canon for its exclusivity to Mission Mode.
Names in other languages[edit]
| Language | Name | Meaning |
|---|---|---|
| 思い出の砂浜? | Throwback Beach | |
| Plage des souvenirs | Beach of Memories | |
| Strand der Erinnerung | Beach of Memory | |
| Playa de los Recuerdos | Beach of Memories |