Tropical Forest Remix: Difference between revisions
GreenPikmin (talk | contribs) |
m (→Names in other languages: Checked and added names from the game files) |
||
| (One intermediate revision by one other user not shown) | |||
| Line 131: | Line 131: | ||
;Others | ;Others | ||
*{{icon|Egg|v=P3|y}} × 1 (contains [[Ultra-spicy nectar]]) | *{{icon|Egg|v=P3|y}} × 1 (contains [[Ultra-spicy nectar]]) | ||
*{{icon|Bomb rock|y}} × 2 | |||
==World records== | ==World records== | ||
| Line 150: | Line 151: | ||
</gallery> | </gallery> | ||
==Names in other languages== | == Names in other languages == | ||
{{Needs translation|Japanese|Chinese|Korean}} | |||
{{Foreignname | {{Foreignname | ||
|Jap=続・原生の杜 | |Jap = 続・原生の杜 | ||
|JapR=Zoku - Gensei no Mori | |JapR = Zoku - Gensei no Mori | ||
|Fra=Forêt primitive bis | |JapM = | ||
|FraM=Alternative primitive forest | |ChiTrad = 續‧原生森林 | ||
|ChiTradR = | |||
|ChiTradM = | |||
|Ger=Urwüchsiger Wald 2 | |ChiSimp = 续·原生森林 | ||
|GerM=Primeval forest 2 | |ChiSimpR = | ||
|Ita=Foresta origine 2 | |ChiSimpM = | ||
|ItaM=Forest origin 2 | |Fra = Forêt primitive bis | ||
|FraM = Alternative primitive forest | |||
|Ger = Urwüchsiger Wald 2 | |||
|GerM = Primeval forest 2 | |||
|Ita = Foresta origine 2 | |||
|ItaM = Forest origin 2 | |||
|Kor = 원주의 숲 속편 | |||
|KorR = | |||
|KorM = | |||
|Spa = Bosque Primigenio 2 | |||
|SpaM = Primitive Forest 2 | |||
}} | }} | ||
{{missions}} | {{missions}} | ||
Revision as of 01:48, January 1, 2025
|
This article is a stub. You can help Pikipedia by expanding it.
|
| Tropical Forest Remix Collect Treasure! | |||||||||
|---|---|---|---|---|---|---|---|---|---|
| Starting Pikmin | |||||||||
| |||||||||
| Requirements | |||||||||
| |||||||||
| Time limit | 8:00 | ||||||||
| Music | Mission Mode (Levels 1-10) | ||||||||
Tropical Forest Remix is a Mission Mode stage in Pikmin 3. It is a remixed version of the Tropical Forest stage, and is playable in the Collect Treasure! mode only. In the original Pikmin 3, it was released in the 1.2.0 update for free, while the other four maps in the second row of the Mission Mode menu were made purchasable via the eShop. In Pikmin 3 Deluxe, it is unlocked by completing the first 5 Mission Mode stages.
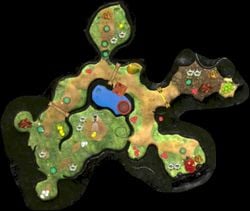
Layout
The overall layout of the stage remains vastly unchanged from the original Tropical Forest. The player starts off as Alph in an elevated area slightly east of the SPERO. Near him are two groups of Red Pikmin, one of which is planted. South of that area is another group of idle Red Pikmin. Nearby them is a large room with a Fiery Blowhog, some Juicy Gaggles, a pile of Nuggets, and 2 White Candypop Buds. The Candypop Buds can turn the Reds into White Pikmin, which can be used to collect the objects faster.
West of that room is the SPERO, and where Brittany starts off. She has some Yellow Pikmin nearby, which can be thrown up to Alph via the Bouncy Mushroom directly behind her. Further southwest of that area is another group of planted White Pikmin, along with some more White Candypop Buds. Along the path is a Pyroclasmic Slooch, which guards a small little room holding some more planted White Pikmin and a nectar egg holding an ultra-spicy spray.
North of there is yet another Pyroclasmic Slooch, guarding a group of planted Yellow Pikmin, a few bomb rocks, and a small alcove holding some bridge fragments for the bridge near the start of the area. For the fragments to reach the bridge, a nearby dirt wall must be destroyed. Beyond that dirt wall is a Yellow Wollywog, which should be defeated so that the bridge can be completed easily. Further north is another group of Red Pikmin, just outside of an area with 2 Dwarf Orange Bulborbs and an Orange Bulborb. In that same room are 2 White Candypop Buds, more Yellow Pikmin, and another pile of Nuggets. Bomb Rocks should be used to dispose of them.
Outside of that area is another dirt wall. Directly behind it is a Seed Hive, and the incomplete bridge leading back to the SPERO. East of the room with the Orange Bulborbs is another small room blocked off by an electric gate. The room holds a plethora of treasures, including a pile of Nuggets and some Dawn Pustules. The room also holds the remaining Fragments, some Red Pikmin, and 2 White Candypop Buds, and is all guarded by a Bulborb. Once the bridge is build, the Pikmin and the leaders can take a shortcut to the SPERO.
Strategy
|
The following article or section contains guides. |
Starting off with Alph, immediately whistle the group of Red Pikmin to your right, throw them down to Brittany and start plucking the Pikmin to the left of where you started. Switch to Brittany and whistle the 5 Yellow Pikmin next to you and throw them up to where Alph is using the Bouncy Mushrooms, whistling the Red Pikmin that were thrown down as well, begin plucking the White Pikmin and switch back to Alph.
Have Alph quickly pluck the second group of Red Pikmin, then whistle the Red Pikmin in the bush near the Fiery Blowhog. Whistle the Yellow Pikmin that were thrown up to Alph, either throwing (more effective in the original version) or having them charge (more effective in the Deluxe version) the electric gate while moving towards the dirt wall, then have your Red Pikmin charge the dirt wall.
Switch to Brittany and throw 3 Red Pikmin on one of the Pyroclasmic Slooches while throwing the other two on the second Pyroclasmic Slooch. Proceed to collect the White Pikmin to the side and then pluck the Yellow Pikmin, sending all of them onto the dirt wall. Switch back to Alph, whose wall should be done, moving through and taking out the Dwarf Orange Bulborb then moving to charge the Yellow Wollywog.
Once all these enemies are defeated have Alph and Brittany team up and clean up, having White Pikmin begin the bridge and other Pikmin start carrying nearby corpses. Pick up the bomb rock, using it to kill the Orange Bulborb, but do not pick it up since it's closer to the bridge; do pick up the Yellow Pikmin while your there with two leaders though.
Begin working your way through the other areas while the whites build the bridge, with the exception of nuggets and the Dawn Pustules, which already have shortcuts on the map, begin splitting up again, if needed make White Pikmin using the numerous White Candypop Buds. Towards the end it becomes a race to get everything, usually revolving around the bridge getting built.
From here how many Pikmin on what is up to how you have done all the previous steps, but the level gives easy access to the quick whites so try to utilize Candypop Buds once you've eliminated elemental obstacles like the Pyroclasmic Slooches, electric gate, and Fiery Blowhog. With some practice and fine tuning, this plan can get a platinum medal.
Objects
- Leaders
- Starting Pikmin
| Icon | Type | Amount | Location(s) |
|---|---|---|---|
| Red Pikmin | 33 | Two groups of 5 leaf Pikmin buried near Alph. 6 leaf Pikmin standing on a ledge near Alph. 6 leaf Pikmin standing inside a bush near the Fiery Blowhog. 5 leaf Pikmin buried between two dirt walls. 6 leaf Pikmin standing inside a bush near the Bulborb. | |
| Yellow Pikmin | 17 | 6 leaf Pikmin standing under the SPERO. 6 leaf Pikmin buried in front of a dirt wall. 6 leaf Pikmin standing inside a bush near the Orange Bulborb. | |
| White Pikmin | 12 | 5 flower Pikmin buried in front of the SPERO. 7 flower Pikmin buried in an alcove near the two Pyroclasmic Slooches. |
- Treasures and Enemies
| Icon | Name | Amount | Value | Total value |
|---|---|---|---|---|
| Dawn Pustules | 20 | |||
| Juicy Gaggle | 9 | |||
| Golden Grenade | 2 | |||
| Seed Hive | 1 | |||
| Nugget | 200 (2 piles of 50, 1 pile of 100) | |||
| Enemy | 1 ( 2 ( 1 ( 1 ( 2 ( 1 ( |
- Obstacles
 Dirt wall × 2
 Electric gate × 1
- Tools
 Bouncy Mushroom × 1
 Bridge (Red)
  × 45 (piles of 15 and 30)
 Climbing stick × 1
- Plants and Fungi
 Candypop Bud (White) × 10
- Others
 Egg × 1 (contains Ultra-spicy nectar)
 Bomb rock × 2
World records
In Pikmin 3, these are the world records for the challenge, as obtained from the in-game global rankings feature. The following scores were retrieved on December 3rd, 2015. Since the in-game leaderboards have been compromised, it is impossible to obtain more up-to-date legitimate records from the game, though players may have obtained higher scores since.
In Pikmin 3 Deluxe, these are the world records for the challenge, as obtained from the in-game global rankings feature. The following scores were retrieved on June 27th, 2022.
Gallery
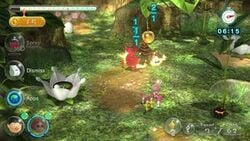
Alph attacking a Fiery Blowhog in front of 50 nuggets and two Juicy Gaggles.
A Bulborb, 15 fragments, 100 nuggets and 20 Dawn Pustules. Notice the idle Red Pikmin under the brown Clover.
Screenshot of the starting point, showing the SPERO, three White Candypop Buds, and a bomb rock.
Screenshot showing two White Candypop Buds, a bomb rock, a Pyroclasmic Slooch and some ultra-spicy nectar.
Screenshot showing a Yellow Wollywog near the starting point.
Screenshot showing two Dwarf Orange Bulborbs, an Orange Bulborb, some nuggets and two White Candypop Buds.
Screenshot showing a Seed Hive, an uncompleted bridge, a Bouncy Mushroom and an electric gate.
Names in other languages
|
The following article or section needs help from someone who can translate Japanese/Chinese/Korean text. |
| Language | Name | Meaning |
|---|---|---|
| 続・原生の杜? Zoku - Gensei no Mori |
||
(traditional) |
續‧原生森林 | |
(simplified) |
续·原生森林 | |
| Forêt primitive bis | Alternative primitive forest | |
| Urwüchsiger Wald 2 | Primeval forest 2 | |
| Foresta origine 2 | Forest origin 2 | |
| 원주의 숲 속편 | ||
| Bosque Primigenio 2 | Primitive Forest 2 |


