Thirsty Desert: Difference between revisions
No edit summary |
|||
| (23 intermediate revisions by 14 users not shown) | |||
| Line 1: | Line 1: | ||
{{stub|<br> | {{stub|<br> | ||
*Add an Overview and Key sections sections, like on the area article policy. | *Add an Overview and Key sections sections, like on the area article policy. | ||
*Add guides. | *Add guides. | ||
}} | }} | ||
[[File:ThirstyDesertOverview.jpg|thumb|300px|An overview of Thirsty Desert.]] | |||
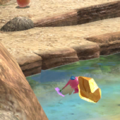
'''Thirsty Desert''' ({{j|渇きの砂|Kawaki no Suna|Thirst Sands}}) is a [[Mission Mode]] stage in {{p3}}. It is a rocky desert with cacti surrounding the playable area. The stage is playable in the Collect Treasure! and Battle Enemies! modes, and has a remixed version, [[Thirsty Desert Remix]]. | |||
==Collect Treasure!== | ==Collect Treasure!== | ||
| Line 19: | Line 18: | ||
|silver = 2000 | |silver = 2000 | ||
|gold = 2700 | |gold = 2700 | ||
|platinum = | |platinum = 3340 | ||
|music = [[Music in Pikmin 3#Mission Mode (Levels 1-10)|Mission Mode (Levels 1-10)]] | |music = [[Music in Pikmin 3#Mission Mode (Levels 1-10)|Mission Mode (Levels 1-10)]] | ||
}} | }} | ||
| Line 26: | Line 25: | ||
The explorers start in a small area to the left of the stage. In this area, there are multiple spots with Red Pikmin planted. Cupid's Grenades and Golden Sunseeds litter this area. To the south of this area is a dirt wall. Beyond this is a small area with a few Golden Grenades. A small creek is past that. At the bottom right corner of the stage is an elevated area that can only be reached by a bridge. In that area is a pile of nuggets, a Face Wrinkler, a Golden Sunseed, and an Insect Condo, all guarded by a lone Pyroclasmic Slooch. | The explorers start in a small area to the left of the stage. In this area, there are multiple spots with Red Pikmin planted. Cupid's Grenades and Golden Sunseeds litter this area. To the south of this area is a dirt wall. Beyond this is a small area with a few Golden Grenades. A small creek is past that. At the bottom right corner of the stage is an elevated area that can only be reached by a bridge. In that area is a pile of nuggets, a Face Wrinkler, a Golden Sunseed, and an Insect Condo, all guarded by a lone Pyroclasmic Slooch. | ||
The fragments to build the bridge to access this area | The fragments to build the bridge to access this area are found to the left of the creek. Past that is a Dwarf Bulborb, and a split path. The right path leads to a bamboo gate, which leads directly back to the SPERO. To the left is a dirt wall. Also on the same path is another Dwarf Bulborb. 2 huge rocks are also found on the path. The first of which can be climbed by a slope leading up to it. At the top is an assortment of treasures, a pile of nuggets, a group of planted Red Pikmin, and a Purple Candypop Bud. The second rock can only be accessed by throwing a leader from the first rock. On the second rock is an Insect Condo, a Golden Sunseed, and a Face Wrinkler. | ||
Past the dirt wall is another Dwarf Bulborb, and a pile of nuggets. Further down the path is a Sunseed Berry and a | Past the dirt wall is another Dwarf Bulborb, and a pile of nuggets. Further down the path is a Sunseed Berry and a White Candypop Bud, guarded by a Dwarf Bulborb. There is a small path with treasures littered throughout which leads to a group of Winged Pikmin. Past there is a small creek. Afterwards, a large ring of land is found. On that ring, various Candypop Buds, a few enemies, and treasures are littered throughout it. In the center of the ring is a pile of fragments, used to cross the small creek. To the northeast is another small ring of treasures, nuggets, and Winged Pikmin, with an Insect Condo in the middle. To the south, there is an Iridescent Flint Beetle, which is located right outside of the starting area. | ||
{{clear}} | {{clear}} | ||
===Objects=== | ===Objects=== | ||
{| class="wikitable sortable" | |||
!class="unsortable" colspan=9 | Leaders | |||
|- | |||
!class="unsortable" | Icon | |||
!Name | |||
!class="unsortable" | Starting location | |||
!Starting leader | |||
|- | |||
|[[File:Alph neutral icon.png|32px]] | |||
|[[Alph]] | |||
|rowspan=3 | Underneath the [[SPERO]] towards the east of the stage | |||
|Player 1 | |||
|- | |||
|[[File:Brittany neutral icon.png|32px]] | |||
|[[Brittany]] | |||
|N/A | |||
|- | |||
|[[File:Charlie neutral icon.png|32px]] | |||
|[[Charlie]] | |||
|Player 2 | |||
|} | |||
The order in ''Pikmin 3'' is Alph, Charlie, Brittany. The [[action menu|order]] in ''Pikmin 3 Deluxe'' is Charlie, Brittany, Alph. | The order in ''Pikmin 3'' is Alph, Charlie, Brittany. The [[action menu|order]] in ''Pikmin 3 Deluxe'' is Charlie, Brittany, Alph. | ||
{| class="wikitable sortable" | |||
!class="unsortable" colspan=9 | Pikmin | |||
* | |- | ||
! class="unsortable" | Icon | |||
!Type | |||
!Amount | |||
! class="unsortable" | Location(s) | |||
|- | |||
|[[File:Red Pikmin P3 icon.png|32px]] | |||
|[[Red Pikmin]] | |||
|43 | |||
| | |||
*9 flower Pikmin sprouts on the raised section towards the west, near a [[Candypop Bud|Purple Candypop Bud]] | |||
*10 leaf Pikmin sprouts adjacent to the [[SPERO]] | |||
*10 leaf Pikmin sprouts on the raised platform in front of the SPERO | |||
*14 flower Pikmin sprouts on the island surrounded by a moat north of the SPERO; the island containing 24 [[fragment]]s | |||
|- | |||
|[[File:Winged Pikmin P3 icon.png|32px]] | |||
|[[Winged Pikmin]] | |||
|37 | |||
| | |||
*10 leaf Pikmin sprouts on the raised section slightly northwest of the SPERO | |||
*12 leaf Pikmin sprouts slightly northeast of the previous group of Winged Pikmin sprouts | |||
*15 flower Pikmin sprouts towards the northwesternmost part of the stage, near the end of the river | |||
|- | |||
|[[File:Candypop Bud P3 white icon.png|32px]] | |||
|[[Candypop Bud|White Candypop Bud]] | |||
|3 | |||
| | |||
*1 towards the far north, directly north of the island containing 24 fragments | |||
*1 slightly west of the SPERO, near a [[Joustmite]] | |||
*1 further west of the previous [[Candypop Bud|White Candypop Bud]], next to a [[Dwarf Bulborb]] and a [[Sunseed Berry]] | |||
|- | |||
|[[File:Candypop Bud P3 purple icon.png|32px]] | |||
|[[Candypop Bud|Purple Candypop Bud]] | |||
|1 | |||
| | |||
*On the raised section towards the west, near the 9 [[Red Pikmin]] sprouts | |||
|} | |||
{| class="wikitable sortable" | |||
!class="unsortable" colspan=9 | Treasures | |||
|- | |||
!class="unsortable" | Icon | |||
!Name | |||
!Amount | |||
!Value | |||
!Total value | |||
!Notes | |||
}} | |- | ||
|[[File:Cupid's Grenade FF icon.png|32px]] | |||
|[[Cupid's Grenade]] | |||
|8 | |||
|[[File:Poko P3 icon.png|12px]] × 20 | |||
|[[File:Poko P3 icon.png|12px]] × 160 | |||
| | |||
|- | |||
|[[File:Sunseed Berry FF icon.png|32px]] | |||
|[[Sunseed Berry]] | |||
|6 | |||
|[[File:Poko P3 icon.png|12px]] × 50 | |||
|[[File:Poko P3 icon.png|12px]] × 300 | |||
| | |||
|- | |||
|[[File:Face Wrinkler icon.png|32px]] | |||
|[[Face Wrinkler]] | |||
|3 | |||
|[[File:Poko P3 icon.png|12px]] × 70 | |||
|[[File:Poko P3 icon.png|12px]] × 210 | |||
| | |||
|- | |||
|[[File:Golden Grenade icon.png|32px]] | |||
|[[Golden Grenade]] | |||
|6 | |||
|[[File:Poko P3 icon.png|12px]] × 100 | |||
|[[File:Poko P3 icon.png|12px]] × 600 | |||
| | |||
|- | |||
|[[File:Insect Condo FF icon.png|32px]] | |||
|[[Insect Condo]] | |||
|3 | |||
|[[File:Poko P3 icon.png|12px]] × 100 | |||
|[[File:Poko P3 icon.png|12px]] × 300 | |||
| | |||
|- | |||
|[[File:Golden Sunseed icon.png|32px]] | |||
|[[Golden Sunseed]] | |||
|5 | |||
|[[File:Poko P3 icon.png|12px]] × 200 | |||
|[[File:Poko P3 icon.png|12px]] × 1000 | |||
| | |||
|- | |||
|[[File:Nugget icon.png|32px]] | |||
|[[Nuggets]] | |||
|220 | |||
|[[File:Poko P3 icon.png|12px]] × 3 | |||
|[[File:Poko P3 icon.png|12px]] × 660 | |||
|4 piles of 30 nuggets <br> 2 piles of 50 nuggets | |||
|- | |||
||[[File:Spirit BE enemy icon.png|32px]] | |||
|[[Enemy|Enemies]] | |||
|6<ref group="note">Only includes enemies that give pokos.</ref> | |||
|Varies | |||
|[[File:Poko P3 icon.png|12px]] × 110 | |||
| | |||
|} | |||
{| class="wikitable sortable" | |||
!class="unsortable" colspan=9 | Enemies | |||
|- | |||
!class="unsortable" | Icon | |||
!Name | |||
!Amount | |||
!Value | |||
!Total value | |||
!Notes | |||
|- | |||
|[[File:Dwarf Bulborb P3 icon.png|32px]] | |||
|[[Dwarf Bulborb]] | |||
|4 | |||
|[[File:Poko P3 icon.png|12px]] × 15 | |||
|[[File:Poko P3 icon.png|12px]] × 60 | |||
| | |||
|- | |||
|[[File:Iridescent Flint Beetle P3 icon.png|32px]] | |||
|[[Iridescent Flint Beetle]] | |||
|1 | |||
|[[File:Poko P3 icon.png|12px]] × 0 | |||
|[[File:Poko P3 icon.png|12px]] × 0 | |||
|Drops 6 [[nectar]]s | |||
|- | |||
|[[File:Joustmite icon.png|32px]] | |||
|[[Joustmite]] | |||
|1 | |||
|[[File:Poko P3 icon.png|12px]] × 30 | |||
|[[File:Poko P3 icon.png|12px]] × 30 | |||
| | |||
|- | |||
|[[File:Pyroclasmic Slooch icon.png|32px]] | |||
|[[Pyroclasmic Slooch]] | |||
|1 | |||
|[[File:Poko P3 icon.png|12px]] × 20 | |||
|[[File:Poko P3 icon.png|12px]] × 20 | |||
| | |||
|} | |||
{| class="wikitable sortable" | |||
!class="unsortable" colspan=9 | Tools and obstacles | |||
|- | |||
! class="unsortable" | Icon | |||
!Name | |||
!Amount | |||
!Notes | |||
|- | |||
|[[File:Bamboo gate icon.png|32px]] | |||
|[[Bamboo gate]] | |||
|1 | |||
| | |||
|- | |||
|[[File:Dirt wall icon.png|32px]] | |||
|[[Dirt wall]] | |||
|2 | |||
| | |||
|- | |||
|[[File:Bridge P3 icon.png|32px]] | |||
|Brown [[fragment bridge]] | |||
|2 | |||
|1 requires 20 {{icon|fragment|y}}s (in 1 pile) <br> 1 requires 24 {{icon|fragment|y}}s (in 1 pile) | |||
|- | |||
|[[File:Water body icon.png|32px]] | |||
|[[Water]] body | |||
|4 | |||
| | |||
|} | |||
{| class="wikitable sortable" | |||
{ | !class="unsortable" colspan=9 | Others | ||
|- | |||
! class="unsortable" | Icon | |||
!Name | |||
!Amount | |||
!Notes | |||
|- | |||
|[[File:Egg P3 icon.png|32px]] | |||
|[[Nectar egg]] | |||
|8 | |||
|All 8 drop 1 [[nectar]] each | |||
|} | |||
{{refs|note}} | |||
==Battle Enemies!== | ==Battle Enemies!== | ||
| Line 77: | Line 249: | ||
|be = y | |be = y | ||
|map = Thirsty Desert BE map.jpg | |map = Thirsty Desert BE map.jpg | ||
|red = 5 | |red = {{tt|5|All leaf}} | ||
|rock = 8 | |rock = {{tt|8|All leaf}} | ||
|blue = 5 | |blue = {{tt|5|All leaf}} | ||
|time = 8:00 | |time = 8:00 | ||
|bronze = 200 | |bronze = 200 | ||
| Line 98: | Line 270: | ||
{{clear}} | {{clear}} | ||
===Objects=== | ===Objects=== | ||
{| class="wikitable sortable" | |||
!class="unsortable" colspan=9 | Leaders | |||
|- | |||
!class="unsortable" | Icon | |||
!Name | |||
!class="unsortable" | Starting location | |||
!Starting leader | |||
|- | |||
|[[File:Alph neutral icon.png|32px]] | |||
|[[Alph]] | |||
|Underneath the [[Red Onion]] | |||
|Player 1 | |||
|- | |||
|[[File:Brittany neutral icon.png|32px]] | |||
|[[Brittany]] | |||
|Underneath the [[Rock Onion]] | |||
|Player 2 | |||
|- | |||
|[[File:Charlie neutral icon.png|32px]] | |||
|[[Charlie]] | |||
|On the wooden bridge slightly south of the [[Blue Onion]] | |||
|N/A | |||
|} | |||
The order in ''Pikmin 3'' is Alph, Brittany, Charlie. The [[action menu|order]] in ''Pikmin 3 Deluxe'' is Brittany, Charlie, Alph. | The order in ''Pikmin 3'' is Alph, Brittany, Charlie. The [[action menu|order]] in ''Pikmin 3 Deluxe'' is Brittany, Charlie, Alph. | ||
{| class="wikitable sortable" | |||
!class="unsortable" colspan=9 | Pikmin | |||
* | |- | ||
*{{icon|Blue | ! class="unsortable" | Icon | ||
!Type | |||
!Amount | |||
! class="unsortable" | Location(s) | |||
|- | |||
|[[File:Red Pikmin P3 icon.png|32px]] | |||
|[[Red Pikmin]] | |||
|5 | |||
| | |||
*All 5 leaf Pikmin are underneath the [[Red Onion]] | |||
|- | |||
|[[File:Rock Pikmin P3 icon.png|32px]] | |||
|[[Rock Pikmin]] | |||
|8 | |||
| | |||
*All 8 leaf Pikmin are between the [[Rock Onion]] and the brown [[fragment bridge]] | |||
|- | |||
|[[File:Blue Pikmin P3 icon.png|32px]] | |||
|[[Blue Pikmin]] | |||
|5 | |||
| | |||
*All 5 leaf Pikmin are underneath the [[Blue Onion]]. | |||
|} | |||
{| class="wikitable sortable" | |||
!class="unsortable" colspan=9 | Onions | |||
|- | |||
!class="unsortable" | Icon | |||
!Name | |||
!class="unsortable" | Starting location | |||
|- | |||
|[[File:Yellow Onion P3 icon.png|32px]] | |||
|[[Yellow Onion]] | |||
|On the raised section towards the east; [[Alph]] starts here | |||
|- | |||
|[[File:Rock Onion P3 icon.png|32px]] | |||
|[[Rock Onion]] | |||
|On a patch of land towards the far north, surrounded by water; [[Brittany]] starts here | |||
|- | |||
|[[File:Blue Onion P3 icon.png|32px]] | |||
|[[Blue Onion]] | |||
|On an island surrounded by a moat towards the southwest; [[Charlie]] starts here | |||
|} | |||
{| class="wikitable sortable" | |||
!class="unsortable" colspan=9 | Pellets and Pellet Posies | |||
|- | |||
!class="unsortable" | Icon | |||
!Name | |||
!colspan=2|Amount | |||
!class="unsortable" | Notes | |||
|- | |||
|rowspan=2|[[File:Pellet Posy P3 icon.png|32px]] | |||
|rowspan=2|[[Pellet Posy]] | |||
|rowspan=2|6 || 3 || Red 1-Pellet Posy | |||
|- | |||
|3 || Blue 1-Pellet Posy | |||
|} | |||
; | {| class="wikitable sortable" | ||
!class="unsortable" colspan=9 | Enemies | |||
|- | |||
! class="unsortable" | Icon | |||
!Name | |||
!Amount | |||
!Value | |||
!Total value | |||
!Notes | |||
|- | |||
|[[File:Bulborb P3 icon.png|32px]] | |||
|[[Bulborb]] | |||
|1 | |||
|[[File:Spirit BE enemy icon.png|12px]] × 50 | |||
|[[File:Spirit BE enemy icon.png|12px]] × 50 | |||
| | |||
|- | |||
|[[File:Desiccated Skitter Leaf icon.png|32px]] | |||
|[[Desiccated Skitter Leaf]] | |||
|9 | |||
|[[File:Spirit BE enemy icon.png|12px]] × 5 | |||
|[[File:Spirit BE enemy icon.png|12px]] × 45 | |||
| | |||
|- | |||
|[[File:Dwarf Bulborb P3 icon.png|32px]] | |||
|[[Dwarf Bulborb]] | |||
|7 | |||
|[[File:Spirit BE enemy icon.png|12px]] × 30 | |||
|[[File:Spirit BE enemy icon.png|12px]] × 210 | |||
| | |||
|- | |||
|[[File:Orange Bulborb P3 icon.png|32px]] | |||
|[[Orange Bulborb]] | |||
|1 | |||
|[[File:Spirit BE enemy icon.png|12px]] × 50 | |||
|[[File:Spirit BE enemy icon.png|12px]] × 50 | |||
| | |||
|- | |||
|[[File:Shearwig P3 icon.png|32px]] | |||
|[[Shearwig]] | |||
|6 | |||
|[[File:Spirit BE enemy icon.png|12px]] × 5 | |||
|[[File:Spirit BE enemy icon.png|12px]] × 30 | |||
| | |||
|- | |||
|[[File:Spotty Bulbear P3 icon.png|32px]] | |||
|[[Spotty Bulbear]] | |||
|70 | |||
|[[File:Spirit BE enemy icon.png|12px]] × 70 | |||
|[[File:Spirit BE enemy icon.png|12px]] × 70 | |||
| | |||
|- | |||
|[[File:Water Dumple P3 icon.png|32px]] | |||
|[[Water Dumple]] | |||
|2 | |||
|[[File:Spirit BE enemy icon.png|12px]] × 30 | |||
|[[File:Spirit BE enemy icon.png|12px]] × 60 | |||
| | |||
|- | |||
|[[File:Whiptongue Bulborb icon.png|32px]] | |||
|[[Whiptongue Bulborb]] | |||
|1 | |||
|[[File:Spirit BE enemy icon.png|12px]] × 50 | |||
|[[File:Spirit BE enemy icon.png|12px]] × 50 | |||
| | |||
|- | |||
|[[File:Wogpole P3 icon.png|32px]] | |||
|[[Wolpole|Wogpole]] | |||
|6 | |||
|[[File:Spirit BE enemy icon.png|12px]] × 5 | |||
|[[File:Spirit BE enemy icon.png|12px]] × 30 | |||
| | |||
|- | |||
|[[File:Yellow Wollywog P3 icon.png|32px]] | |||
|[[Yellow Wollyhop|Yellow Wollywog]] | |||
|1 | |||
|[[File:Spirit BE enemy icon.png|12px]] × 30 | |||
|[[File:Spirit BE enemy icon.png|12px]] × 30 | |||
| | |||
|} | |||
{| class="wikitable sortable" | |||
!class="unsortable" colspan=9 | Tools and obstacles | |||
|- | |||
! class="unsortable" | Icon | |||
!Name | |||
!colspan=2|Amount | |||
!Notes! | |||
|- | |||
|[[File:Crystal wall icon.png|32px]] | |||
|[[Crystal wall]] | |||
|colspan=2|2 | |||
| | |||
|- | |||
|[[File:Dirt wall icon.png|32px]] | |||
|[[Dirt wall]] | |||
|colspan=2|3 | |||
| | |||
|- | |||
|[[File:Geyser icon.png|32px]] | |||
|[[Geyser]] | |||
|colspan=2|7 | |||
|5 are encased by one [[small crystal]] each | |||
|- | |||
|rowspan=2|[[File:Bridge P3 icon.png|32px]] | |||
|rowspan=2|[[Fragment bridge]] | |||
|rowspan=2|2 || Brown || Requires 20 {{icon|fragment|y}}s (in 1 pile) | |||
|- | |||
|Brown || Requires 20 {{icon|fragment|y}}s (in 1 pile) | |||
|- | |||
|[[File:Small crystal icon.png|32px]] | |||
|[[Small crystal]] | |||
|colspan=2|7 | |||
|5 encase one [[geyser]] each | |||
|- | |||
|[[File:Water body icon.png|32px]] | |||
|[[Water]] body | |||
|colspan=2|4 | |||
| | |||
|} | |||
{| class="wikitable sortable" | |||
!class="unsortable" colspan=9 | Others | |||
|- | |||
! class="unsortable" | Icon | |||
!Name | |||
!Amount | |||
!Notes | |||
|- | |||
|[[File:Bingo Battle Bomb icon.png|32px]] | |||
|[[Bomb Rock]] | |||
|7 | |||
| | |||
|- | |||
|[[File:Egg P3 icon.png|32px]] | |||
|[[Nectar egg]] | |||
|8 | |||
|6 drop 1 [[nectar]] each <br> 2 drop 1 [[ultra-spicy nectar]] each | |||
|} | |||
==World records== | ==World records== | ||
| Line 144: | Line 506: | ||
Thirsty Desert CT icon.png|Collect Treasure! icon. | Thirsty Desert CT icon.png|Collect Treasure! icon. | ||
Thirsty Desert BE icon.png|Battle Enemies! icon. | Thirsty Desert BE icon.png|Battle Enemies! icon. | ||
Pikmin3 Nuggets.png|A pile of nuggets in the Collect Treasure! version of the stage. | |||
Nepeta7.jpg|A screenshot showing a Pyroclasmic Slooch, an Insect Condo, a Golden Sunseed, a pile of nuggets and a Face Wrinkler. | |||
</gallery> | </gallery> | ||
==Names in other languages== | == Names in other languages == | ||
{{Needs translation|Chinese|Italian|Korean}} | |||
{{Foreignname | {{Foreignname | ||
|Jap=渇きの砂 | |Jap = 渇きの砂 | ||
|JapM= | |JapR = Kawaki no Suna | ||
| | |JapM = Thirst Sands | ||
| | |ChiTrad = 乾枯沙地 | ||
| | |ChiTradR = | ||
| | |ChiTradM = | ||
|Ger=Verdorrte Wüste | |ChiSimp = 干枯沙地 | ||
|GerM=Withered desert | |ChiSimpR = | ||
|Ita=Terre aride | |ChiSimpM = | ||
|Fra = Terres arides | |||
|FraM = Arid lands | |||
|Ger = Verdorrte Wüste | |||
|GerM = Withered desert | |||
|Ita = Terre aride | |||
|ItaM = | |||
|Kor = 바싹 마른 모래 | |||
|KorR = | |||
|KorM = | |||
|Spa = Desierto Sediento | |||
|SpaM = Thirsty Desert | |||
}} | }} | ||
{{missions}} | {{missions}} | ||
Latest revision as of 14:17, March 5, 2025
|
This article is a stub. You can help Pikipedia by expanding it.
|

Thirsty Desert (渇きの砂?, lit.: "Thirst Sands") is a Mission Mode stage in Pikmin 3. It is a rocky desert with cacti surrounding the playable area. The stage is playable in the Collect Treasure! and Battle Enemies! modes, and has a remixed version, Thirsty Desert Remix.
Collect Treasure![edit]
| Thirsty Desert Collect Treasure! | |||||||||
|---|---|---|---|---|---|---|---|---|---|

| |||||||||
| Starting Pikmin | |||||||||
| |||||||||
| Requirements | |||||||||
| |||||||||
| Time limit | 10:00 | ||||||||
| Music | Mission Mode (Levels 1-10) | ||||||||
Layout[edit]
The explorers start in a small area to the left of the stage. In this area, there are multiple spots with Red Pikmin planted. Cupid's Grenades and Golden Sunseeds litter this area. To the south of this area is a dirt wall. Beyond this is a small area with a few Golden Grenades. A small creek is past that. At the bottom right corner of the stage is an elevated area that can only be reached by a bridge. In that area is a pile of nuggets, a Face Wrinkler, a Golden Sunseed, and an Insect Condo, all guarded by a lone Pyroclasmic Slooch.
The fragments to build the bridge to access this area are found to the left of the creek. Past that is a Dwarf Bulborb, and a split path. The right path leads to a bamboo gate, which leads directly back to the SPERO. To the left is a dirt wall. Also on the same path is another Dwarf Bulborb. 2 huge rocks are also found on the path. The first of which can be climbed by a slope leading up to it. At the top is an assortment of treasures, a pile of nuggets, a group of planted Red Pikmin, and a Purple Candypop Bud. The second rock can only be accessed by throwing a leader from the first rock. On the second rock is an Insect Condo, a Golden Sunseed, and a Face Wrinkler.
Past the dirt wall is another Dwarf Bulborb, and a pile of nuggets. Further down the path is a Sunseed Berry and a White Candypop Bud, guarded by a Dwarf Bulborb. There is a small path with treasures littered throughout which leads to a group of Winged Pikmin. Past there is a small creek. Afterwards, a large ring of land is found. On that ring, various Candypop Buds, a few enemies, and treasures are littered throughout it. In the center of the ring is a pile of fragments, used to cross the small creek. To the northeast is another small ring of treasures, nuggets, and Winged Pikmin, with an Insect Condo in the middle. To the south, there is an Iridescent Flint Beetle, which is located right outside of the starting area.
Objects[edit]
| Leaders | ||||||||
|---|---|---|---|---|---|---|---|---|
| Icon | Name | Starting location | Starting leader | |||||
| Alph | Underneath the SPERO towards the east of the stage | Player 1 | ||||||
| Brittany | N/A | |||||||
| Charlie | Player 2 | |||||||
The order in Pikmin 3 is Alph, Charlie, Brittany. The order in Pikmin 3 Deluxe is Charlie, Brittany, Alph.
| Pikmin | ||||||||
|---|---|---|---|---|---|---|---|---|
| Icon | Type | Amount | Location(s) | |||||
| Red Pikmin | 43 |
| ||||||
| Winged Pikmin | 37 |
| ||||||
| White Candypop Bud | 3 |
| ||||||
| Purple Candypop Bud | 1 |
| ||||||
| Treasures | ||||||||
|---|---|---|---|---|---|---|---|---|
| Icon | Name | Amount | Value | Total value | Notes | |||
| Cupid's Grenade | 8 | |||||||
| Sunseed Berry | 6 | |||||||
| Face Wrinkler | 3 | |||||||
| Golden Grenade | 6 | |||||||
| Insect Condo | 3 | |||||||
| Golden Sunseed | 5 | |||||||
| Nuggets | 220 | 4 piles of 30 nuggets 2 piles of 50 nuggets | ||||||
| Enemies | 6[note 1] | Varies | ||||||
| Enemies | ||||||||
|---|---|---|---|---|---|---|---|---|
| Icon | Name | Amount | Value | Total value | Notes | |||
| Dwarf Bulborb | 4 | |||||||
| Iridescent Flint Beetle | 1 | Drops 6 nectars | ||||||
| Joustmite | 1 | |||||||
| Pyroclasmic Slooch | 1 | |||||||
| Tools and obstacles | ||||||||
|---|---|---|---|---|---|---|---|---|
| Icon | Name | Amount | Notes | |||||
| Bamboo gate | 1 | |||||||
| Dirt wall | 2 | |||||||
| Brown fragment bridge | 2 | 1 requires 20 1 requires 24 | ||||||
| Water body | 4 | |||||||
| Others | ||||||||
|---|---|---|---|---|---|---|---|---|
| Icon | Name | Amount | Notes | |||||
| Nectar egg | 8 | All 8 drop 1 nectar each | ||||||
- ^ Only includes enemies that give pokos.
Battle Enemies![edit]
| Thirsty Desert Battle Enemies! | |||||||||
|---|---|---|---|---|---|---|---|---|---|

| |||||||||
| Starting Pikmin | |||||||||
| |||||||||
| Requirements | |||||||||
| |||||||||
| Time limit | 8:00 | ||||||||
| Music | Mission Mode (Levels 1-10) | ||||||||
Layout[edit]
All 3 leaders are available in this mission. The player starts out as Charlie in the middle of a small pond with 5 Blue Pikmin and the Blue Onion. In the pond are a few Wogpoles. A dirt wall is nearby, with a group of 7 Shearwigs guarding it. Past that dirt wall is a lone Spotty Bulbear, with 2 more Wogpoles in the small pond nearby. Around the Blue Onion are a few Desiccated Skitter Leaves and 3 blue Pellet Posies. North of the Blue Onion is a dirt wall, enclosing an area where a Whiptongue Bulborb resides.
Further north is where Brittany and the Rock Pikmin, along with their Onion, is located. Near the Onion is a pile of fragments, used to create a bridge over the body of water. This body of water contains 2 more Wogpoles as well as a Yellow Wollywog. Outside the body of water is a lone Dwarf Bulborb. Right beyond the bridge to the rock Onion is a cluster of 3 Dwarf Bulborbs. Further south is a split path. The path leading east leads to the Whiptongue Bulborb, and the path leading south is where Alph and the Red Onion are located.
Nearby the Red Onion are 3 red Pellet Posies. North of the Red Onion is a geyser, which leads to a large rock on which a Bulborb is sleeping. Nearby that geyser are some encased geysers that can only be broken by Rock Pikmin. To the east of the Red Onion is a sleeping Orange Bulborb, which should be taken out using a large squad or a bomb rock. South of the Orange Bulborb is a crystal wall, blocking the path to a pile of fragments and a large group of Desiccated Skitter Leaves. These fragments are used to build a bridge down the path from the family of Desiccated Skitter Leaves. Nearby are 3 Dwarf Bulborbs, and 2 Water Dumples in the small creek. The bridge leads back to the Blue Onion.
Objects[edit]
| Leaders | ||||||||
|---|---|---|---|---|---|---|---|---|
| Icon | Name | Starting location | Starting leader | |||||
| Alph | Underneath the Red Onion | Player 1 | ||||||
| Brittany | Underneath the Rock Onion | Player 2 | ||||||
| Charlie | On the wooden bridge slightly south of the Blue Onion | N/A | ||||||
The order in Pikmin 3 is Alph, Brittany, Charlie. The order in Pikmin 3 Deluxe is Brittany, Charlie, Alph.
| Pikmin | ||||||||
|---|---|---|---|---|---|---|---|---|
| Icon | Type | Amount | Location(s) | |||||
| Red Pikmin | 5 |
| ||||||
| Rock Pikmin | 8 |
| ||||||
| Blue Pikmin | 5 |
| ||||||
| Onions | ||||||||
|---|---|---|---|---|---|---|---|---|
| Icon | Name | Starting location | ||||||
| Yellow Onion | On the raised section towards the east; Alph starts here | |||||||
| Rock Onion | On a patch of land towards the far north, surrounded by water; Brittany starts here | |||||||
| Blue Onion | On an island surrounded by a moat towards the southwest; Charlie starts here | |||||||
| Pellets and Pellet Posies | ||||||||
|---|---|---|---|---|---|---|---|---|
| Icon | Name | Amount | Notes | |||||
| Pellet Posy | 6 | 3 | Red 1-Pellet Posy | |||||
| 3 | Blue 1-Pellet Posy | |||||||
| Enemies | ||||||||
|---|---|---|---|---|---|---|---|---|
| Icon | Name | Amount | Value | Total value | Notes | |||
| Bulborb | 1 | |||||||
| Desiccated Skitter Leaf | 9 | |||||||
| Dwarf Bulborb | 7 | |||||||
| Orange Bulborb | 1 | |||||||
| Shearwig | 6 | |||||||
| Spotty Bulbear | 70 | |||||||
| Water Dumple | 2 | |||||||
| Whiptongue Bulborb | 1 | |||||||
| Wogpole | 6 | |||||||
| Yellow Wollywog | 1 | |||||||
| Tools and obstacles | ||||||||
|---|---|---|---|---|---|---|---|---|
| Icon | Name | Amount | Notes! | |||||
| Crystal wall | 2 | |||||||
| Dirt wall | 3 | |||||||
| Geyser | 7 | 5 are encased by one small crystal each | ||||||
| Fragment bridge | 2 | Brown | Requires 20 | |||||
| Brown | Requires 20 | |||||||
| Small crystal | 7 | 5 encase one geyser each | ||||||
| Water body | 4 | |||||||
| Others | ||||||||
|---|---|---|---|---|---|---|---|---|
| Icon | Name | Amount | Notes | |||||
| Bomb Rock | 7 | |||||||
| Nectar egg | 8 | 6 drop 1 nectar each 2 drop 1 ultra-spicy nectar each | ||||||
World records[edit]
In Pikmin 3, these are the world records for the challenge, as obtained from the in-game global rankings feature. The following scores were retrieved on June 20th, 2016. Since the in-game leaderboards have been compromised, it is impossible to obtain more up-to-date legitimate records from the game, though players may have obtained higher scores since.
- Collect Treasure!
- Solo:
 × 15520
 - Co-op: × 14680
- Solo:
- Battle Enemies!
- Solo:
 × 12700
 - Co-op: × 12460
- Solo:
In Pikmin 3 Deluxe, these are the world records for the challenge, as obtained from the in-game global rankings feature. The following scores were retrieved on June 27th, 2022.
- Collect Treasure!
- Solo: × 16150
- Co-op: × 15520
- Solo:
- Battle Enemies!
- Solo: × 13000
- Co-op: × 12790
- Solo:
Gallery[edit]
|
This article or section is in need of more images. |
Collect Treasure! icon.
Battle Enemies! icon.
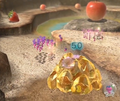
A pile of nuggets in the Collect Treasure! version of the stage.
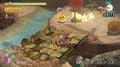
A screenshot showing a Pyroclasmic Slooch, an Insect Condo, a Golden Sunseed, a pile of nuggets and a Face Wrinkler.


Names in other languages[edit]
|
The following article or section needs help from someone who can translate Chinese/Italian/Korean text. |
| Language | Name | Meaning |
|---|---|---|
| 渇きの砂? Kawaki no Suna |
Thirst Sands | |
(traditional) |
乾枯沙地 | |
(simplified) |
干枯沙地 | |
| Terres arides | Arid lands | |
| Verdorrte Wüste | Withered desert | |
| Terre aride | ||
| 바싹 마른 모래 | ||
| Desierto Sediento | Thirsty Desert |