Serene Shores: Difference between revisions
KawaiiKiwii (talk | contribs) m (→Obstacles: They aren't meant to be there.) |
(→Tools: The clay things are incomplete when you find them.) Tags: Mobile edit Advanced mobile edit |
||
| (16 intermediate revisions by 11 users not shown) | |||
| Line 15: | Line 15: | ||
|music = [[Music in Pikmin 4#Serene Shores|''Serene Shores'']] | |music = [[Music in Pikmin 4#Serene Shores|''Serene Shores'']] | ||
}} | }} | ||
'''Serene Shores''' is the third main [[area]] in Pikmin 4. It is set on a beach, with many rock pools and other bodies of water. The area contains a large sandcastle as a focal point, with many pathways to scale it. | The '''Serene Shores''' is the third main [[area]] in ''[[Pikmin 4]]''. It is set on a beach, with many rock pools and other bodies of water. The area contains a large sandcastle as a focal point, with many pathways to scale it. | ||
Uniquely, this area will change depending on the time of [[day]], with the tide shifting to lower water levels at midday. This area has {{sparklium|p4|7,945}} worth of treasure, of which {{sparklium|p4|3,255}} is above ground. | Uniquely, this area will change depending on the time of [[day]], with the tide shifting to lower water levels at midday. This area has {{sparklium|p4|7,945}} worth of treasure, of which {{sparklium|p4|3,255}} is above ground. | ||
| Line 30: | Line 30: | ||
* Large pools of water. | * Large pools of water. | ||
* A sandcastle occupying the southern section. | * A sandcastle occupying the southern section. | ||
=== Bases === | === Bases === | ||
* Blossoming Dunes: This is the default landing site, found to the right of the sand castle. | * Blossoming Dunes: This is the default landing site, found to the right of the sand castle. | ||
| Line 37: | Line 37: | ||
== Caves == | == Caves == | ||
{|class="wikitable" style="text-align: center;" | |||
!Image | |||
!Name | |||
!Sublevels | |||
![[Castaway]]s | |||
![[Treasure]]s | |||
![[Onion]]s | |||
!Suggested [[Pikmin]] | |||
!Wild Pikmin | |||
|- | |||
|[[File:P4 Voyage Log Olimar 49.png|100px]] | |||
|[[Seafloor Resort]] | |||
|4 | |||
|2 | |||
|23 | |||
|1 | |||
|{{icon|Blue Pikmin|v=P4 HUD}} {{icon|Ice Pikmin|v=P4 HUD}} | |||
|{{icon|Blue Pikmin|v=P4 HUD}} {{icon|Ice Pikmin|v=P4 HUD}} | |||
|- | |||
|[[File:P4 Voyage Log Olimar 50.png|100px]] | |||
|[[Subzero Sauna]] | |||
|3 | |||
|2 | |||
|5 | |||
|0 | |||
|{{icon|Blue Pikmin|v=P4 HUD}} {{icon|Ice Pikmin|v=P4 HUD}} | |||
|{{icon|Blue Pikmin|v=P4 HUD}} {{icon|Ice Pikmin|v=P4 HUD}} {{icon|White Pikmin|v=P4 HUD}} | |||
|- | |||
|[[File:P4 Voyage Log Olimar 51.png|100px]] | |||
|[[Below-Grade Discotheque]] | |||
|5 | |||
|1 | |||
|11 | |||
|0 | |||
|{{icon|Red Pikmin|v=P4 HUD}} {{icon|Yellow Pikmin|v=P4 HUD}} | |||
|{{icon|Red Pikmin|v=P4 HUD}} {{icon|Yellow Pikmin|v=P4 HUD}} {{icon|Winged Pikmin|v=P4 HUD}} | |||
|- | |||
|[[File:P4 Voyage Log Olimar 52.png|100px]] | |||
|[[Engulfed Castle]] | |||
|5 | |||
|2 | |||
|17 | |||
|0 | |||
|{{icon|Blue Pikmin|v=P4 HUD}} | |||
|{{icon|Blue Pikmin|v=P4 HUD}} {{icon|Purple Pikmin|v=P4 HUD}} | |||
|} | |||
=== Dandori Challenge 1 === | === Dandori Challenge 1 === | ||
| Line 55: | Line 97: | ||
=== Treasures === | === Treasures === | ||
{{columns|2| | {{columns|2| | ||
* {{icon|Ambiguous Hostel|v=P4|y}} | * {{icon|Ambiguous Hostel|v=P4|y}} × 1 | ||
* {{icon|Bright Sword|v=P4|y}} | * {{icon|Bright Sword|v=P4|y}} × 1 | ||
* {{icon|Chance Totem|v=P4|y}} × 2 | * {{icon|Chance Totem|v=P4|y}} × 2 | ||
* {{icon|Crimson Banquet|v=P4|y}} | * {{icon|Crimson Banquet|v=P4|y}} × 1 | ||
* {{icon|Dapper Rubber Cutie|v=P4|y}} | * {{icon|Dapper Rubber Cutie|v=P4|y}} × 1 | ||
* {{icon|Dawn Pustules|v=P4|y}} | * {{icon|Dawn Pustules|v=P4|y}} × 1 | ||
* {{icon|Emperor Whistle|v=P4|y}} | * {{icon|Emperor Whistle|v=P4|y}} × 1 | ||
* {{icon|Face Wrinkler|v=P4|y}} | * {{icon|Face Wrinkler|v=P4|y}} × 1 | ||
* {{icon|Fish-Bed Snack|v=P4|y}} | * {{icon|Fish-Bed Snack|v=P4|y}} × 1 | ||
* {{icon|Fishy Bed|v=P4|y}} | * {{icon|Fishy Bed|v=P4|y}} × 1 | ||
* {{icon|Foolish Fruit|v=P4|y}} | * {{icon|Foolish Fruit|v=P4|y}} × 1 | ||
* {{icon|Giant's Fossil|v=P4|y}} | * {{icon|Giant's Fossil|v=P4|y}} × 1 | ||
* {{icon|Gold Nugget|v=P4|y}} × 60 (3 piles of 20) | * {{icon|Gold Nugget|v=P4|y}} × 60 (3 piles of 20) (40 appear at noon) | ||
* {{icon|Heroine's Tear|v=P4|y}} | * {{icon|Heroine's Tear|v=P4|y}} × 1 | ||
* {{icon|Juicy Gaggle|v=P4|y}} | * {{icon|Juicy Gaggle|v=P4|y}} × 1 | ||
* {{icon|Lamp of Inspiration|v=P4|y}} | * {{icon|Lamp of Inspiration|v=P4|y}} × 1 | ||
* {{icon|Lesser Mock Bottom|v=P4|y}} | * {{icon|Lesser Mock Bottom|v=P4|y}} × 1 | ||
* {{icon|Mock Bottom|v=P4|y}} | * {{icon|Mock Bottom|v=P4|y}} × 1 | ||
* {{icon|Mystery Squish Fish|v=P4|y}} | * {{icon|Mystery Squish Fish|v=P4|y}} × 1 | ||
* {{icon|Newtolite Shell|v=P4|y}} | * {{icon|Newtolite Shell|v=P4|y}} × 1 | ||
* {{icon|Orbital Communication Sphere|v=P4|y}} | * {{icon|Orbital Communication Sphere|v=P4|y}} × 1 | ||
* {{icon|Princess Pearl|v=P4|y}} | * {{icon|Princess Pearl|v=P4|y}} × 1 (one appears at noon) | ||
* {{icon|Ring-of-Return Shield|v=P4|y}} | * {{icon|Ring-of-Return Shield|v=P4|y}} × 1 | ||
* {{icon|Slapstick Crescent|v=P4|y}} | * {{icon|Slapstick Crescent|v=P4|y}} × 1 | ||
* {{icon|Stately Rubber Cutie|v=P4|y}} × 3 | * {{icon|Stately Rubber Cutie|v=P4|y}} × 3 | ||
* {{icon|Stellar Extrusion|v=P4|y}} | * {{icon|Stellar Extrusion|v=P4|y}} × 1 | ||
* {{icon|Zest Bomb|v=P4|y}} | * {{icon|Zest Bomb|v=P4|y}} × 1 | ||
}} | }} | ||
=== Onions === | |||
* {{icon|Blue Onion|v=P4|y}} × 1 | |||
* {{icon|Flarlic|v=P4|y}} × 1 | |||
=== Enemies === | === Enemies === | ||
{{columns|2| | {{columns|2| | ||
* {{icon|Aristocrab Offspring|v=P4|y}} × 5 (2 appear at noon) | * {{icon|Aristocrab Offspring|v=P4|y}} × 5 (2 appear at noon) | ||
* {{icon|Armored Cannon Larva|v=P4|y}} × | * {{icon|Armored Cannon Larva|v=P4|y}} × 4 (1 appears at noon) | ||
* {{icon|Crusted Rumpup|v=P4|y}} × 1 | * {{icon|Crusted Rumpup|v=P4|y}} × 1 | ||
* {{icon|Hermit Crawmad|v=P4|y}} × 3 | * {{icon|Hermit Crawmad|v=P4|y}} × 3 | ||
| Line 103: | Line 149: | ||
=== Obstacles === | === Obstacles === | ||
* {{icon|Dirt wall|y}} ×4 | {{columns|2| | ||
* {{icon|Breakable pot|v=P4|y}} × 4 | |||
* {{icon|Dirt wall|v=P4|y}} × 4 | |||
* {{icon|Hydro jelly|v=P4|y}} × 8 | |||
* {{icon|Iron fence|v=P4|y}} × 1 | |||
* {{icon|Paper bag|v=P4|y}} × 2 | |||
* {{icon|Potted plant|v=P4|y}} × 1 | |||
* {{icon|Water body|v=P4|y}} × 10 | |||
* {{icon|Water spout|v=P4|y}} × 6 | |||
}} | |||
=== Tools === | === Tools === | ||
* | {{columns|2| | ||
* {{icon|Clay bridge incomplete|v=P4|y|l=Clay#Clay bridge|n=Clay bridge}} × 3 (requires 17, 27, and 34 raw material) | |||
* {{icon|Climbing stick|v=P4|y}} × 1 | |||
* {{icon|Climbing wall incomplete|v=P4|y|l=Clay#Climbing wall|n=Climbing wall}} × 1 (requires 13 raw material) | |||
* {{icon|Dirt-mound|v=P4|y}} × 5 (10 raw materials × 4, bomb rock × 1) | |||
* {{icon|Fishing rope|v=P4|y}} × 2 | |||
* {{icon|Geyser|v=P4|y}} × 1 | |||
}} | |||
=== Others === | === Others === | ||
* {{icon|Burgeoning Spiderwort|v=P4|y}} × 2 | |||
* {{icon|Egg|v=P4|y}} × 3 (2 × small, 1 × large) | |||
* {{icon|Pellet Posy|v=P4|y}} × 14 (9 × 1 pellet, 4 × 5 pellet, 1 × 10 pellet) | |||
* {{icon|Raw material pile|v=P4|n=Pile of raw material|l=Raw material|y}} × 8 (piles of 3, 5, 8, 10, 22, 33, 34, 35) | |||
== Guide == | == Guide == | ||
{{guide}} | {{guide}} | ||
{{game help|p4|Add a guide on how to clear the area.}} | {{game help|p4|Add a guide on how to clear the area.}} | ||
== Night expeditions == | == Night expeditions == | ||
All 3 bases in the Serene Shores have [[night expedition]]s. | All 3 bases in the Serene Shores have [[night expedition]]s. Night expeditions take place exclusively during low tide. | ||
=== Blossoming Dunes === | === Blossoming Dunes === | ||
{{infobox night expedition | {{infobox night expedition | ||
|name = Blossoming Dunes | |name = Blossoming Dunes | ||
|image = P4 Save File Serene Shores Blossoming Dunes Night.png | |||
|size = 200px | |||
|danger = 1 | |danger = 1 | ||
|lumiknolls = 1 | |lumiknolls = 1 | ||
| Line 142: | Line 209: | ||
** Pile of 30 × 1 | ** Pile of 30 × 1 | ||
** Pile of 40 × 1 | ** Pile of 40 × 1 | ||
{{clear}} | |||
=== Water's Edge === | === Water's Edge === | ||
{{infobox night expedition | {{infobox night expedition | ||
|name = Water's Edge | |name = Water's Edge | ||
|image = P4 Save File Serene Shores Water's Edge Night.png | |||
|size = 200px | |||
|danger = 2 | |danger = 2 | ||
|lumiknolls = 2 | |lumiknolls = 2 | ||
| Line 162: | Line 233: | ||
==== Objects ==== | ==== Objects ==== | ||
* {{icon|Glow pellet|v=P4|y}} × 415 | * {{icon|Glow pellet|v=P4|y}} × 415 | ||
** Pile of 5 × | ** Pile of 5 × 12 (Toady Bloysters and Whiptongue Bulborbs drop 1 pile each) | ||
** Pile of 10 × 12 | ** Pile of 10 × 12 | ||
** Pile of 15 × 7 | ** Pile of 15 × 7 | ||
** Pile of 20 × 5 | ** Pile of 20 × 5 | ||
** Pile of 30 × 1 | ** Pile of 30 × 1 | ||
{{clear}} | |||
=== The Sand Keep === | === The Sand Keep === | ||
{{infobox night expedition | {{infobox night expedition | ||
|name = The Sand Keep | |name = The Sand Keep | ||
|image = P4 Save File Serene Shores The Sand Keep Night.png | |||
|size = 200px | |||
|danger = 3 | |danger = 3 | ||
|lumiknolls = 1 | |lumiknolls = 1 | ||
| Line 187: | Line 262: | ||
==== Objects ==== | ==== Objects ==== | ||
* {{icon|Glow pellet|v=P4|y}} × 200 | * {{icon|Glow pellet|v=P4|y}} × 200 | ||
** Pile of 5 × | ** Pile of 5 × 11 (Toady Bloysters and Whiptongue Bulborbs drop 1 pile each) | ||
** Pile of 10 × 8 | ** Pile of 10 × 8 | ||
** Pile of 15 × 3 | ** Pile of 15 × 3 | ||
** Pile of 20 × 1 | ** Pile of 20 × 1 | ||
{{clear}} | |||
== Olimar's Shipwreck Tale == | == Olimar's Shipwreck Tale == | ||
| Line 285: | Line 362: | ||
*This is the only aboveground [[area]] in {{p4}} where [[Purple Pikmin]] are recommended for use. | *This is the only aboveground [[area]] in {{p4}} where [[Purple Pikmin]] are recommended for use. | ||
*If the [[water]] is [[ice|frozen]] when the tide changes, it will become unfrozen in the [[cutscene]] and go down like normal. The Ice Pikmin freezing it will simply drop down to ground level when the cutscene is over.{{cite youtube|3kwOCmOdqLY|showing the water frozen during the tide change|m=10|s=9|published={{date|7|August|2023}}|retrieved={{date|6|October|2023}}}} | *If the [[water]] is [[ice|frozen]] when the tide changes, it will become unfrozen in the [[cutscene]] and go down like normal. The Ice Pikmin freezing it will simply drop down to ground level when the cutscene is over.{{cite youtube|3kwOCmOdqLY|showing the water frozen during the tide change|m=10|s=9|published={{date|7|August|2023}}|retrieved={{date|6|October|2023}}}} | ||
*The large body of water on the eastern side of the area becomes seperated into two seperate bodies after the tide lowers, however the game still considers them to be one body of water. This can be observed by throwing [[Ice Pikmin]] into them, which will cause both bodies to freeze regardless of which one they're thrown into. | |||
*This is the only area where not all treasure is present at all times. | |||
== Names in other languages == | == Names in other languages == | ||
| Line 315: | Line 394: | ||
}} | }} | ||
{{needs translation|Japanese|Chinese|Dutch|Korean}} | |||
'''Blossoming Dunes''' | '''Blossoming Dunes''' | ||
{{foreignname | {{foreignname | ||
|Jap = | |Jap = ラッパ花砂漠 | ||
|JapR = | |JapR = | ||
|JapM = | |JapM = | ||
| | |Chi = 喇叭花沙漠 | ||
| | |ChiR = | ||
| | |ChiM = | ||
|Dut = Bloemenduinen | |||
|Dut = | |||
|DutM = | |DutM = | ||
|Fra = Dunes fleuries | |Fra = Dunes fleuries | ||
| Line 332: | Line 409: | ||
|Ger = Blüten-Dünen | |Ger = Blüten-Dünen | ||
|GerM = Pellet-dunes | |GerM = Pellet-dunes | ||
|Ita = | |Ita = Duna fiorita | ||
|ItaM = | |ItaM = Flowered dune | ||
|Kor = | |Kor = 나팔꽃 사막 | ||
|KorM = | |KorM = | ||
|Spa = | |Spa = Dunas floreadas | ||
|SpaM = | |SpaM = Flowery dunes | ||
|Por = Dunas em flor | |Por = Dunas em flor | ||
|PorM = Dunes in bloom | |PorM = Dunes in bloom | ||
| Line 344: | Line 421: | ||
'''Water's Edge''' | '''Water's Edge''' | ||
{{foreignname | {{foreignname | ||
|Jap = | |Jap = なぎさの休憩所 | ||
|JapR = | |JapR = | ||
|JapM = | |JapM = | ||
|ChiTrad = | |ChiTrad = 海邊休憩所 | ||
|ChiTradR = | |ChiTradR = | ||
|ChiTradM = | |ChiTradM = | ||
|ChiSimp = | |ChiSimp = 海边休憩所 | ||
|ChiSimpR = | |ChiSimpR = | ||
|ChiSimpM = | |ChiSimpM = | ||
|Dut = | |Dut = Kustvallei | ||
|DutM = | |DutM = | ||
|Fra = Havre de la berge | |Fra = Havre de la berge | ||
| Line 359: | Line 436: | ||
|Ger = Felsiges Ufer | |Ger = Felsiges Ufer | ||
|GerM = Rocky shore | |GerM = Rocky shore | ||
|Ita = | |Ita = Ristoro sull'acqua | ||
|ItaM = | |ItaM = Water's haven | ||
|Kor = | |Kor = 물가의 휴게소 | ||
|KorM = | |KorM = | ||
|Spa = | |Spa = Orilla acuática | ||
|SpaM = | |SpaM = Aquatic edge | ||
|Por = Beira d'água | |Por = Beira d'água | ||
|PorM = Water's edge | |PorM = Water's edge | ||
| Line 370: | Line 447: | ||
'''The Sand Keep''' | '''The Sand Keep''' | ||
{{foreignname | {{foreignname | ||
|Jap = | |Jap = 天守閣 | ||
|JapR = | |JapR = | ||
|JapM = | |JapM = | ||
|ChiTrad = | |ChiTrad = 天守閣 | ||
|ChiTradR = | |ChiTradR = | ||
|ChiTradM = | |ChiTradM = | ||
|ChiSimp = | |ChiSimp = 天守阁 | ||
|ChiSimpR = | |ChiSimpR = | ||
|ChiSimpM = | |ChiSimpM = | ||
|Dut = | |Dut = Zandvesting | ||
|DutM = | |DutM = | ||
|Fra = Donjon des sables | |Fra = Donjon des sables | ||
|FraM = Sand keep | |FraM = Sand keep | ||
|Ger = Sandfestung | |Ger = Sandfestung | ||
|GerM = | |GerM = Sand fortress | ||
|Ita = | |Ita = Fortezza sabbiosa | ||
|ItaM = | |ItaM = Sandy fortress | ||
|Kor = | |Kor = 성 꼭대기 | ||
|KorM = | |KorM = | ||
|Spa = | |Spa = Fortaleza arenosa | ||
|SpaM = | |SpaM = Sandy fortress | ||
|Por = Castelos de areia | |Por = Castelos de areia | ||
|PorM = Sand castles | |PorM = Sand castles | ||
| Line 405: | Line 481: | ||
{{refs}} | {{refs}} | ||
{{Serene Shores}} | |||
{{p4 areas}} | {{p4 areas}} | ||
[[Category:Serene Shores| ]] | [[Category:Serene Shores| ]] | ||
Latest revision as of 00:30, September 17, 2024
| Serene Shores | |
|---|---|
| |
| Rescues | 10 |
| Treasures | 86 |
| Onions | 3 |
| Caves | 4 |
| Dandori Challenges | 2 |
| Dandori Battles | 1 |
| Suggested Pikmin | |
| Wild Pikmin | |
| Requirements | |
| Next area | Hero's Hideaway |
| Music | Serene Shores |


The Serene Shores is the third main area in Pikmin 4. It is set on a beach, with many rock pools and other bodies of water. The area contains a large sandcastle as a focal point, with many pathways to scale it.
Uniquely, this area will change depending on the time of day, with the tide shifting to lower water levels at midday. This area has ![]() × 7,945 worth of treasure, of which
× 7,945 worth of treasure, of which ![]() × 3,255 is above ground.
× 3,255 is above ground.
Plot[edit]
|
The following article or section is in need of assistance from someone who plays Pikmin 4. |
After collecting more Sparklium, Collin detects more signals from a beach area. The Red Leafling is here with another castaway.
Layout[edit]
The following notable features can be found in this area.
- Sandy and rocky terrain.
- Low-lying vegetation.
- Palm trees in the distance.
- Large pools of water.
- A sandcastle occupying the southern section.
Bases[edit]
- Blossoming Dunes: This is the default landing site, found to the right of the sand castle.
- Water's Edge: This base is unguarded by creatures, but is covered with sand. It can be found towards the map's center, past the pools of water.
- The Sand Keep: This base is guarded by a Crusted Rumpup at the top of the large sandcastle near the player's initial landing site.
Caves[edit]
| Image | Name | Sublevels | Castaways | Treasures | Onions | Suggested Pikmin | Wild Pikmin |
|---|---|---|---|---|---|---|---|

|
Seafloor Resort | 4 | 2 | 23 | 1 | ||

|
Subzero Sauna | 3 | 2 | 5 | 0 | ||

|
Below-Grade Discotheque | 5 | 1 | 11 | 0 | ||

|
Engulfed Castle | 5 | 2 | 17 | 0 |
Dandori Challenge 1[edit]
Found in the elevated area of the level, accessed only through the exit of the Engulfed Castle. The entrance to the Dandori Challenge is in a nearby alcove past the Whiptongue Bulborb.
Dandori Challenge 2[edit]
In the large body of water where the Slapstick Crescent and the Giant's Fossil are found, the entrance is hidden in some seaweed. Because its entrance is fully submerged, it is the only Dandori Challenge or Dandori Battle cave without a cutscene encounter with the Leafling of the level, instead simply opening the hole like any regular cave entrance. Oatchi will also emerge regularly from the hole, landing on the seabed and only floating to the top of the water once the exit cutscene has ended.
Dandori Battle[edit]
A Dandori Battle can be found near the 1st base, Blossoming Dunes. To the left, the cave's entrance is surrounded by water. As the player and Oatchi are immune to water, they can simply travel up the slope to access the entrance. However, to transport the castaway earned from completing the battle safely, it's recommended the bridge connecting the cave to the mainland is built or the water surrounding it is frozen.
Objects[edit]
Treasures[edit]
 Ambiguous Hostel × 1
 Bright Sword × 1
 Chance Totem × 2
 Crimson Banquet × 1
 Dapper Rubber Cutie × 1
 Dawn Pustules × 1
 Emperor Whistle × 1
 Face Wrinkler × 1
 Fish-Bed Snack × 1
 Fishy Bed × 1
 Foolish Fruit × 1
 Giant's Fossil × 1
 Gold Nugget × 60 (3 piles of 20) (40 appear at noon)
 Heroine's Tear × 1
 Juicy Gaggle × 1
 Lamp of Inspiration × 1
 Lesser Mock Bottom × 1
 Mock Bottom × 1
 Mystery Squish Fish × 1
 Newtolite Shell × 1
 Orbital Communication Sphere × 1
 Princess Pearl × 1 (one appears at noon)
 Ring-of-Return Shield × 1
 Slapstick Crescent × 1
 Stately Rubber Cutie × 3
 Stellar Extrusion × 1
 Zest Bomb × 1
Onions[edit]
 Blue Onion × 1
 Flarlic × 1
Enemies[edit]
 Aristocrab Offspring × 5 (2 appear at noon)
 Armored Cannon Larva × 4 (1 appears at noon)
 Crusted Rumpup × 1
 Hermit Crawmad × 3
 Honeywisp × 2
 Hydro Dweevil × 1
 Pearly Clamclamp × 3 (1 appears at noon)
 Peckish Aristocrab × 2
 Pricklepuff × 6
 Puckering Blinnow × 19
 Skeeterskate × 4
 Toady Bloyster × 3
 Water Dumple × 5
 Whiptongue Bulborb × 1
Obstacles[edit]
 Breakable pot × 4
 Dirt wall × 4
 Hydro jelly × 8
 Iron fence × 1
 Paper bag × 2
 Potted plant × 1
 Water body × 10
 Water spout × 6
Tools[edit]
 Clay bridge × 3 (requires 17, 27, and 34 raw material)
 Climbing stick × 1
 Climbing wall × 1 (requires 13 raw material)
 Dirt-mound × 5 (10 raw materials × 4, bomb rock × 1)
 Fishing rope × 2
 Geyser × 1
Others[edit]
 Burgeoning Spiderwort × 2
 Egg × 3 (2 × small, 1 × large)
 Pellet Posy × 14 (9 × 1 pellet, 4 × 5 pellet, 1 × 10 pellet)
 Pile of raw material × 8 (piles of 3, 5, 8, 10, 22, 33, 34, 35)
Guide[edit]
|
The following article or section contains guides. |
|
The following article or section is in need of assistance from someone who plays Pikmin 4. |
Night expeditions[edit]
All 3 bases in the Serene Shores have night expeditions. Night expeditions take place exclusively during low tide.
Blossoming Dunes[edit]
| Blossoming Dunes | |
|---|---|

| |
| Danger level | |
| Lumiknolls | 1 |
| Enemies | 36 |
| Starting Glow Pikmin | 10 |
There is one Lumiknoll located northeast of the base. This location has a danger level of 1 and starts the player off with 10 Glow Pikmin.
Enemies[edit]
 Puffy Blowhog × 4
 Shearwig × 14
- Water Dumple × 18
Objects[edit]
 Glow pellet × 270
- Pile of 10 × 4
- Pile of 15 × 8
- Pile of 20 × 2
- Pile of 30 × 1
- Pile of 40 × 1
Water's Edge[edit]
| Water's Edge | |
|---|---|

| |
| Danger level | |
| Lumiknolls | 2 |
| Enemies | 18 |
| Starting Glow Pikmin | 10 |
There are two Lumiknolls, the blue one located just southeast of the base and the orange one located in the other side of the nearby bridge, close to where the Fishy Bed is located. This location has a danger level of 2 and starts the player off with 10 Glow Pikmin.
Enemies[edit]
- Toady Bloyster × 5
- Water Dumple × 8
- Whiptongue Bulborb × 5
Objects[edit]
- Glow pellet × 415
- Pile of 5 × 12 (Toady Bloysters and Whiptongue Bulborbs drop 1 pile each)
- Pile of 10 × 12
- Pile of 15 × 7
- Pile of 20 × 5
- Pile of 30 × 1
The Sand Keep[edit]
| The Sand Keep | |
|---|---|

| |
| Danger level | |
| Lumiknolls | 1 |
| Enemies | 43 |
| Starting Glow Pikmin | 50 |
There is one Lumiknoll located directly at the base. This location has a danger level of 3 and starts the player off with 50 Glow Pikmin, the most of any night expedition.
Enemies[edit]
- Toady Bloyster × 3
- Water Dumple × 36
- Whiptongue Bulborb × 4
Objects[edit]
- Glow pellet × 200
- Pile of 5 × 11 (Toady Bloysters and Whiptongue Bulborbs drop 1 pile each)
- Pile of 10 × 8
- Pile of 15 × 3
- Pile of 20 × 1
Olimar's Shipwreck Tale[edit]
| Serene Shores | |
|---|---|

| |
| Ship parts | 8 |
| Onions | 5 |
| Requirements | Recover 8 ship parts |
| Next area | Hero's Hideaway |
| Music | Serene Shores (Olimar's Shipwreck Tale) |
The Serene Shores is the third area Captain Olimar explores in his Shipwreck Tale.
Plot[edit]
Captain Olimar lands in the Serene Shores to continue his search for any missing parts for his ship, the S.S. Dolphin. He manages to find eight of his missing pieces with the help of the Pikmin and the space dog Moss.
Layout[edit]
The layout of the Serene Shores in Olimar's Shipwreck Tale is almost identical to that of the one in the main game. The major differences are the objects and enemies present, along with the caves entrances not being present. The upper area, to the north-west, is inaccessible during Olimar's time here as the Engulfed Castle cave is not present.
Bases[edit]
- Blossoming Dunes: Two Whiptongue Bulborbs can be found by this base, but you can still move base without killing them.
- Water's Edge: This is the default landing site upon first visiting.
- The Sand Keep: A Sovereign Bulblax guards this base.
Objects[edit]
Ship parts[edit]
 Automatic Gear × 3 (1 inside Bug-Eyed Crawmad)
 Bowsprit × 1
 Extraordinary Bolt × 1 (inside Grubchucker)
 Sagittarius × 1 (inside Pearly Clamclamp)
 Repair-Type Bolt × 1
 Secret Safe × 1 (inside Sovereign Bulblax)
Onions[edit]
- Blue Onion × 1
- Flarlic × 4
Enemies[edit]
- Aristocrab Offspring × 8
 Bug-Eyed Crawmad × 1 (drops a ship part)
 Flighty Joustmite × 3
 Grubchucker × 2 (1 drops a ship part)
- Hermit Crawmad × 2
 Masterhop × 1
- Pearly Clamclamp × 1 (drops a ship part)
- Peckish Aristocrab × 2
- Pricklepuff × 2
- Puckering Blinnow × 13
 Sovereign Bulblax × 1 (drops a ship part)
 Waddlepus × 3
- Whiptongue Bulborb × 2
 Wolpole × 4
 Yellow Wollyhop × 3
Obstacles[edit]
- Breakable pot × 18 (1 drops a super-spicy spray, 1 drops 3 nectar, 1 drops a bomb rock)
 Bubble blower × 7
- Dirt wall × 2
- Iron fence × 2
- Potted plant × 1
- Water body × 9
Tools[edit]
 Clay bridge × 1 (requires 21 raw material)
 Climbing wall × 1 (requires 11 raw material)
 Clipboard × 1 (requires 20 Yellow Pikmin)
Other[edit]
- Burgeoning Spiderwort × 1
- Egg × 2 (1 drops a super-spicy spray)
- Pellet Posy × 18 (14 × 1 pellet, 3 × 5 pellet, 1 × 10 pellet)
- Raw material pile × 4 (piles of 5, 6, 10, and 11)
Guide[edit]
|
The following article or section contains guides. |
|
The following article or section is in need of assistance from someone who plays Pikmin 4. |
Gallery[edit]
|
This article or section is in need of more images. |
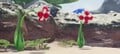
Burgeoning Spiderworts.
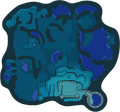
The Radar Map of Serene Shores after the tide lowers.
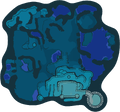
The Radar Map of Serene Shores in Olimar's Shipwreck Tale after the tide lowers.


Trivia[edit]
- This is the only aboveground area in Pikmin 4 where Purple Pikmin are recommended for use.
- If the water is frozen when the tide changes, it will become unfrozen in the cutscene and go down like normal. The Ice Pikmin freezing it will simply drop down to ground level when the cutscene is over.[1]
- The large body of water on the eastern side of the area becomes seperated into two seperate bodies after the tide lowers, however the game still considers them to be one body of water. This can be observed by throwing Ice Pikmin into them, which will cause both bodies to freeze regardless of which one they're thrown into.
- This is the only area where not all treasure is present at all times.
Names in other languages[edit]
Serene Shores
| Language | Name | Meaning |
|---|---|---|
| とこなぎの浜辺? Tokonagi no Hamabe |
Ever-Lulled Shores | |
(traditional) |
靜謐海邊 Jìngmì Hǎibiān |
Tranquil Shores |
(simplified) |
静谧海边 Jìngmì Hǎibiān |
Tranquil Shores |
| Land van zand en water | Land of sand and water | |
| Rivages sereins | Serene shorelines | |
| Stille Ufer | Quiet Shores | |
| Riva serena | Serene shore | |
| 잔잔한 해변 Janjanhan Haebyeon |
Serene Shores | |
| Prainha serena | Serene beachlet | |
| Riberas serenas | Serene riverbanks |
|
The following article or section needs help from someone who can translate Japanese/Chinese/Dutch/Korean text. |
Blossoming Dunes
| Language | Name | Meaning |
|---|---|---|
| ラッパ花砂漠? | ||
| 喇叭花沙漠 | ||
| Bloemenduinen | ||
| Dunes fleuries | Flowery dunes | |
| Blüten-Dünen | Pellet-dunes | |
| Duna fiorita | Flowered dune | |
| 나팔꽃 사막 | ||
| Dunas em flor | Dunes in bloom | |
| Dunas floreadas | Flowery dunes |
Water's Edge
| Language | Name | Meaning |
|---|---|---|
| なぎさの休憩所? | ||
(traditional) |
海邊休憩所 | |
(simplified) |
海边休憩所 | |
| Kustvallei | ||
| Havre de la berge | Riverbank's haven | |
| Felsiges Ufer | Rocky shore | |
| Ristoro sull'acqua | Water's haven | |
| 물가의 휴게소 | ||
| Beira d'água | Water's edge | |
| Orilla acuática | Aquatic edge |
The Sand Keep
| Language | Name | Meaning |
|---|---|---|
| 天守閣? | ||
(traditional) |
天守閣 | |
(simplified) |
天守阁 | |
| Zandvesting | ||
| Donjon des sables | Sand keep | |
| Sandfestung | Sand fortress | |
| Fortezza sabbiosa | Sandy fortress | |
| 성 꼭대기 | ||
| Castelos de areia | Sand castles | |
| Fortaleza arenosa | Sandy fortress |
See also[edit]
References[edit]
- ^ YouTube video showing the water frozen during the tide change (at 10:09), published on August 7th, 2023, retrieved on October 6th, 2023
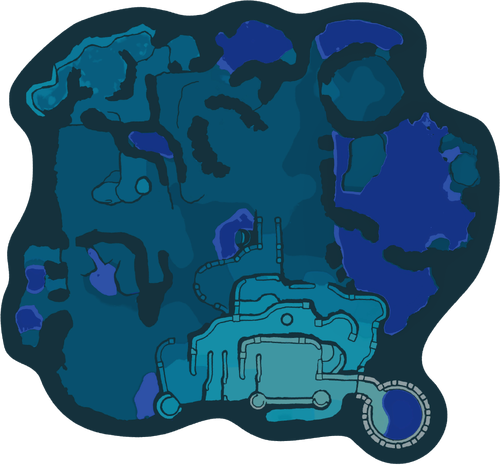
| Pikmin 4 areas |
|---|
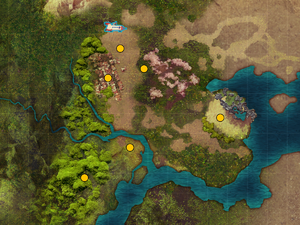 Click an area on the image Rescue Command Post • Sun-Speckled Terrace • Blossoming Arcadia • Serene Shores • Hero's Hideaway • Giant's Hearth • Primordial Thicket |