Fortress of Festivity: Difference between revisions
(editing page for Pikmin Wiki migration (internals note: from file: 'importjson-mergemain--')) |
No edit summary |
||
| (89 intermediate revisions by 27 users not shown) | |||
| Line 1: | Line 1: | ||
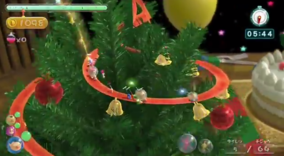
{{ | [[File:ChristmasPikmin.png|thumb|284px|The leaders sliding down the ribbon that runs around a decorated tree in the Fortress of Festivity.]] | ||
'''Fortress of Festivity''' ({{j|冬の贈りもの|Fuyu no Okurimono|Winter Gifts}}) is a [[Mission Mode]] stage in {{p3}}. This stage is Christmas-themed, taking place on a table covered in various festive decorations, including a small Christmas tree with a spiraling ribbon attached to it, which the Pikmin can slide down. The stage is playable in the Collect Treasure! and Battle Enemies! modes. In the original ''Pikmin 3'', it was released in the 1.4.0 [[update]] for free, while the other four stages in the third row of the [[Mission Mode menu]] were made purchasable via the eShop. In {{p3d}}, it can be unlocked in each of the 2 modes by completing the first 10 stages in that mode. | |||
{{stub|<br> | |||
{{ | *Add a Key sections section, like on the area article policy. | ||
*Add guides. | |||
}} | |||
==Overview== | |||
The map mainly takes place on top of a table decorated for Christmas. The abundance of presents and building blocks gives the map a maze-like layout, with a few standout structures like a pizza box, a Christmas tree and a cake. The two variants of the stage are very similar to each other, only being different in the layout of the presents. | |||
==Collect Treasure!== | |||
{{Infobox mission | |||
|map = Fortress of Festivity.jpg | |||
|red = {{tt|11|All leaf}} | |||
|rock = {{tt|10|All leaf}} | |||
|yellow = {{tt|15|All leaf}} | |||
|winged = {{tt|10|All flower}} | |||
|blue = {{tt|5|All flower}} | |||
|purple = {{tt|3|All leaf}} | |||
|white = {{tt|10|All flower}} | |||
|time = 12:00 | |||
|bronze = 2000 | |||
|silver = 3000 | |||
|gold = 4500 | |||
|platinum = 5900 | |||
|music = [[Music in Pikmin 3#Fortress of Festivity|Fortress of Festivity]] | |||
}} | |||
===Layout=== | |||
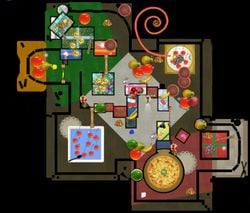
The player starts in the middle of the stage with the [[SPERO]] and presents with various fruits on it. On the presents are 2 [[Cupid's Grenade]]s, 2 [[Slapstick Crescent]]s, and a total of 11 [[Red Pikmin]]. Nearby the start is a [[bamboo gate]] and a [[geyser]] blocked by a [[crystal]], which leads to a patch of 10 [[Rock Pikmin]]. Further down this path is a Bug-Eyed Crawmad in the middle of a pepperoni pizza. To the west of the pizza is a plethora of fruits, with a Slapstick Crescent, [[Seed Hive]], [[Insect Condo]], and a [[Zest Bomb]]. There is a Zest Bomb further up on a high stack of presents that requires [[Yellow Pikmin]] to reach. | |||
Nearby are 5 [[Blue Pikmin]]. Next to them is a pile of 100 [[Nugget]]s, with a Zest Bomb laying on a present. West of that is a huge plate filled with [[water]]. In this plate are 10 Cupid's Grenades. There is a [[dirt wall]] nearby, which leads to a path further north of the area. Eventually, players will reach a split path. To the west is an room fenced off by an [[electric gate]]. Inside the room are 2 Insect Condos and 1 Seed Hive along with 4 Yellow Pikmin. There is a geyser nearby, which leads to atop of some presents. Here, there are 4 [[Golden Grenade]]s and a pile of 20 Nuggets along with 5 planted [[White Pikmin]]. Also nearby is a geyser, which, in a convoluted series of bouncy mushrooms and sliding around the Christmas tree, leads atop of a cake in the northeast corner of the room. This cake has 5 Cupid's Grenades and a bunch of Dusk Pustules. There is also a series of [[Bouncy Mushroom]]s here which can lead to obtaining the Rock Pikmin. | |||
Back at the crossroads, going east will reveal a giant blue present. Atop the present are 3 [[Purple Pikmin]] along with 3 Golden Grenades, with a [[Burgeoning Spiderwort]] nearby. To the north of the present is a dirt wall. Past it is quite a lot to explore. To the north is a small path, with a pile of Nuggets and an Insect Condo. But directly ahead are two Seed Hives, two Insect Condos, and a Slapstick Crescent. Before that is a crystallized geyser that leads back to the starting area. Beyond all that is a large pile of Nuggets nearby the cake. | |||
Curving around south, there is yet another Seed Hive and Insect Condo, along with a slightly out of place [[Lesser Mock Bottom]]. Further south of that are 10 planted [[Winged Pikmin]]. To the east of that is a Seed Hive and a clump of [[Dusk Pustules]], all of which are fairly high up, requiring Yellow or Winged Pikmin. Going even further south, there is a pile of Nuggets. To the east of it in a small corner of the stage are the final 5 White Pikmin. | |||
{{clear}} | |||
===Objects=== | |||
;Leaders | |||
*{{icon|Alph|y|v=neutral}} (player 1's starting leader) | |||
*{{icon|Brittany|y|v=neutral}} (player 2's starting leader) | |||
*{{icon|Charlie|y|v=neutral}} | |||
The order in ''Pikmin 3'' is Alph, Brittany, Charlie. The [[action menu|order]] in ''Pikmin 3 Deluxe'' is Brittany, Charlie, Alph. | |||
;Starting Pikmin | |||
{| class="wikitable sortable" | |||
! class="unsortable" | Icon | |||
!Type | |||
!Amount | |||
! class="unsortable" | Location(s) | |||
|- | |||
|[[File:Red Pikmin P3 icon.png|32px]] | |||
|[[Red Pikmin]] | |||
|11 | |||
|5 leaf Pikmin buried on a present near the [[SPERO]].<br>6 leaf Pikmin buried on a present next to the [[bamboo gate]]. | |||
|- | |||
|[[File:Rock Pikmin P3 icon.png|32px]] | |||
|[[Rock Pikmin]] | |||
|10 | |||
|10 leaf Pikmin buried in front of the pizza box. | |||
|- | |||
|[[File:Yellow Pikmin P3 icon.png|32px]] | |||
|[[Yellow Pikmin]] | |||
|15 | |||
|5 leaf Pikmin buried being the [[electric gate]].<br>10 leaf Pikmin buried on top of the cake. | |||
|- | |||
|[[File:Winged Pikmin P3 icon.png|32px]] | |||
|[[Winged Pikmin]] | |||
|10 | |||
|10 flower Pikmin buried on a present near the [[bamboo gate]]. | |||
|- | |||
|[[File:Blue Pikmin P3 icon.png|32px]] | |||
|[[Blue Pikmin]] | |||
|5 | |||
|5 flower Pikmin buried next to the pond. | |||
|- | |||
|[[File:Purple Pikmin P3 icon.png|32px]] | |||
|[[Purple Pikmin]] | |||
|3 | |||
|3 leaf Pikmin buried on a present at the center of the map. | |||
|- | |||
|[[File:White Pikmin P3 icon.png|32px]] | |||
|[[White Pikmin]] | |||
|10 | |||
|5 flower Pikmin buried on top of a present near the electric gate.<br>5 flower Pikmin buried behind the pizza box. | |||
|} | |||
;Treasures and Enemies | |||
{| class="wikitable sortable" | |||
! class="unsortable" | Icon | |||
!Name | |||
!Amount | |||
!Value | |||
!Total value | |||
|- | |||
|[[File:Dusk Pustules icon.png|32px]] | |||
|[[Dusk Pustules]] | |||
|40 | |||
|[[File:Poko P3 icon.png|12px]] × 200 <small>(Whole fruit)</small><br>[[File:Poko P3 icon.png|12px]] × 10 <small>(Each part)</small> | |||
|[[File:Poko P3 icon.png|12px]] × 400 | |||
|- | |||
|[[File:Lesser Mock Bottom icon.png|32px]] | |||
|[[Lesser Mock Bottom]] | |||
|1 | |||
|[[File:Poko P3 icon.png|12px]] × 50 | |||
|[[File:Poko P3 icon.png|12px]] × 50 | |||
|- | |||
|[[File:Golden Grenade icon.png|32px]] | |||
|[[Golden Grenade]] | |||
|7 | |||
|[[File:Poko P3 icon.png|12px]] × 100 | |||
|[[File:Poko P3 icon.png|12px]] × 700 | |||
|- | |||
|[[File:Seed Hive icon.png|32px]] | |||
|[[Seed Hive]] | |||
|6 | |||
|[[File:Poko P3 icon.png|12px]] × 200 | |||
|[[File:Poko P3 icon.png|12px]] × 1200 | |||
|- | |||
|[[File:Cupid's Grenade FF icon.png|32px]] | |||
|[[Cupid's Grenade]] | |||
|22 | |||
|[[File:Poko P3 icon.png|12px]] × 20 | |||
|[[File:Poko P3 icon.png|12px]] × 440 | |||
|- | |||
|[[File:Insect Condo FF icon.png|32px]] | |||
|[[Insect Condo]] | |||
|7 | |||
|[[File:Poko P3 icon.png|12px]] × 100 | |||
|[[File:Poko P3 icon.png|12px]] × 700 | |||
|- | |||
|[[File:Zest Bomb icon.png|32px]] | |||
|[[Zest Bomb]] | |||
|3 | |||
|[[File:Poko P3 icon.png|12px]] × 70 | |||
|[[File:Poko P3 icon.png|12px]] × 210 | |||
|- | |||
|[[File:Slapstick Crescent icon.png|32px]] | |||
|[[Slapstick Crescent]] | |||
|4 | |||
|[[File:Poko P3 icon.png|12px]] × 300 | |||
|[[File:Poko P3 icon.png|12px]] × 1200 | |||
|- | |||
|[[File:Nugget icon.png|32px]] | |||
|[[Nugget]] | |||
|300 <small>(Piles of 20, 30, 40, 50, 60, and 100)</small> | |||
|[[File:Poko P3 icon.png|12px]] × 3 | |||
|[[File:Poko P3 icon.png|12px]] × 900 | |||
|- | |||
|[[File:Spirit BE enemy icon.png|32px]] | |||
|[[Enemy]] | |||
|1 <small>({{icon|Bug-Eyed Crawmad|y}})</small> | |||
|[[File:Poko P3 icon.png|12px]] × 100 <small>([[Bug-Eyed Crawmad]])</small> | |||
|[[File:Poko P3 icon.png|12px]] × 100 | |||
|} | |||
;Obstacles | |||
*{{icon|Bamboo gate|y}} × 1 | |||
*{{icon|Dirt wall|y}} × 2 | |||
*{{icon|Electric gate|v=P3|y}} × 1 | |||
*{{icon|Small crystal|y}} × 2 | |||
*{{icon|Water body|y}} × 1 | |||
;Tools | |||
*{{icon|Bouncy Mushroom|y}} × 5 | |||
*{{icon|Climbing stick|y}} × 3 | |||
*{{icon|Geyser|y}} × 5 (two encased in a small crystal) | |||
;Plants and Fungi | |||
*{{icon|Burgeoning Spiderwort|v=P3|y}} × 2 | |||
;Other | |||
*{{icon|Egg|v=P3|y}} × 1 | |||
===Guides=== | |||
{{guide}} | |||
Begin by having Alph throw Brittany and Charlie to the present boxes with the Red Pikmin sprouts on it. Have Alph begin plucking the 5 Blue Pikmin sprouts near the pile of nuggets. Switch over to Brittany once more, and throw Charlie onto the second present by the bamboo gate with the remaining Red Pikmin sprouts. After plucking, call Charlie back over and throw him onto the large present with 3 Purple Pikmin sprouts. Now, throw the 3 Purple Pikmin back to Brittany, and have Brittany throw 3 Red Pikmin back to Charlie. With Charlie, have the 3 Red Pikmin begin tearing down the dirt wall. | |||
Switching back to Alph, use the 5 Blue Pikmin to begin collecting the Cupid's Grenades in the bowl of water. Brittany, with the remaining Red Pikmin and Purple Pikmin, can begin collecting the large fruit located in the starting area. After all the Pikmin are helping retrieve fruit, have Brittany travel over to the electric gate to meet Charlie. With Alph and the remaining Pikmin at base, clear out all nearby fruit, including the other 5 Cupid's Grenades submerged in water. Set a handful of Red Pikmin to start chipping away at the nuggets. After the starting area has been cleared out, Alph should travel to the electric gate as well with 3 Purple Pikmin and 4 others in tow. | |||
With Brittany, regroup with Charlie and throw Charlie over the small present besides the electric gate, allowing him to access the Yellow Pikmin. Have the Yellow Pikmin begin working on the electric gate, and then ride the geyser up to pluck the White Pikmin. Set those White Pikmin to begin retrieving the nuggets atop the highest present. The 3 Red Pikmin should have taken down the dirt wall by now; with Brittany, have the 3 Red Pikmin carry back each of the Golden Grenades on the large central present. As soon as the electric gate is taken down, take both Alph and Brittany inside. Have Alph's 3 Purple Pikmin carry back each of the large fruit behind the gate. Bring the 5 Yellow Pikmin with you. | |||
After riding the geyser up and joining Charlie again, have 4 other Pikmin take back the 4 Golden Grenades, then take the geyser up to the Bouncy Mushrooms and the Christmas tree. Upon reaching the cake, regroup with your squad and pluck the remaining Yellow Pikmin. With the 15 Yellow Pikmin, have 5 carry back each of the 5 Cupid's Grenades and have the other 10 start on the Dusk Pustules. The leaders should take the Bouncy Mushrooms to land on a present near the SPERO. With Alph, throw Brittany and Charlie up to pluck the Rock Pikmin. After plucking those, have Brittany throw Charlie to begin plucking the Winged Pikmin atop a present to the right of the bamboo gate. Immediately after getting the Rock Pikmin, take down the two crystallized geysers: one directly in base and one outside of it. After both geysers are taken out, have the 10 Rock Pikmin start on the pile of nuggets at the base of the cake. Then have Brittany make her way to the White Pikmin, which should be done with the pile of nuggets. Have those 5 White Pikmin work on the larger pile of nuggets below. Once the Winged Pikmin have completed the Dusk Pustules, have them carry back the large Seed Hive atop the present. | |||
With Charlie's 10 Winged Pikmin, have him first start on the pile of nuggets. After that has been completed, walk down to the south of the large presents with the Dusk Pustules. Throw the Winged Pikmin at the top of the box; even though they will not land on top of it, they should begin working on collecting them. Afterwards, have Charlie pluck the 5 White Pikmin near the southernmost pile of nuggets, and have them begin working on those nuggets. Alph and the remaining Pikmin at base can begin a cleanup. The 3 Purple Pikmin and 5 Yellow Pikmin carrying the Cupid's Grenades should have returned to base. Throw the 5 Yellow Pikmin onto the Zest Bomb on top of the high present. Once the Winged Pikmin bring the Seed Hive back, have them open up the bamboo gate and begin retrieving the large fruit still left. If there are Yellow Pikmin working on the Dusk Pustules or the Rock Pikmin working on the nuggets, call them to help carry back the treasures. Do not forget the Insect Condo at the northernmost point. Put a few more Pikmin working on the pile of nuggets next to the Insect Condo. | |||
After all the large fruits have been obtained, take all of your idle Pikmin, including the Winged Pikmin holding up the bamboo gate, up to the pizza box to fight the Bug-Eyed Crawmad. Defeat the Crawmad and carry back its spoils to ensure a platinum ranking. The most important objective on this stage is to quickly get access to the Rock Pikmin and Winged Pikmin, to open up the geysers and bamboo gates. As such, begin working on the electric gate as soon as possible, but do not neglect the other treasures close to base either. When fully optimized, the level can be defeated with ample time to spare. | |||
==Battle Enemies!== | |||
{{infobox mission | |||
|be = y | |||
|map = Fortress of Festivity BE map.jpg | |||
|red = {{tt|7|All leaf}} | |||
|rock = {{tt|10|All leaf}} | |||
|yellow = {{tt|10|All leaf}} | |||
|winged = {{tt|10|All flower}} | |||
|blue = {{tt|8|All leaf}} | |||
|time = 7:30 | |||
|bronze = 250 | |||
|silver = 400 | |||
|gold = 550 | |||
|platinum = 690 | |||
|noicons = y | |||
|music = [[Music in Pikmin 3#Fortress of Festivity|Fortress of Festivity]] | |||
}} | |||
===Layout=== | |||
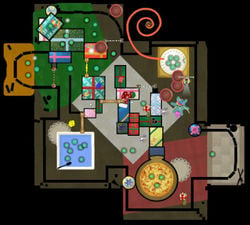
The 3 leaders, [[Alph]], [[Brittany]], and [[Charlie]], start off below the cake, with the [[SPERO]] and the master [[Onion]]. There are 10 other [[Winged Pikmin]] nearby. South of them is a lone [[Puffy Blowhog]]. Even further south of it is a [[Burgeoning Spiderwort]] plant. Back nearby the Onion is a [[geyser]] that leads atop the presents. Right east of the Onion is a room with one [[Skutterchuck]] and a [[Burgeoning Spiderwort]]. The room is closed off by a [[Gate#Crystal wall|crystal wall]]. To the east of this wall is a present with a few [[Red Pikmin]]. Nearby the present is a [[Fiery Blowhog]] by a [[Gate#Dirt wall|dirt wall]] and a [[Watery Blowhog]] guarding a crystal wall. The larger present in the center has 8 [[Blue Pikmin]] on it. | |||
Past the crystal wall is another room with 3 more Watery Blowhogs. Past them is a geyser that leads atop the large presents. Atop the presents are 3 [[Dwarf Orange Bulborb]]s. Below and to the east of the presents is a small room with 3 Fiery Blowhogs. This room has another geyser leading up to the presents. The room is also closed off by a [[Gate#Bamboo gate|bamboo gate]]. Past the gate is another Fiery Blowhog next to an [[Gate#Electric gate|electric gate]]. South of this is a patch of planted [[Yellow Pikmin]] nearby a dirt wall. | |||
Next to them is the plate filled with water. This time, it is filled with 7 [[Skeeterskate]]s. To the west of them are 2 [[Yellow Wollywog]]s. To the north of them on a present are 10 planted [[Rock Pikmin]]. Nearby them is a crystallized geyser which leads up to the cheese pizza. On the pizza, there are now 3 [[Waddlepus]]es. | |||
{{clear}} | |||
===Objects=== | |||
;Leaders | |||
*{{icon|Alph|y|v=neutral}} (player 1's starting leader) | |||
*{{icon|Brittany|y|v=neutral}} (player 2's starting leader) | |||
*{{icon|Charlie|y|v=neutral}} | |||
The order in ''Pikmin 3'' is Alph, Brittany, Charlie. The [[action menu|order]] in ''Pikmin 3 Deluxe'' is Brittany, Charlie, Alph. | |||
;Pikmin | |||
{| class="wikitable sortable" | |||
! class="unsortable" | Icon | |||
!Type | |||
!Amount | |||
! class="unsortable" | Location(s) | |||
|- | |||
|[[File:Red Pikmin P3 icon.png|32px]] | |||
|[[Red Pikmin]] | |||
|7 | |||
|7 leaf Pikmin buried on a present near the [[crystal wall]]. | |||
|- | |||
|[[File:Rock Pikmin P3 icon.png|32px]] | |||
|[[Rock Pikmin]] | |||
|10 | |||
|10 leaf Pikmin buried on a present near the [[Onion]]. | |||
|- | |||
|[[File:Yellow Pikmin P3 icon.png|32px]] | |||
|[[Yellow Pikmin]] | |||
|10 | |||
|10 leaf Pikmin buried next to the pond. | |||
|- | |||
|[[File:Winged Pikmin P3 icon.png|32px]] | |||
|[[Winged Pikmin]] | |||
|10 | |||
|10 flower Pikmin buried at the Onion. | |||
|- | |||
|[[File:Blue Pikmin P3 icon.png|32px]] | |||
|[[Blue Pikmin]] | |||
|8 | |||
|8 leaf Pikmin buried on a present at the center of the map. | |||
|} | |||
;Enemies | |||
{| class="wikitable sortable" | |||
! class="unsortable" | Icon | |||
!Name | |||
!Amount | |||
!Value | |||
!Total value | |||
|- | |||
|[[File:Skutterchuck icon.png|32px]] | |||
|[[Skutterchuck]] | |||
|1 | |||
|[[File:Spirit BE enemy icon.png|12px]] × 5 | |||
|[[File:Spirit BE enemy icon.png|12px]] × 5 | |||
|- | |||
|[[File:Skeeterskate icon.png|32px]] | |||
|[[Skeeterskate]] | |||
|7 | |||
|[[File:Spirit BE enemy icon.png|12px]] × 5 | |||
|[[File:Spirit BE enemy icon.png|12px]] × 35 | |||
|- | |||
|[[File:Dwarf Bulborb P3 icon.png|32px]] | |||
|[[Dwarf Bulborb]] | |||
|5 | |||
|[[File:Spirit BE enemy icon.png|12px]] × 15 | |||
|[[File:Spirit BE enemy icon.png|12px]] × 75 | |||
|- | |||
|[[File:Dwarf Orange Bulborb P3 icon.png|32px]] | |||
|[[Dwarf Orange Bulborb]] | |||
|3 | |||
|[[File:Spirit BE enemy icon.png|12px]] × 15 | |||
|[[File:Spirit BE enemy icon.png|12px]] × 45 | |||
|- | |||
|[[File:Dwarf Bulbear P3 icon.png|32px]] | |||
|[[Dwarf Bulbear]] | |||
|3 | |||
|[[File:Spirit BE enemy icon.png|12px]] × 20 | |||
|[[File:Spirit BE enemy icon.png|12px]] × 60 | |||
|- | |||
|[[File:Yellow Wollywog P3 icon.png|32px]] | |||
|[[Yellow Wollywog]] | |||
|2 | |||
|[[File:Spirit BE enemy icon.png|12px]] × 30 | |||
|[[File:Spirit BE enemy icon.png|12px]] × 60 | |||
|- | |||
|[[File:Fiery Blowhog P3 icon.png|32px]] | |||
|[[Fiery Blowhog]] | |||
|5 | |||
|[[File:Spirit BE enemy icon.png|12px]] × 30 | |||
|[[File:Spirit BE enemy icon.png|12px]] × 150 | |||
|- | |||
|[[File:Watery Blowhog P3 icon.png|32px]] | |||
|[[Watery Blowhog]] | |||
|4 | |||
|[[File:Spirit BE enemy icon.png|12px]] × 30 | |||
|[[File:Spirit BE enemy icon.png|12px]] × 120 | |||
|- | |||
|[[File:Waddlepus icon.png|32px]] | |||
|[[Waddlepus]] | |||
|3 | |||
|[[File:Spirit BE enemy icon.png|12px]] × 30 | |||
|[[File:Spirit BE enemy icon.png|12px]] × 90 | |||
|- | |||
|[[File:Puffy Blowhog P3 icon.png|32px]] | |||
|[[Puffy Blowhog]] | |||
|1 | |||
|[[File:Spirit BE enemy icon.png|12px]] × 50 | |||
|[[File:Spirit BE enemy icon.png|12px]] × 50 | |||
|} | |||
;Obstacles | |||
{{columns|2| | |||
*{{icon|Bamboo gate|y}} × 1 | |||
*{{icon|Crystal wall|y}} × 2 | |||
*{{icon|Dirt wall|y}} × 2 | |||
*{{icon|Electric gate|v=P3|y}} × 1 | |||
*{{icon|Small crystal|y}} × 2 | |||
*{{icon|Water body|y}} × 1 | |||
}} | |||
;Tools | |||
*{{icon|Bouncy Mushroom|y}} × 5 | |||
*{{icon|Geyser|y}} × 6 (two encased in a small crystal) | |||
;Plants and fungi | |||
*{{icon|Burgeoning Spiderwort|v=P3|y}} × 2 | |||
;Others | |||
*{{icon|Master Onion|v=P3|y}} × 1 | |||
==World records== | |||
{{world records | date = {{date|20|June|2016}} | cts = 18350 | ctc = 16760 | bes = 3790 | bec = 3560 | p3 = y}} | |||
{{world records | date = {{date|27|June|2022}} | cts = 19250 | ctc = 17870 | bes = 4350 | bec = 4040 | p3d = y}} | |||
== Gallery== | |||
<gallery> | |||
Fortress of Festivity CT icon.png|Collect Treasure! icon. | |||
Fortress of Festivity BE icon.png|Battle Enemies! icon. | |||
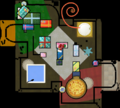
Fortress of Festivity map.png|A full map of the Fortress of Festivity. | |||
P3DX Prerelease Fortress of Festivity.jpg|The cake and various fruits surrounding it. | |||
Bug-Eyed Crawmad in Fortress of Festivity P3.jpg|The Bug-Eyed Crawmad on the pizza. | |||
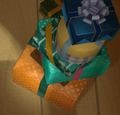
Gifts.png|A stack of gifts outside the border of the level. | |||
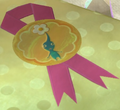
Blue Ribbon.png|A ribbon with a Blue Pikmin found within the level. | |||
Purple Ribbon.png|A ribbon with a Purple Pikmin found within the level. | |||
Red Ribbon.png|A ribbon with a Red Pikmin found within the level. | |||
Rock Ribbon.png|A ribbon with a green colored Rock Pikmin found within the level. | |||
White Ribbon.png|A ribbon with a White Pikmin found within the level. | |||
Winged Ribbon.png|A ribbon with a Winged Pikmin found within the level. | |||
WWP Ribbon.png|A ribbon with a Winged, a White, and a Purple Pikmin found within the level. | |||
Yellow Ribbon.png|A ribbon with a Yellow Pikmin found within the level. | |||
RYB Stocking.png|A stocking featuring a Red, Yellow, and Blue Pikmin found within the level. | |||
WhitePurpleWingedStocking.png|A stocking featuring a Winged, a White, and a Purple Pikmin. | |||
</gallery> | |||
==Trivia== | |||
[[File:Pikmin keychain.jpg|100px|thumb|The keychains released using images from the Fortress of Festivity.]] | |||
* This is the only stage in ''Pikmin 3'' to feature all seven main species of [[Pikmin family|Pikmin]]. | |||
* This stage has the most fruit out of any map in the game, both in Story Mode and Mission Mode, with a total of 90 individual pieces of fruit. | |||
* Some of the Pikmin images used for the ribbons and the stockings were also used to produce real world keychains. | |||
==Names in other languages== | |||
{{Foreignname | |||
|Jap=冬の贈りもの | |||
|JapR=Fuyu no Okurimono | |||
|JapM=Winter Gifts | |||
|Fra=Présents hivernaux | |||
|FraM=Winter presents | |||
|SpaE=Regalo Invernal | |||
|SpaEM=Winter Present | |||
|Ger=Gabentisch | |||
|GerM=Table of gifts | |||
|Ita=Regali invernali | |||
|ItaM=Winter presents | |||
}} | |||
{{missions}} | |||
Revision as of 13:04, November 22, 2024
Fortress of Festivity (冬の贈りもの?, lit.: "Winter Gifts") is a Mission Mode stage in Pikmin 3. This stage is Christmas-themed, taking place on a table covered in various festive decorations, including a small Christmas tree with a spiraling ribbon attached to it, which the Pikmin can slide down. The stage is playable in the Collect Treasure! and Battle Enemies! modes. In the original Pikmin 3, it was released in the 1.4.0 update for free, while the other four stages in the third row of the Mission Mode menu were made purchasable via the eShop. In Pikmin 3 Deluxe, it can be unlocked in each of the 2 modes by completing the first 10 stages in that mode.
|
This article is a stub. You can help Pikipedia by expanding it.
|
Overview
The map mainly takes place on top of a table decorated for Christmas. The abundance of presents and building blocks gives the map a maze-like layout, with a few standout structures like a pizza box, a Christmas tree and a cake. The two variants of the stage are very similar to each other, only being different in the layout of the presents.
Collect Treasure!
| Fortress of Festivity Collect Treasure! | |||||||||||||||
|---|---|---|---|---|---|---|---|---|---|---|---|---|---|---|---|
| |||||||||||||||
| Starting Pikmin | |||||||||||||||
| |||||||||||||||
| Requirements | |||||||||||||||
| |||||||||||||||
| Time limit | 12:00 | ||||||||||||||
| Music | Fortress of Festivity | ||||||||||||||
Layout
The player starts in the middle of the stage with the SPERO and presents with various fruits on it. On the presents are 2 Cupid's Grenades, 2 Slapstick Crescents, and a total of 11 Red Pikmin. Nearby the start is a bamboo gate and a geyser blocked by a crystal, which leads to a patch of 10 Rock Pikmin. Further down this path is a Bug-Eyed Crawmad in the middle of a pepperoni pizza. To the west of the pizza is a plethora of fruits, with a Slapstick Crescent, Seed Hive, Insect Condo, and a Zest Bomb. There is a Zest Bomb further up on a high stack of presents that requires Yellow Pikmin to reach.
Nearby are 5 Blue Pikmin. Next to them is a pile of 100 Nuggets, with a Zest Bomb laying on a present. West of that is a huge plate filled with water. In this plate are 10 Cupid's Grenades. There is a dirt wall nearby, which leads to a path further north of the area. Eventually, players will reach a split path. To the west is an room fenced off by an electric gate. Inside the room are 2 Insect Condos and 1 Seed Hive along with 4 Yellow Pikmin. There is a geyser nearby, which leads to atop of some presents. Here, there are 4 Golden Grenades and a pile of 20 Nuggets along with 5 planted White Pikmin. Also nearby is a geyser, which, in a convoluted series of bouncy mushrooms and sliding around the Christmas tree, leads atop of a cake in the northeast corner of the room. This cake has 5 Cupid's Grenades and a bunch of Dusk Pustules. There is also a series of Bouncy Mushrooms here which can lead to obtaining the Rock Pikmin.
Back at the crossroads, going east will reveal a giant blue present. Atop the present are 3 Purple Pikmin along with 3 Golden Grenades, with a Burgeoning Spiderwort nearby. To the north of the present is a dirt wall. Past it is quite a lot to explore. To the north is a small path, with a pile of Nuggets and an Insect Condo. But directly ahead are two Seed Hives, two Insect Condos, and a Slapstick Crescent. Before that is a crystallized geyser that leads back to the starting area. Beyond all that is a large pile of Nuggets nearby the cake.
Curving around south, there is yet another Seed Hive and Insect Condo, along with a slightly out of place Lesser Mock Bottom. Further south of that are 10 planted Winged Pikmin. To the east of that is a Seed Hive and a clump of Dusk Pustules, all of which are fairly high up, requiring Yellow or Winged Pikmin. Going even further south, there is a pile of Nuggets. To the east of it in a small corner of the stage are the final 5 White Pikmin.
Objects
- Leaders
The order in Pikmin 3 is Alph, Brittany, Charlie. The order in Pikmin 3 Deluxe is Brittany, Charlie, Alph.
- Starting Pikmin
| Icon | Type | Amount | Location(s) |
|---|---|---|---|
| Red Pikmin | 11 | 5 leaf Pikmin buried on a present near the SPERO. 6 leaf Pikmin buried on a present next to the bamboo gate. | |
| Rock Pikmin | 10 | 10 leaf Pikmin buried in front of the pizza box. | |
| Yellow Pikmin | 15 | 5 leaf Pikmin buried being the electric gate. 10 leaf Pikmin buried on top of the cake. | |
| Winged Pikmin | 10 | 10 flower Pikmin buried on a present near the bamboo gate. | |
| Blue Pikmin | 5 | 5 flower Pikmin buried next to the pond. | |
| Purple Pikmin | 3 | 3 leaf Pikmin buried on a present at the center of the map. | |
| White Pikmin | 10 | 5 flower Pikmin buried on top of a present near the electric gate. 5 flower Pikmin buried behind the pizza box. |
- Treasures and Enemies
| Icon | Name | Amount | Value | Total value |
|---|---|---|---|---|
| Dusk Pustules | 40 | |||
| Lesser Mock Bottom | 1 | |||
| Golden Grenade | 7 | |||
| Seed Hive | 6 | |||
| Cupid's Grenade | 22 | |||
| Insect Condo | 7 | |||
| Zest Bomb | 3 | |||
| Slapstick Crescent | 4 | |||
| Nugget | 300 (Piles of 20, 30, 40, 50, 60, and 100) | |||
| Enemy | 1 ( |
- Obstacles
 Bamboo gate × 1
 Dirt wall × 2
 Electric gate × 1
 Small crystal × 2
 Water body × 1
- Tools
 Bouncy Mushroom × 5
 Climbing stick × 3
 Geyser × 5 (two encased in a small crystal)
- Plants and Fungi
- Other
 Egg × 1
Guides
|
The following article or section contains guides. |
Begin by having Alph throw Brittany and Charlie to the present boxes with the Red Pikmin sprouts on it. Have Alph begin plucking the 5 Blue Pikmin sprouts near the pile of nuggets. Switch over to Brittany once more, and throw Charlie onto the second present by the bamboo gate with the remaining Red Pikmin sprouts. After plucking, call Charlie back over and throw him onto the large present with 3 Purple Pikmin sprouts. Now, throw the 3 Purple Pikmin back to Brittany, and have Brittany throw 3 Red Pikmin back to Charlie. With Charlie, have the 3 Red Pikmin begin tearing down the dirt wall.
Switching back to Alph, use the 5 Blue Pikmin to begin collecting the Cupid's Grenades in the bowl of water. Brittany, with the remaining Red Pikmin and Purple Pikmin, can begin collecting the large fruit located in the starting area. After all the Pikmin are helping retrieve fruit, have Brittany travel over to the electric gate to meet Charlie. With Alph and the remaining Pikmin at base, clear out all nearby fruit, including the other 5 Cupid's Grenades submerged in water. Set a handful of Red Pikmin to start chipping away at the nuggets. After the starting area has been cleared out, Alph should travel to the electric gate as well with 3 Purple Pikmin and 4 others in tow.
With Brittany, regroup with Charlie and throw Charlie over the small present besides the electric gate, allowing him to access the Yellow Pikmin. Have the Yellow Pikmin begin working on the electric gate, and then ride the geyser up to pluck the White Pikmin. Set those White Pikmin to begin retrieving the nuggets atop the highest present. The 3 Red Pikmin should have taken down the dirt wall by now; with Brittany, have the 3 Red Pikmin carry back each of the Golden Grenades on the large central present. As soon as the electric gate is taken down, take both Alph and Brittany inside. Have Alph's 3 Purple Pikmin carry back each of the large fruit behind the gate. Bring the 5 Yellow Pikmin with you.
After riding the geyser up and joining Charlie again, have 4 other Pikmin take back the 4 Golden Grenades, then take the geyser up to the Bouncy Mushrooms and the Christmas tree. Upon reaching the cake, regroup with your squad and pluck the remaining Yellow Pikmin. With the 15 Yellow Pikmin, have 5 carry back each of the 5 Cupid's Grenades and have the other 10 start on the Dusk Pustules. The leaders should take the Bouncy Mushrooms to land on a present near the SPERO. With Alph, throw Brittany and Charlie up to pluck the Rock Pikmin. After plucking those, have Brittany throw Charlie to begin plucking the Winged Pikmin atop a present to the right of the bamboo gate. Immediately after getting the Rock Pikmin, take down the two crystallized geysers: one directly in base and one outside of it. After both geysers are taken out, have the 10 Rock Pikmin start on the pile of nuggets at the base of the cake. Then have Brittany make her way to the White Pikmin, which should be done with the pile of nuggets. Have those 5 White Pikmin work on the larger pile of nuggets below. Once the Winged Pikmin have completed the Dusk Pustules, have them carry back the large Seed Hive atop the present.
With Charlie's 10 Winged Pikmin, have him first start on the pile of nuggets. After that has been completed, walk down to the south of the large presents with the Dusk Pustules. Throw the Winged Pikmin at the top of the box; even though they will not land on top of it, they should begin working on collecting them. Afterwards, have Charlie pluck the 5 White Pikmin near the southernmost pile of nuggets, and have them begin working on those nuggets. Alph and the remaining Pikmin at base can begin a cleanup. The 3 Purple Pikmin and 5 Yellow Pikmin carrying the Cupid's Grenades should have returned to base. Throw the 5 Yellow Pikmin onto the Zest Bomb on top of the high present. Once the Winged Pikmin bring the Seed Hive back, have them open up the bamboo gate and begin retrieving the large fruit still left. If there are Yellow Pikmin working on the Dusk Pustules or the Rock Pikmin working on the nuggets, call them to help carry back the treasures. Do not forget the Insect Condo at the northernmost point. Put a few more Pikmin working on the pile of nuggets next to the Insect Condo.
After all the large fruits have been obtained, take all of your idle Pikmin, including the Winged Pikmin holding up the bamboo gate, up to the pizza box to fight the Bug-Eyed Crawmad. Defeat the Crawmad and carry back its spoils to ensure a platinum ranking. The most important objective on this stage is to quickly get access to the Rock Pikmin and Winged Pikmin, to open up the geysers and bamboo gates. As such, begin working on the electric gate as soon as possible, but do not neglect the other treasures close to base either. When fully optimized, the level can be defeated with ample time to spare.
Battle Enemies!
| Fortress of Festivity Battle Enemies! | |||||||||||
|---|---|---|---|---|---|---|---|---|---|---|---|
| |||||||||||
| Starting Pikmin | |||||||||||
| |||||||||||
| Requirements | |||||||||||
| |||||||||||
| Time limit | 7:30 | ||||||||||
| Music | Fortress of Festivity | ||||||||||
Layout
The 3 leaders, Alph, Brittany, and Charlie, start off below the cake, with the SPERO and the master Onion. There are 10 other Winged Pikmin nearby. South of them is a lone Puffy Blowhog. Even further south of it is a Burgeoning Spiderwort plant. Back nearby the Onion is a geyser that leads atop the presents. Right east of the Onion is a room with one Skutterchuck and a Burgeoning Spiderwort. The room is closed off by a crystal wall. To the east of this wall is a present with a few Red Pikmin. Nearby the present is a Fiery Blowhog by a dirt wall and a Watery Blowhog guarding a crystal wall. The larger present in the center has 8 Blue Pikmin on it.
Past the crystal wall is another room with 3 more Watery Blowhogs. Past them is a geyser that leads atop the large presents. Atop the presents are 3 Dwarf Orange Bulborbs. Below and to the east of the presents is a small room with 3 Fiery Blowhogs. This room has another geyser leading up to the presents. The room is also closed off by a bamboo gate. Past the gate is another Fiery Blowhog next to an electric gate. South of this is a patch of planted Yellow Pikmin nearby a dirt wall.
Next to them is the plate filled with water. This time, it is filled with 7 Skeeterskates. To the west of them are 2 Yellow Wollywogs. To the north of them on a present are 10 planted Rock Pikmin. Nearby them is a crystallized geyser which leads up to the cheese pizza. On the pizza, there are now 3 Waddlepuses.
Objects
- Leaders
The order in Pikmin 3 is Alph, Brittany, Charlie. The order in Pikmin 3 Deluxe is Brittany, Charlie, Alph.
- Pikmin
| Icon | Type | Amount | Location(s) |
|---|---|---|---|
| Red Pikmin | 7 | 7 leaf Pikmin buried on a present near the crystal wall. | |
| Rock Pikmin | 10 | 10 leaf Pikmin buried on a present near the Onion. | |
| Yellow Pikmin | 10 | 10 leaf Pikmin buried next to the pond. | |
| Winged Pikmin | 10 | 10 flower Pikmin buried at the Onion. | |
| Blue Pikmin | 8 | 8 leaf Pikmin buried on a present at the center of the map. |
- Enemies
| Icon | Name | Amount | Value | Total value |
|---|---|---|---|---|
| Skutterchuck | 1 | |||
| Skeeterskate | 7 | |||
| Dwarf Bulborb | 5 | |||
| Dwarf Orange Bulborb | 3 | |||
| Dwarf Bulbear | 3 | |||
| Yellow Wollywog | 2 | |||
| Fiery Blowhog | 5 | |||
| Watery Blowhog | 4 | |||
| Waddlepus | 3 | |||
| Puffy Blowhog | 1 |
- Obstacles
 Bamboo gate × 1
 Crystal wall × 2
 Dirt wall × 2
 Electric gate × 1
 Small crystal × 2
 Water body × 1
- Tools
 Bouncy Mushroom × 5
 Geyser × 6 (two encased in a small crystal)
- Plants and fungi
- Others
 Master Onion × 1
World records
In Pikmin 3, these are the world records for the challenge, as obtained from the in-game global rankings feature. The following scores were retrieved on June 20th, 2016. Since the in-game leaderboards have been compromised, it is impossible to obtain more up-to-date legitimate records from the game, though players may have obtained higher scores since.
In Pikmin 3 Deluxe, these are the world records for the challenge, as obtained from the in-game global rankings feature. The following scores were retrieved on June 27th, 2022.
Gallery
Trivia
- This is the only stage in Pikmin 3 to feature all seven main species of Pikmin.
- This stage has the most fruit out of any map in the game, both in Story Mode and Mission Mode, with a total of 90 individual pieces of fruit.
- Some of the Pikmin images used for the ribbons and the stockings were also used to produce real world keychains.
Names in other languages
| Language | Name | Meaning |
|---|---|---|
| 冬の贈りもの? Fuyu no Okurimono |
Winter Gifts | |
| Présents hivernaux | Winter presents | |
| Gabentisch | Table of gifts | |
| Regali invernali | Winter presents | |
| Regalo Invernal | Winter Present |
