|
|
| (88 intermediate revisions by 32 users not shown) |
| Line 1: |
Line 1: |
| {{game icons|p=y|p2=y|p3=y|hp=y}} | | {{game icons|p=y|p2=y|p3=y|p4=y|hp=y}} |
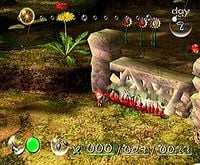
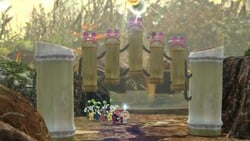
| [[File:Destroyingwall.jpg|thumb|200px|right|A simple white gate in [[The Forest of Hope]].]] | | [[File:P3DX Promo Screenshot 5.jpg|thumb|right|250px|[[Winged Pikmin]] lifting up a [[bamboo gate]] in {{p3}}.]] |
| {{stub|Add locations (see [[Talk:Gate#Locations|the talk page]]), and ''Hey! Pikmin'' info.}} | | '''Gates''' (also called '''walls''') are [[obstacle]]s in all [[Pikmin series|''Pikmin'' games]] that block paths to other sections of an [[area]]. There are several different types of gate in each game, which require different methods to overcome. They serve to either make the player wait before being able to access part of an area (encouraging multitasking), to prevent access to part of an area before unlocking a certain Pikmin type, or to force the player to consider strategy and Pikmin management as they explore an area. |
| '''Gates''' (also called '''walls''') are obstacles in all [[Pikmin series|''Pikmin'' games]] that block paths to other areas. They are found in a number of different forms, which require different strategies to overcome. In general, they can be destroyed by [[Pikmin family|Pikmin]]: a [[leader]] just needs to order them to work on the structure. As time passes, a gate that is being destroyed becomes weaker in distinct stages, before finally being taken down with the standard "task complete" sound effect. The length of time it takes to demolish a gate depends on its type, and the number and types of Pikmin working on it. Some gates require specific Pikmin types to overcome. | |
| | |
| In ''Pikmin'' and ''Pikmin 2'', gates have three stages, and when passing from one to the next, they sink lower to the ground. ''Pikmin 3'' eschews this for a more realistic look, where the gates show visible damage.
| |
|
| |
|
| ==Bramble gate== | | ==Bramble gate== |
| {{todo|Research the relationship between color and HP values better.}} | | [[File:Destroyingwall.jpg|thumb|right|200px|A white bramble gate in [[The Forest of Hope]].]] |
| '''Bramble gates''' are the most basic type of gate in ''Pikmin'' and ''Pikmin 2'', being replaced with [[#Dirt wall|dirt walls]] for the third game. Any Pikmin type can damage a bramble gate. There are two types of these gates: white and black. Black gates are harder to break down than white ones. These can also be found with [[gas pipe]]s within, requiring [[White Pikmin]] to take them down. | | {{main|Bramble gate}} |
| | '''Bramble gates''' are the most basic type of gate in {{p1}} and {{p2}}. Any Pikmin type can damage a bramble gate. They come in white and black colors, with black gates having more health than white gates. Some bramble gates in ''Pikmin 2'' have [[poison emitter]]s inside them and can only be destroyed by [[White Pikmin]] as a result. |
|
| |
|
| In ''Pikmin'', white gates can also be destroyed with two [[bomb rock]]s, and black gates require four. The exact health values are not very rigid, however – the gate that encloses the [[Emperor Bulblax]]'s arena on [[The Final Trial]] is surprisingly frail. In ''Pikmin 2'', normal gates above ground have between 10000 and 43000 hit points. They tend in general to be much sturdier than the [[Randomness|random]]ly generated ones in [[cave]]s (100 - 12800) and [[Challenge Mode (Pikmin 2)|Challenge Mode]] levels (1 - 4000). For comparison, a [[Red Bulborb]] has 750 hit points.
| | {{clear}} |
| | |
| <gallery>
| |
| Gate.png|A standard white bramble gate.
| |
| Black Bramble Gate.png|A regular black bramble gate.
| |
| WhiteGatePoision.png|A poisonous white bramble gate.
| |
| Poison Gate.png|A black poison gate in the [[Wistful Wild]].
| |
| </gallery>
| |
| | |
| ===Locations===
| |
| ;''Pikmin'':
| |
| *[[The Impact Site]]: There is a white gate to the southwest in the area with [[Pearly Clamclamp]]s.
| |
| *[[The Forest of Hope]]: There is one white gate right in the base, another white in the easternmost part of the main area with [[Red Bulborb]]s, a black one in front of the area with the [[Nova Blaster]], a submerged white gate shortly beyond the previously mentioned black gate, and finally, a black gate in front of the arena with the [[Armored Cannon Beetle]].
| |
| *[[The Forest Navel]]: A white gate is found directly next to the base, and must be broken down to allow the [[Number 1 Ionium Jet]] to be delivered to the ship. A black gate is located at the beginning of the pathway leading towards the [[Libra]] and [[Analog Computer]], and a second black gate can be found adjacent to the [[Beady Long Legs]]' arena, though not serving as a direct impediment.
| |
| *[[The Distant Spring]]: A white gate is found blocking off access to the [[Zirconium Rotor]], and a black gate is directly opposite to it, leading into the area where the [[Pilot's Seat]] is found. Another white gate is found beside the tree trunks surrounding the Armored Cannon Beetle, in the path of the [[Bowsprit]]'s waypoints.
| |
| *[[The Final Trial]]: Two white gates are located around the perimeter of the [[Emperor Bulblax]] arena.
| |
| | |
| ;''Pikmin 2'':
| |
| *[[Valley of Repose]]: A white gate is right before [[Emergence Cave]] while another just past it in a pool of water blocks access to half the level. A white poison gate is located in front of [[Subterranean Complex]].
| |
| *[[Awakening Wood]]: There is a black gate in the center, near the [[Burgeoning Spiderwort]]s. Beyond this gate, a white poison gate can be found shortly beyond the [[White Flower Garden]] by taking a right, while another lies opposite the [[Hole of Beasts]] to the left. A white gate in a pool of water with a [[clog]] is located near the landing site. Another white gate blocks the entrance to [[Snagret Hole]].
| |
| *[[Perplexing Pool]]: A submerged black gate is near the landing site and another blocks the area with the [[Submerged Castle]] on the opposite end of the river. A white poison gate is located near where [[Yellow Pikmin]] are discovered.
| |
| *[[Wistful Wild]]: Two black poison gates are found in the [[The Impact Site]] half of the area, denying access to the [[Dream Den]] and two overworld treasures. A white gate in a pool of water is located near the [[Cavern of Chaos]].
| |
|
| |
|
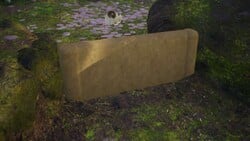
| ==Dirt wall== | | ==Dirt wall== |
| [[File:Dirt Wall P3.jpg|thumb|250px|A dirt wall.]] | | [[File:Dirt Wall Closeup P4.jpg|thumb|250px|left|A dirt wall in ''Pikmin 4''.]] |
| [[File:P3D Dirt Walls.jpg|thumb|250px|The 8 designs of dirt walls in ''Pikmin 3 Deluxe''.]]
| | {{main|Dirt wall}} |
| {{game help|hp}} | | '''Dirt walls''' are sandcastle-like gates found in {{p3}}, {{p4}}, and {{hp}}. They are the most basic type of gate in these games. These types of gates can be destroyed by any Pikmin type, and as they are damaged, parts of the gate will fall away until they are completely destroyed. |
| '''Dirt walls''' are sandcastle-like gates found in {{p3}} and {{hp}}. They are the most basic type of gate and replace bramble gates from the first two games. They break down and fall apart as opposed to sinking into the ground. These types of gates can be destroyed by any Pikmin type; however, some of these walls are found partially or completely submerged underwater, meaning that they require [[Blue Pikmin]] to destroy. In ''Pikmin 3'', Pikmin are more effective at taking one down if they are latched onto it from a throw{{cite youtube|mRGpLSrUyVc|comparing latched Pikmin, grounded Pikmin, thrown Rock Pikmin, and lone Rock Pikmin on a dirt wall|rname=dirt_speed}}, but as the layers on the gate peel down, those Pikmin will eventually fall and attack at ground level. For [[Rock Pikmin]], throwing them at the wall repeatedly is much faster than letting them lunge on their own, and is in fact, the fastest way to take down a wall using Pikmin.{{cite youtube|rname=dirt_speed}} These walls can be destroyed using a single [[bomb rock]]. These walls all have the same design in ''Pikmin 3'', but in ''Pikmin 3 Deluxe'', there are 8 different designs of dirt wall with various patterns of white paint on the columns at the sides of the wall. Those designs are: no paint, 3 horizontal stripes, 1 vertical stripe, 2 wavy stripes (all walls with this pattern are found in water), 3 diagonal stripes, an "X" mark, 3 triangles, and 4 circles. | |
| | |
| <gallery>
| |
| Freezing Wasteland 5.jpg|The dirt wall in [[Freezing Wasteland]].
| |
| Pikmin3 SandcastleWall.png|Red Pikmin destroying a dirt wall in a [[Pikmin 3 prerelease information|prerelease version]].
| |
| </gallery>
| |
| | |
| ===Locations===
| |
| ;''Pikmin 3''
| |
| *[[Tropical Wilds]]: One is found on the first day, inside the cave where the [[Pyroclasmic Slooch]] would normally be, another is outside the landing site, and closes off access to a [[Pocked Airhead]], a third wall underwater guards access to the [[Calcified Crushblat]]'s arena, and a fourth can be found separating the small brown bridge near the landing site from the area with a [[Dapper Blob]] and a [[Swooping Snitchbug]].
| |
| *[[Garden of Hope]]: One is located in the second half of the area, near the [[Bug-Eyed Crawmad]]'s nest, and another is located near the [[Toady Bloyster]] and a pile of fragments used to build the pot. Both of these are completely submerged underwater. A third separates the landing site from the [[fragment]] pile used to build the nearby [[bridge]], with this bridge leading to a fourth wall by the [[Bulborb]]. A fifth wall blocks the 2D facing area with the [[Zest Bomb]] and [[Astringent Clump]], with the last one blocking access to the [[Armored Mawdad]]'s arena.
| |
| *[[Distant Tundra]]: Two of the dirt walls in this area are partially submerged in the main river. One is by the area with [[Wogpole]]s, near the land protrusion to swap Pikmin in, while the other one is right next to the ledge with the [[Face Wrinkler]]. The last dirt wall is also by the land protrusion, but it blocks an alcove with a [[Bearded Amprat]] and a [[Bouncy Mushroom]].
| |
| *[[Twilight River]]: One wall is in the second half of the area, and blocks off a small land bridge to cross the river, and a second one separates the area with the [[clipboard]]s and the swarm of [[Scornet]]s.
| |
| *[[Formidable Oak]]: The first is found at the end of the room with the [[Red Bulborb|Bulborbs]], the next one can be found to the far end of the circular area where the bridge is built, a third is at the end of the path where the [[Nectarous Dandelfly]] is, and the fourth is in the dark cave, and simply separates a path to get the fragments (this wall does not need to be destroyed, however). The final is also in the dark cave, blocking the path that needs to be taken if the clipboard is not lifted.
| |
| | |
| ;''Hey! Pikmin''
| |
| *'''[[Snowfall Field]]'''
| |
| **[[Freezing Wasteland]]: There is a dirt wall found near the end of the level, blocking the player's path. The player must be careful when breaking it, as they also have to ward off a [[Clicking Slurker]] nearby.
| |
| | | |
| {{clear}} | | {{clear}} |
|
| |
|
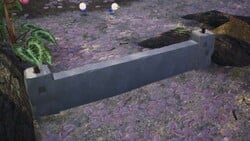
| ==Reinforced wall== | | ==Reinforced wall== |
| | [[File:Reinforced Wall P4.jpg|thumb|right|250px|A reinforced wall in ''Pikmin 4''.]] |
| | {{main|Reinforced wall}} |
| | '''Reinforced walls''' are gates that can only be destroyed with [[bomb rock]]s. Pikmin cannot break these walls on their own. The number of bomb rock explosions needed to destroy a reinforced wall varies by game. |
|
| |
|
| '''Reinforced walls''' (also known as '''stone gates'''{{cite web|https://www.nintendo.co.uk/Games/Wii/NEW-PLAY-CONTROL-Pikmin-282343.html#Surviving_the_Planet|NEW PLAY CONTROL! Pikmin|Nintendo.co.uk}}) are, as the name would suggest, less destructible than regular gates. They do not appear in the second game. Pikmin cannot attack these stone walls: if they are told to try, they will just tap their stems at them for a bit, before sighing and giving up. [[Bomb rock]]s must explode near them in order to take them down. In ''Pikmin 3'', only three bomb rocks are needed to take one down (aside from one in the [[Battle Enemies!]] version of [[Clockwork Chasm]] that only requires one bomb rock), but in ''Pikmin'' white, gray and black gates, need three, six and nine bomb rocks to destroy, respectively. In ''Pikmin 3'', they seem to be made out of concrete, as pieces of rebar can be seen sticking out of the top.
| | {{clear}} |
| | |
| <gallery>
| |
| Reinforced wall P1.png|A reinforced wall in ''Pikmin''.
| |
| Reinforced wall P3.jpg|A reinforced wall in ''Pikmin 3''.
| |
| Reinforced wall.jpg|Alph and his Pikmin near a reinforced wall.
| |
| </gallery>
| |
| | |
| ===Locations===
| |
| ;''Pikmin'':
| |
| *[[The Impact Site]]: There is a white reinforced wall on the opposite side of the tree stump where one fights the Mamuta or Goolix.
| |
| *[[The Forest of Hope]]: There are two reinforced walls near where the player first finds the Yellow Pikmin, and one next to the landing site, all of which are white. One black wall blocks off the alcove with the [[Extraordinary Bolt]].
| |
| *[[The Forest Navel]]: There are four reinforced walls scattered around the landing site plateau, serving only to block shortcuts. The first is directly adjacent to the landing site, and is gray. The other gray wall and a black wall lie near the [[Beady Long Legs]] arena, providing similar shortcuts – the gray wall is safe as long as the bridge has been unfurled, while the black wall opens a path guarded by [[mandiblard]]s. The final wall is a black one that provides a direct route from the landing site to the beach covered in [[Fiery Blowhogs]]. A fifth gray wall guards the Beady Long Legs directly, and must be taken down to collect the [[Guard Satellite]] at any speed.
| |
| *[[The Distant Spring]]: Two walls block the landing site from the majority of the land section- a black one directly next to the landing site opens the way to a large space with plenty of [[Spotty Bulbears]], while a gray one blocks a narrow route between a tree stump and a river crawling with [[Yellow Wollywog]]s.
| |
| *[[The Final Trial]]: One white wall blocks the two bridges in the middle of the area.
| |
| ;''Pikmin 3'':
| |
| *[[Tropical Wilds]]: There is one beside the landing site, one beside the bridge near the [[Dawn Pustules]], and one guarding the [[Shaggy Long Legs]] arena with [[fire geyser]]s.
| |
| *[[Twilight River]]: There is one beside the landing site, and one blocking a small alcove with a [[Tremendous Sniffer]].
| |
| *[[Formidable Oak]]: The only reinforced wall in this area is in the long corridor where the [[Mysterious Life Form]] first begins chasing the player. It blocks a shortcut to the end of the first room.
| |
|
| |
|
| ==Electric gate== | | ==Electric gate== |
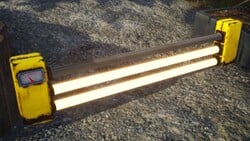
| '''Electric gates''' carry [[Electricity|electrical current]]. As such, Pikmin that are not [[Yellow Pikmin|Yellow]] cannot touch them, under the risk of death (''Pikmin 2'') or temporary paralysis (''Pikmin 3''). Other than that, they can be taken down just like any other type of gate. | | [[File:Electric Gate Closeup P4.jpg|thumb|left|250px|An electric gate in ''Pikmin 4''.]] |
| | | {{main|Electric gate}} |
| In ''Pikmin 2'', they resemble a fence made of metal, and sink to the ground as they take damage. All electric gates have exactly 16000 [[Health|hit-points]].
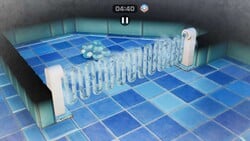
| | '''Electric gates''' carry an [[Electricity|electrical current]]. As such, Pikmin that are not [[Yellow Pikmin]] cannot touch them, under the risk of death (''Pikmin 2''), temporary paralysis (''Pikmin 3''), or a combination of both (''Pikmin 4''). Other than that, they can be taken down just like any other type of gate. |
| | |
| In ''Pikmin 3'', they are made of four {{w|fluorescent lamp}}s laid horizontally on top of one another, with each lamp breaking down (and becoming harmless) at each stage of destruction. When the gate is finally opened, all lamps explode. Pikmin cannot grab on to this type of gate – they can only attack from the ground. Bomb rocks cannot be used to damage these gates.
| |
| | |
| In ''Pikmin 3 Deluxe'', some electric gates have additional black stripes on them, and there are 4 variants of gates: one with no black stripes, one with 2 horizontal black stripes on each pillar, one with a vertical black stripe on each pillar, and one with diagonal black stripes on each pillar.
| |
| | |
| <gallery>
| |
| Electric Fence.png|An electric gate in ''Pikmin 2''.
| |
| Electric gate P3 screenshot.jpg|An electric gate in ''Pikmin 3''.
| |
| Electric gate.jpg|Alph and his Pikmin near an electric gate in ''Pikmin 3''.
| |
| Pollution Pool 3.jpg|An electric gate in ''Hey! Pikmin''.
| |
| P3D Electric Gates.jpg|The 4 types of electric gates in ''Pikmin 3 Deluxe''.
| |
| </gallery>
| |
| | |
| ===Locations===
| |
| {{game help|p3|Add Bingo Battle locations.}}
| |
| ;''Pikmin 2'':
| |
| *[[Awakening Wood]]: one blocks access to the [[Bulblax Kingdom]], the other bars in the section where [[Blue Pikmin]] are found.
| |
| *[[Perplexing Pool]]: the three gates block the accesses to the [[Shower Room]], the [[Glutton's Kitchen]] and the [[Optical Illustration]] (US) / [[Abstract Masterpiece]] (Europe).
| |
| *[[Wistful Wild]]: a gate blocks access to the bamboo ramp near the [[Armored Cannon Beetle Larva]].
| |
| | |
| ;''Pikmin 3'':
| |
| *[[Tropical Wilds]]: one gate blocks the entrance to the [[Shaggy Long Legs]]'s main arena.
| |
| *[[Garden of Hope]]: one gate is near the [[Red Bulborb]] at the start, another is in the dirt area with [[Fiery Blowhog]]s, next to the landing site, a third is after the area where [[Brittany]] is rescued, and the final one is on the [[elevator platform]] puzzle side-view section.
| |
| *[[Distant Tundra]]: the first gate is right next to the landing site, and the second is between the entrance to the [[Pyroclasmic Slooch]] cave and the entrance to the [[Yellow Pikmin]] cave.
| |
| *[[Twilight River]]: one is on the other side of the river from the landing site, to the north, and the other is next to the [[Burrowing Snagret]]'s arena.
| |
| *[[Silver Lake]]: a gate blocks off the circular alcove in the northernmost part of the area in both versions.
| |
| *[[Twilight Hollow]]: In the Collect Treasure! version, a gate is between the eastern section and the southern connector and another is in the western part separating the lily pad access point.
| |
| *[[Tropical Forest Remix]]: one gate is near the building side of the bridge.
| |
| *[[Silver Lake Remix]]: the same gate appears as in Silver Lake.
| |
| *[[Distant Tundra Remix]]: the first and second gates return from the original area, and a third one appears near the second next to the river.
| |
| *[[Fortress of Festivity]]: In the Connect Treasure! version, one gate is in the east, next to the Yellow Pikmin, two [[Insect Condo]]s, and a [[Slapstick Crescent]]. In the Battle Enemies! version, a gate is between the largest red and cyan presents, with a [[Fiery Blowhog]] on either side.
| |
| *[[The Rustyard]]: In the Collect Treasure! version, one gate is on the western path that connects the two halves.
| |
| *[[Forgotten Cove]]: In the Collect Treasure! version, one gate blocks the entrance to the [[Baldy Long Legs]]'s arena.
| |
| *[[Clockwork Chasm]]: In the Battle Enemies! version, one gate is right next to the [[SPERO]].
| |
| | |
| ;''Hey! Pikmin'':
| |
| *'''[[Ravaged Rustworks]]'''
| |
| **[[Pollution Pool]]: The only two electric gates in the game appear here. The first one is near the beggining, and can be taken down quickly. The second is right before the end of the level. Because Yellow Pikmin can't be brought underwater, and they are needed to break the gate, the player must complete a bridge with [[Blue Pikmin]].
| |
|
| |
|
| {{clear}} | | {{clear}} |
|
| |
|
| ==Crystal wall== | | ==Crystal wall== |
| [[File:Cracked crystal wall.jpg|thumb|A crystal wall.]] | | [[File:Crystal Wall P4.jpg|thumb|right|250px|A crystal wall in ''Pikmin 4''.]] |
| {{game help|p3|Investigate further how resistant each gate is. Take in consideration hitting the same quadrant or different quadrants.}} | | {{main|Crystal wall}} |
| | '''Crystal walls''' are gates in ''Pikmin 3'' and ''Pikmin 4'' that require [[Rock Pikmin]] to break. They are made of a sheet of glass-like [[crystal]] between two metal clamps. |
|
| |
|
| '''Crystal walls''' are gate types found only in ''[[Pikmin 3]]'', and require [[Rock Pikmin]] to break. The gate itself is made of a piece of glass (identified as "[[crystal]]") stuck between 2 clamps, and will crack as Rock Pikmin hit it. Once enough damage has occurred, the wall will shatter altogether rather than break gradually or sink in the ground. The cracks are split in quadrants, and once a quadrant has been damaged enough, the whole structure breaks. As such, hitting the same quadrant repeatedly will take the wall down faster than hitting several quadrants. Although uncertain, it appears that all crystal walls in story mode take 24 direct hits to break if the same quadrant is hit every time, and 28 direct hits if a different quadrant is hit each time. Any crystal gate needs 2 bomb rock explosions in order to shatter, regardless of health value.
| | {{clear}} |
|
| |
|
| In a prerelease version of ''Pikmin 3'', this gate was called a "crystallized wall". It may have been changed at some point in the game's development to shorten and simplify it.
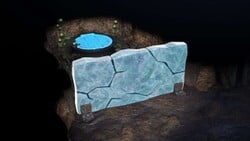
| | ==Ice wall== |
| | [[File:Ice Wall P4.jpg|thumb|left|250px|An ice wall.]] |
| | {{main|Ice wall}} |
| | '''Ice walls''' are gates in ''Pikmin 4'' that are made of an [[Ice|icy]] material. Only [[Ice Pikmin]] can destroy these gates without getting frozen. |
|
| |
|
| ===Locations===
| | {{clear}} |
| *[[Garden of Hope]]: One beside where [[Rock Pikmin]] are first discovered, one guarding access to Brittany, and one by the landing site.
| |
| *[[Distant Tundra]]: One near the two [[Pyroclasmic Slooch]]es, one of which holds a [[Sunseed Berry]], and one near the bomb rocks by the [[Spotty Bulbear]].
| |
| *[[Formidable Oak]] : One near a pathway containing an [[iron ball]].
| |
|
| |
|
| <gallery>
| | ==Bamboo gate== |
| Crystal wall.jpg|Alph and some Pikmin near a crystal wall.
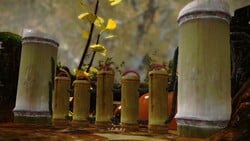
| | [[File:Bamboo gate closed P3 screenshot.jpg|thumb|right|250px|A bamboo gate.]] |
| Rock Pikmin damage crystal wall P3.png|The crystal wall in an [[Pikmin 3 prerelease information|earlier version]] of ''Pikmin 3''.
| | {{main|Bamboo gate}} |
| Crystalized wall.png|The wall locked on in an earlier version of ''Pikmin 3''. Notice the different name.
| | '''Bamboo gates''' are gates made out of bamboo sticks, and are found only in ''Pikmin 3''. They require [[Winged Pikmin]] to open, but unlike other gates, they cannot be opened permanently. They require 10 Winged Pikmin to be holding up the gate to allow passage underneath, and when those Pikmin are whistled off, the bamboo sticks will fall, closing the gate. |
| </gallery>
| |
|
| |
|
| {{clear}} | | {{clear}} |
|
| |
|
| ==Cinderblock== | | ==Numbered gate== |
| '''Cinderblocks''' are rare, indestructible walls used to block certain paths in [[Mission Mode]] in ''Pikmin 3''. In story mode, a single cinderblock is used to block the entrance to the rest of the [[Garden of Hope]] containing the [[Blue Onion]]. At some point in the story, it is blown up by Louie in an attempt to escape the crew. | | [[File:Numbered Gate P4.jpg|thumb|left|250px|A numbered gate.]] |
| | {{main|Numbered gate}} |
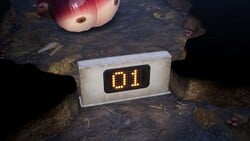
| | '''Numbered gates''' are gates that open once a certain number of nearby objectives have been cleared. These objectives are most often defeating nearby [[Enemy|enemies]]. They are made of metal and have a dot-matrix display on the side for showing a 2-digit number. This number counts down as those objectives are met, and once it reaches 0, the gate opens by lowering into the ground. |
|
| |
|
| ===Locations===
| |
| *[[Garden of Hope]]: In the main game, one is found blocking the way to the rest of the Garden of Hope. It is later blown up by Louie in an attempt to escape the crew later in the game. This is the only time in the game where a cinderblock is destroyed. Five can be seen as background decorations in inaccessable areas.
| |
| *[[Tropical Wilds Remix]]: Three block off the south side of the original landing site, two are found in the place of where a bridge would normally be located in the main game, and two more are used to make the grassy region of the [[Shaggy Long Legs]] arena only accessable from the dirt side.
| |
| *[[Garden of Hope Remix]]: One is found in it's original location in the main game along with the two decorative cinderblocks, four are used to block off access to sub-areas, and the last two blocks off the sub-area containing the Rock Pikmin and Brittany's crash site. The last one is found where a [[dirt wall]] is found submerged in water in the main game, making it completely impossible to go to the section of the map that contains the Blue Onion in the main game.
| |
| <gallery>
| |
| </gallery>
| |
| {{clear}} | | {{clear}} |
|
| |
|
| ==Bamboo gate== | | ==Switch gate== |
| '''Bamboo gates''' are gates made out of bamboo sticks, and are found only in ''Pikmin 3''. They require [[Winged Pikmin]] to get use but, unlike other gates, these cannot be opened permanently. Each of the five sticks has a pink handle on top, which requires two Winged Pikmin in order to be lifted – as such, ten Winged Pikmin must be issued to lift the entire gate. Until they are called back, they will keep the gate in this opened position, allowing leaders, Pikmin, or even [[enemy|enemies]] passage underneath. No more than 10 Winged Pikmin can lift a single gate, and once they are told to return, they will close it again. If less than all the Winged Pikmin get called back, the gate will fall and any remaining Pikmin will struggle to hold up the gate. If an item gets stuck under a closed bamboo gate, it will glitch back and forth while remaining stuck in the gate. It will be freed if the gate is lifted back up, however. | | [[File:Switch Gate P4.jpg|thumb|right|250px|A switch gate and its button.]] |
| | {{main|Switch gate}} |
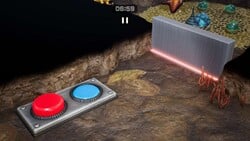
| | '''Switch gates''' are gates in ''Pikmin 4'' that can be either raised (blocking a path) or lowered (allowing passage), and are toggled with [[switch]]es. There are three types: '''white gates''' can be lowered with single-button switches and cannot be raised afterwards, and '''red gates''' and '''blue gates''' can be toggled between their raised and lowered states with 2-button switches. |
|
| |
|
| ===Locations===
| | {{clear}} |
| *[[Garden of Hope]]: One in the pool where [[Blue Pikmin]] are found.
| |
| *[[Distant Tundra]]: One guarding the [[Shaggy Long Legs]] arena, and another guarding the [[Spotty Bulbear]].
| |
| *[[Twilight River]]: One serving as a back entrance, allowing one to reach the [[Portable Sunset]] without fighting the three [[Orange Bulborb]]s in close proximity. Found near the [[Burrowing Snagret]] arena.
| |
|
| |
|
| <gallery>
| | ==Stubborn rocks== |
| Bamboo gate closed P3 screenshot.jpg|thumb|A bamboo gate, closed.
| | [[File:P3 Distant Tundra Stubborn Rocks.jpg|thumb|left|250px|A set of stubborn rocks in the Distant Tundra.]] |
| Bamboo gate.jpg|Alph and the Pikmin near a bamboo gate.
| | {{main|Stubborn rocks}} |
| Bamboo gate P3 screenshot.png|A bamboo gate in the process of being lifted by [[Winged Pikmin]].
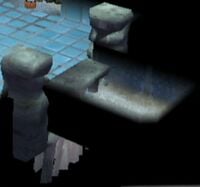
| | '''Stubborn rocks''' are walls in ''Pikmin 3'' made of stones that are destroyed by pushing [[iron ball]]s down a slope. They're found frequently in [[Side Stories]], but are never paired with iron balls in them, instead acting as unpassable barriers alongside cinderblocks and wooden signs. |
| </gallery>
| |
|
| |
|
| {{clear}} | | {{clear}} |
|
| |
| ==Brick wall==
| |
| [[File:Distant Tundra Snow Wall.jpg|thumb|right|One of the brick walls in the Distant Tundra, destroyed.]]
| |
| '''Brick walls''' are rare walls in ''Pikmin 3'' that are destroyed by pushing [[iron ball]]s down a slope. They cannot be locked-on to, as there is no other way to destroy them. There are two in [[Story Mode]], both in the [[Distant Tundra]]:
| |
| * One at the exit of the cave where [[Brittany]] lands upon first arriving in the Distant Tundra. This wall must be destroyed to exit the cave and start the day properly, without the use of [[Glitches in Pikmin 3|glitches]].
| |
| * One in the northern section of the main area with the [[geyser]]s and [[Arctic Cannon Larva]]e. Destroying the wall gives access to the large cave system where the [[Vehemoth Phosbat]] is found. Two leaders must be used to access the ledge where the iron ball can be pushed down from, restricting access to the cave until [[Alph]] and [[Brittany]] are reunited.
| |
|
| |
|
| == Minor glitch == | | == Minor glitch == |
| [[File:Gate Glitch.JPG|thumb|100px|The submerged part is seen next to the "10" on the HUD.]] | | [[File:P2 Gate Glitch.jpg|thumb|200px|The submerged part of the gate is still visible beneath the map.]] |
| {{todo|Move to the glitches articles.}} | | {{todo|Move to the glitches articles.}} |
| In the first two games, a visual glitch that occurs with certain gates allows them to remain visible underground when parts are submerged. Once the entire gate has been torn down, everything appears normal again. This is best seen [[Cave|underground]] in ''Pikmin 2'', and in [[The Forest Navel]] in ''Pikmin''. In the latter case, it is a simple black gate near a [[Fiery Blowhog]] and a [[Pellet Posy]] growing in a pool. | | In the first two games, a visual glitch that occurs with certain gates allows them to remain visible underground when parts are submerged. Once the entire gate has been torn down, everything appears normal again. This is best seen [[Cave|underground]] in ''Pikmin 2'', and in [[The Forest Navel]] in ''Pikmin''. In the latter case, it is a simple black gate near a [[Fiery Blowhog]] and a [[Pellet Posy]] growing in a pool. |
|
| |
|
| {{clear}} | | {{clear}} |
| | |
| ==Trivia== | | ==Trivia== |
| | [[File:Pikmin 3 trial map.jpg|thumb|Concept art for Tropical Forest, with a bramble gate visible between "Area 3" and "Area 4".]] |
| *In ''Pikmin 3'', Pikmin that are thrown and touch a destroyed gate will perform a celebratory flip and cheer. It is unknown whether this is an oversight or on purpose. | | *In ''Pikmin 3'', Pikmin that are thrown and touch a destroyed gate will perform a celebratory flip and cheer. It is unknown whether this is an oversight or on purpose. |
| *While bramble gates do not appear in ''Pikmin 3'' as dirt walls replace them, one can be seen in [[:File:Pikmin_3_trial_map.jpg|concept art]] for [[Tropical Forest]], suggesting they were originally planned to return. | | *While bramble gates do not appear in ''Pikmin 3'' as dirt walls replace them, one can be seen in concept art for [[Tropical Forest]], suggesting they were originally planned to return. |
| | |
| {{clear}} | | {{clear}} |
|
| |
|
| ==Names in other languages== | | ==Names in other languages== |
| {{foreignname | | {{foreignname |
| | |Jap = ゲート<br>''Gēto''<br>カべ<br>''Kabe'' |
| | |JapM = Gate<br><br>Wall |
| |PorP = Parede | | |PorP = Parede |
| |PorPM = Wall | | |PorPM = Wall |
| |PorPN = Translation taken from the ''Pikmin'' instruction manual. | | |PorPN = Translation taken from the ''Pikmin'' instruction manual. |
| | |PorB = Parede |
| | |PorBM = Wall |
| | |PorBN = Translation taken from ''Pikmin 4''. |
| |Fra = Barrage/Mur | | |Fra = Barrage/Mur |
| |FraM = Dam/Wall | | |FraM = Dam/Wall |
| Line 202: |
Line 102: |
| |Ita= | | |Ita= |
| |ItaM= | | |ItaM= |
| |SpaA= | | |Spa=Muro/Puerta |
| |SpaAM= | | |SpaM=Wall/Gate |
| |SpaE=
| |
| |SpaEM=
| |
| |notes = y | | |notes = y |
| }}
| |
|
| |
| '''Dirt wall'''
| |
| {{Foreignname
| |
| |FraA=
| |
| |FraAM=
| |
| |FraE=Mur de terre
| |
| |FraEM=Earth wall
| |
| |Ger=Lehmwand
| |
| |GerM=Loam wall
| |
| |Ita=Muro di fango
| |
| |ItaM=Mud wall
| |
| |SpaA=
| |
| |SpaAM=
| |
| |SpaE=Muro de barro
| |
| |SpaEM=Mud wall
| |
| }}
| |
|
| |
| '''Electric gate'''
| |
| {{Foreignname
| |
| |FraA=
| |
| |FraAM=
| |
| |FraE=
| |
| |FraEM=
| |
| |Ger=Elektrozaun
| |
| |GerM=Electric fence
| |
| |Ita=
| |
| |ItaM=
| |
| |SpaA=
| |
| |SpaAM=
| |
| |SpaE=
| |
| |SpaEM=
| |
| }}
| |
|
| |
| '''Crystal wall'''
| |
| {{Foreignname
| |
| |FraA=
| |
| |FraAM=
| |
| |FraE=
| |
| |FraEM=
| |
| |Ger=
| |
| |GerM=
| |
| |Ita=
| |
| |ItaM=
| |
| |SpaE=Muro de cristal
| |
| |SpaEM=Crystal wall
| |
| }}
| |
|
| |
| '''Bamboo gate'''
| |
| {{foreignname
| |
| |FraA=
| |
| |FraAM=
| |
| |FraE=
| |
| |FraEM=
| |
| |Ger=Bambuszaun
| |
| |GerM=Bamboo fence
| |
| |Ita=
| |
| |ItaM=
| |
| |SpaA=
| |
| |SpaAM=
| |
| |SpaE=Puerta de bambú
| |
| |SpaEM=Bamboo door
| |
| }} | | }} |
|
| |
|
| Line 274: |
Line 110: |
| *[[Bomb rock]] | | *[[Bomb rock]] |
| *[[Bridge]] | | *[[Bridge]] |
|
| |
| ==References==
| |
| {{refs}}
| |
|
| |
|
| {{featured|{{date|18|March}}|{{date|21|June|2013}}}} | | {{featured|{{date|18|March}}|{{date|21|June|2013}}}} |
|
| |
|
| {{obstacles}} | | {{obstacles}} |
