Moving walkway: Difference between revisions
(I don't have this stage, so this is speculation. Please confirm. Also, from your todo, I can assume that some switches reverse more than one belt. Correct me if I'm wrong. Finally, a few lead to bottomless pits, yeah? I remember a friend telling me...) |
(→Trivia) Tags: Mobile edit Advanced mobile edit |
||
| (15 intermediate revisions by 9 users not shown) | |||
| Line 1: | Line 1: | ||
{{game icons|p3=y}} | {{game icons|p3=y|p4=y}} | ||
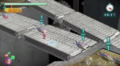
[[File:ClockworkChasm.jpg|thumb|A conveyor belt and | [[File:ClockworkChasm.jpg|thumb|A conveyor belt and a switch.]] | ||
'''Moving walkways''' are [[tool]]s in {{p3}} and {{p4}}. They are silver conveyor belts that constantly move in a certain direction, and their direction can be switched by activating a [[switch]]. Objects on top of one are carried along the belt until they reach static land or fall off, sometimes into the [[pit]]. In ''Pikmin 3'', they are found only in the [[Mission Mode]] stage [[Clockwork Chasm]], while in ''Pikmin 4'' they are found in several [[cave]]s. | |||
'' | |||
Some belts are faster than others, and although [[leader]]s and [[Pikmin family|Pikmin]] are fast enough to cross against the slower ones, faster ones may make it impossible to go against the flow other than by [[Oatchi]]'s [[rush]]. Regardless of speed, Pikmin will only [[carry]] objects with the flow. The direction of all belts in the stage can be reversed if a Pikmin, leader or [[pikpik carrot]] is [[throw]]n onto a [[switch]] or if [[Oatchi]] jumps on top of it. Due to their nature, they're also used alongside other tools, like [[Bouncy Mushroom]]s and [[fan]]s. | |||
The conveyor belts in Clockwork Chasm are used as the stage's main gimmick; so much so that the leaders and a blob of nectar begin on top of one on the Collect Treasure! mission, which carries them to the main platform. They mostly provide a strategy element to the stage, since players have to plan out their usual routine, but also have to coordinate when and where the conveyor belts must be switched, to help Pikmin move quicker or open up paths. In this stage, there are 22 belts in the Collect Treasure! mission, and 18 in the Battle Enemies! mission. | |||
==Locations== | ==Locations== | ||
;''Pikmin 3'' | |||
*[[Clockwork Chasm]] | |||
**Collect Treasure! × 22 | |||
**Battle Enemies! × 18 | |||
;''Pikmin 4'' | |||
*[[Sun-Speckled Terrace]] (does not appear above ground) | |||
**[[Industrial Maze]] | |||
***Sublevel 1 × 4 | |||
*[[Serene Shores]] (does not appear above ground) | |||
**[[Below-Grade Discotheque]] | |||
***Sublevel 3 × 3 | |||
*[[Hero's Hideaway]] (does not appear above ground) | |||
**[[Doppelgänger's Den]] | |||
***Sublevel 3 × 5 | |||
*[[Giant's Hearth]] (does not appear above ground) | |||
**[[Ultimate Testing Range]] | |||
***Sublevel 4 × 10 | |||
*[[Dandori Challenge]]s | |||
**[[Trial of the Sage Leaf]] 6th Story: Gimmick Gambit × 4 | |||
==Gallery== | ==Gallery== | ||
{{image}} | {{image}} | ||
<gallery> | |||
Puckering Blinnows carried on conveyor belts P3.png|Some [[Blue Pikmin]] carrying [[Puckering Blinnow]] corpses across a conveyor belt. | |||
P4 Below-Grade Discotheque 3 Mechanical Devices.jpg|A group of moving walkways inside sublevel 3 of the [[Below-Grade Discotheque]]. | |||
</gallery> | |||
== Trivia == | |||
*Conveyor belts, alongside conveyor switches, are the only tools in ''Pikmin 3'' to only appear in Mission Mode. | |||
*Pikmin sprouts will not be carried by conveyor belts.{{cite web|https://twitter.com/EspyoPT/status/1443302341340323841|Twitter clip|Twitter|published={{date|29|September|2021}}|retrieved={{date|29|September|2021}}}} This can be seen in the Battle Enemies! variant of the Clockwork Chasm, since there is a [[Swooping Snitchbug]] flying above a conveyor belt. | |||
==See also== | ==See also== | ||
* [[Switch]] | |||
* [[Bridge]] | * [[Bridge]] | ||
* [[Clipboard]] | * [[Clipboard]] | ||
{{ | ==References== | ||
{{refs}} | |||
{{tools}} | |||
Latest revision as of 09:11, June 30, 2024

Moving walkways are tools in Pikmin 3 and Pikmin 4. They are silver conveyor belts that constantly move in a certain direction, and their direction can be switched by activating a switch. Objects on top of one are carried along the belt until they reach static land or fall off, sometimes into the pit. In Pikmin 3, they are found only in the Mission Mode stage Clockwork Chasm, while in Pikmin 4 they are found in several caves.
Some belts are faster than others, and although leaders and Pikmin are fast enough to cross against the slower ones, faster ones may make it impossible to go against the flow other than by Oatchi's rush. Regardless of speed, Pikmin will only carry objects with the flow. The direction of all belts in the stage can be reversed if a Pikmin, leader or pikpik carrot is thrown onto a switch or if Oatchi jumps on top of it. Due to their nature, they're also used alongside other tools, like Bouncy Mushrooms and fans.
The conveyor belts in Clockwork Chasm are used as the stage's main gimmick; so much so that the leaders and a blob of nectar begin on top of one on the Collect Treasure! mission, which carries them to the main platform. They mostly provide a strategy element to the stage, since players have to plan out their usual routine, but also have to coordinate when and where the conveyor belts must be switched, to help Pikmin move quicker or open up paths. In this stage, there are 22 belts in the Collect Treasure! mission, and 18 in the Battle Enemies! mission.
Locations[edit]
- Pikmin 3
- Clockwork Chasm
- Collect Treasure! × 22
- Battle Enemies! × 18
- Pikmin 4
- Sun-Speckled Terrace (does not appear above ground)
- Industrial Maze
- Sublevel 1 × 4
- Industrial Maze
- Serene Shores (does not appear above ground)
- Below-Grade Discotheque
- Sublevel 3 × 3
- Below-Grade Discotheque
- Hero's Hideaway (does not appear above ground)
- Doppelgänger's Den
- Sublevel 3 × 5
- Doppelgänger's Den
- Giant's Hearth (does not appear above ground)
- Ultimate Testing Range
- Sublevel 4 × 10
- Ultimate Testing Range
- Dandori Challenges
- Trial of the Sage Leaf 6th Story: Gimmick Gambit × 4
Gallery[edit]
|
This article or section is in need of more images. |
Some Blue Pikmin carrying Puckering Blinnow corpses across a conveyor belt.
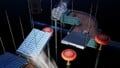
A group of moving walkways inside sublevel 3 of the Below-Grade Discotheque.


Trivia[edit]
- Conveyor belts, alongside conveyor switches, are the only tools in Pikmin 3 to only appear in Mission Mode.
- Pikmin sprouts will not be carried by conveyor belts.[1] This can be seen in the Battle Enemies! variant of the Clockwork Chasm, since there is a Swooping Snitchbug flying above a conveyor belt.
See also[edit]
References[edit]
- ^ Twitter clip on Twitter, published on September 29th, 2021, retrieved on September 29th, 2021
| Tools |
|---|
|
|
| Minor tools |