High scores menu
The high scores menu contains some records and statistics for runs of the main story mode. Generally, the faster and more efficient the player is, the higher they score in the tables.
Pikmin[edit]
| High scores menu | |
|---|---|

| |
| Accessed from | Options menu |
| Music | Pikmin |
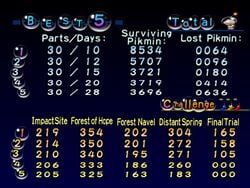
In Pikmin, the top half of the screen contains records for the story mode, while the bottom half contains records for Challenge Mode. In the story mode section, there are four columns, one for the ship parts gathered, one for the days it took to complete, one for the final number of surviving Pikmin, and one for the total of lost Pikmin. There are 5 rows, each one dedicated for a place in the high score table. The Challenge Mode section contains columns for each area, and rows for each of the five top places.
Pikmin 2[edit]
| High scores menu | |
|---|---|

| |
| Accessed from | Title screen, ending cutscene |
| Provides access to | Title screen |
| Music | High scores, Debt completion results, Treasure completion results |
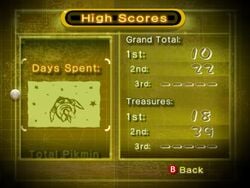
In Pikmin 2, the left side of the screen contains a scrollable list with the categories. The right side contains the top three values for that category, separated into two types: the value when the debt was repaid ("Grand Total") and the value for when all treasures were collected ("Treasures"). Any missing values are filled with "-----" or "--:--". The pictures used for the categories have a stylized simple look. The following categories exist:
- Days Spent: The fewer days spent to complete the game, the better.
- Total Pikmin Lost: The smaller the amount of Pikmin lost, the better. The same applies for the following categories as well.
- Pikmin Lost in Battle
- Pikmin Left Behind
- Pikmin Lost to Fire
- Pikmin Lost to Water
- Pikmin Lost to Electricity
- Pikmin Lost to Explosions
- Pikmin Lost to Poison
- Pikmin Born: The smaller the amount of Pikmin born, the harder it is to complete the game, so the higher the player scores. 1 is added to a type when a Pikmin of that type is born, but is subtracted by 1 when a Pikmin of that type gets converted. As a result, this can lead to negative numbers. All of this also applies to the following categories too.
- Red Pikmin Born
- Yellow Pikmin Born
- Blue Pikmin Born
- White Pikmin Born
- Purple Pikmin Born
- Total Play Time: The less time it takes to complete the game, the better.
A different high score screen also appears after the Debt Completion and Treasure Completion Cinemas in Pikmin 2. When it appears after the Debt Completion Cinema, its title is "Results Prior to Repaying Dept[sic]" on the original Gamecube releases, "Results Prior to Repaying Debt" in the North American New Play Control! release, and "Results up to Debt Repayment" in the European New Play Control! release and the Nintendo Switch release In its appearance after the Treasure Completion Cinema it is simply called "High Scores", no matter the release. Internally, both instances of this menu are collectively known as "result_final". This screen has a black background and a blue table, with bubbled images on the right representing all the screen's categories, and serving as a marker as to where the player is, in the menu. It still contains a scrollable list with the categories, but the records are also inside the list. Atop the best 3 scores is the player's score for that category. If this score enters the table, it gets highlighted in yellow on the individual score, and purple on the table. To the right of the screen, 8 pairs of icons appear, indicating the categories represented in each page of the list. The pictures used for this screen are full 3D renders, as opposed to the previously mentioned simplistically-styled images.
Pikmin 3[edit]
|
This article or section is in need of more images. Particularly: |
|
To do: Move menu-related info from Pikmin 3#Global rankings to here. |
|
The following article or section is in need of assistance from someone who plays Pikmin 3. |
Pikmin 3 provides high scores for Story Mode, and also every Mission Mode stage in both singleplayer and multiplayer. The high scores come in 2 forms, accessed by separate buttons in the lower right of the day selection menu, the final results menu, and the mission results menu. (The Mission Mode menu only displays the "Rankings" button, and displays the single best score for solo and co-op on the right side of the screen.)
The first form is called "Top 5", and contains the player's best 5 completions of the game or stage. Listed for Story Mode runs are the number of fruits collected, the number of days taken, the time in the day that the final boss was defeated (measured from 06:00 to 18:00), and the number of surviving Pikmin at the end. Listed for Mission Mode runs is the final score. If the list is viewed from a results menu, the player's most recent result will be highlighted.
The second form is called "Rankings", and this compares the player's best run to the best runs of other players around the world, with data obtained from SpotPass on the Wii U and Nintendo Switch Online on the Nintendo Switch. The data is shown in a graph, and there are 2 available: one showing the amount of fruit taken back (ranging from 0 to 65, with the full 66 not shown), and one showing the number of days needed to take home all fruit (ranging from 10 to 99 in descending order). If the graph is viewed from a results menu, the player's most recent result will be shown in addition to their best result.
The "Top 5" menu as it appears in the Side Stories of Pikmin 3 Deluxe.
Pikmin 3 Deluxe[edit]
This menu is mostly unchanged in Pikmin 3 Deluxe, but there are some changes. There are three "Top 5" lists in Story mode, separated by difficulty. The graphs in the "Rankings" section are also divided by difficulty, and the "Fruit collected" section includes the full 66 fruits as the rightmost number on the graph.
Pikmin 4[edit]
Despite having a final results menu like Pikmin and Pikmin 3, Story Mode's results aren't able to be re-viewed. However, in Olimar's Shipwreck Tale, the lowest real-world time taken to repair the S.S Dolphin, and the lowest amount of Pikmin deaths, for both single-player and and Co-op Mode, is stored in a menu named "High Score", which is accessible by pressing Y in the Olimar's Shipwreck Tale day selection menu.
Gallery[edit]
|
This article or section is in need of more images. Particularly: |
Pikmin 2 drawing for combat deaths.
Pikmin 2 drawing for drowning deaths.
Pikmin 2 drawing for poison deaths.
Pikmin 2 drawing for explosion deaths.
Pikmin 2 drawing for electrocution deaths.
Pikmin 2 drawing for burning deaths.
Trivia[edit]
- The high scores screen at the end of Pikmin 2 contains the top three scores. However, the in-game files for this screen call the image files
best5_<number>, suggesting that at one point, the game was meant to keep track of the five top scores. - In Pikmin 2, whenever Pikmin are left behind via being planted when one delves further into a cave, such deaths won’t count towards the Pikmin Left Behind counter, but instead the Pikmin Lost in Battle counter.
- Pikmin 3's Rankings menu show that the most common number of fruit collected (apart from all 66) is 40, and the most common number of days taken to retrieve all fruit is 44, as of October 11th, 2020.
- Pikmin 3 Deluxe's Rankings menu show that the most common number of fruit collected (apart from all 66) is 44 (On Normal difficulty), and the most common number of days taken to retrieve all fruit is 20 (On Normal difficulty), as of December 24th, 2024.


