Zest Bomb: Difference between revisions
No edit summary |
(New featured article – Breadbug.) |
||
| (9 intermediate revisions by 6 users not shown) | |||
| Line 22: | Line 22: | ||
|amount = 3 | |amount = 3 | ||
}} | }} | ||
The '''Zest Bomb''' ({{j|カボストニタリヨタリ|Kabosutonitariyotari|Just Like a ''{{w|Kabosu}}''}}) is a [[fruit]] in ''[[Pikmin 3]]'' and a [[treasure]] in {{p4}}. It is a {{w|Lime (fruit)|lime}}, and in ''Pikmin 3''{{'s}} [[Story Mode]] it can be found in the [[Tropical Wilds]], the [[Garden of Hope]], and the [[Distant Tundra]]. In ''Pikmin 4'', it can be found in [[Serene Shores]], [[Frozen Inferno]], and [[Cavern for a King]]. | The '''Zest Bomb''' ({{j|カボストニタリヨタリ|Kabosutonitariyotari|Just Like a ''{{w|Kabosu}}''}}) is a [[fruit]] in ''[[Pikmin 3]]'' and a [[treasure]] in {{p4}}. It is a {{w|Lime (fruit)|lime}}, and it produces 1.5 bottles of [[juice]] in ''Pikmin 3'' and is worth 60 [[Sparklium]] in ''Pikmin 4''. In ''Pikmin 3''{{'s}} [[Story Mode]], it can be found in the [[Tropical Wilds]], the [[Garden of Hope]], and the [[Distant Tundra]]. In ''Pikmin 4'', it can be found in the [[Serene Shores]], the [[Frozen Inferno]], and the [[Cavern for a King]]. | ||
== Collecting the fruit == | == Collecting the fruit == | ||
| Line 40: | Line 40: | ||
{{map icon | Zest Bomb | 120 | 202}} | {{map icon | Zest Bomb | 120 | 202}} | ||
}} | }} | ||
In the [[Garden of Hope]], there is a [[segment]] on the side with two sets of [[elevator platform]]s. The first set is rather simple, and the Zest Bomb is on a plateau near the platforms. To obtain it, first throw a Pikmin onto one of the two platforms, weighing it down. Next, throw a leader and five Pikmin onto the lower platform. On the opposite platform, throw at least 7 Pikmin on it to rise the other leader up. Switch to the other leader, and the fruit will be easily reachable. | In the [[Garden of Hope]], there is a [[segment]] on the side of the area with two sets of [[elevator platform]]s. The first set is rather simple, and the Zest Bomb is on a plateau near the platforms. To obtain it, first throw a Pikmin onto one of the two platforms, weighing it down. Next, throw a leader and five Pikmin onto the lower platform. On the opposite platform, throw at least 7 Pikmin on it to rise the other leader up. Switch to the other leader, and the fruit will be easily reachable. | ||
{{clear}} | {{clear}} | ||
| Line 48: | Line 48: | ||
{{map icon | Zest Bomb | 167 | 167}} | {{map icon | Zest Bomb | 167 | 167}} | ||
}} | }} | ||
The Zest Bomb in the [[Distant Tundra]] is | The Zest Bomb in the [[Distant Tundra]] is not far from the landing site, but it is recommended that you have rescued [[Captain Charlie]] before collecting it. Throw 2 leaders over to the plateau next to the [[Dodge Whistle]]. To the far left of the cliff is a [[Bouncy Mushroom]]. Throw a leader and a large amount of Yellow Pikmin onto it. Afterwards, the leader will be on another plateau near the landing site with 2 [[Bearded Amprat]]s and a [[Citrus Lump]]. Kill the enemies and proceed to have the Pikmin work on assembling a slope with the nearby stack of [[hay]]. With the slope complete, the fruit is able to be reached, by following a narrow path between a wall and a small cliff. An [[Arctic Cannon Larva]] will shoot snowballs along this path, so use the alcoves to the left for safety. At the end lies the Zest Bomb encased in a [[crystal]]. Destroy it with [[Rock Pikmin]] to access the fruit. Alternatively, if you have not rescued Charlie, Rock Pikmin can be thrown from the ledge below, but this is an unreliable method. | ||
{{clear}} | {{clear}} | ||
| Line 56: | Line 56: | ||
=== Serene Shores === | === Serene Shores === | ||
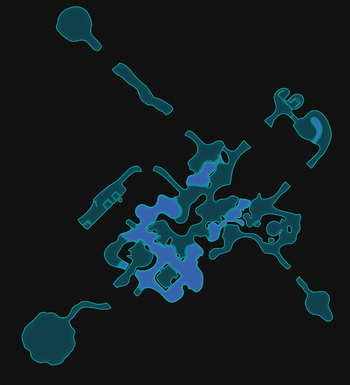
{{location map | width = 350 | height = 325 | image = Serene Shores high tide map.png | caption = Location of the Zest Bomb in the Serene Shores. | icons = | |||
{{map icon | Zest Bomb | v=P4 | 293 | 200}} | |||
}} | |||
The Zest Bomb in the [[Serene Shores]] is submerged underwater in the southeasternmost body of water. A cluster of [[Dawn Pustules]] is located nearby. It is guarded by a [[Pricklepuff]] and four [[Puckering Blinnow]]s, which should be defeated before attempting to collect this treasure. It can only be collected by [[Blue Pikmin]], or by [[Oatchi]]'s Doggy-Paddle level 3 skill. | |||
{{clear}} | |||
=== Frozen Inferno === | === Frozen Inferno === | ||
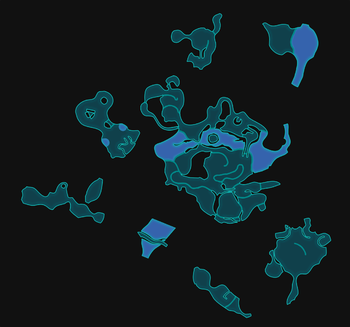
There is a Zest Bomb inside | {{location map | width = 300 | height = 275 | image = Frozen Inferno Sublevel 3 map.png | caption = Location of the Zest Bomb on sublevel 3 of the [[Frozen Inferno]]. | icons = | ||
{{map icon | Zest Bomb | v=P4 | 242 | 70}} | |||
}} | |||
There is a Zest Bomb inside the [[Freezecake]] in the northeastern room of sublevel 3 of the [[Frozen Inferno]]. To collect this treasure, you must first defeat the Freezecake, then retrieve the treasure. | |||
{{clear}} | |||
=== Cavern for a King === | === Cavern for a King === | ||
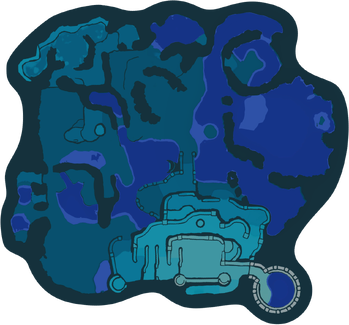
There is a Zest Bomb lying in a pond along the western edge of sublevel 19 of the [[Cavern for a King]], | {{location map | width = 275 | height = 300 | image = Cavern for a King Sublevel 19 map.png | caption = Location of the Zest Bomb on sublevel 19 of the [[Cavern for a King]]. | icons = | ||
{{map icon | Zest Bomb | v=P4 | 70 | 160}} | |||
}} | |||
There is a Zest Bomb lying in a pond along the western edge of sublevel 19 of the [[Cavern for a King]], near to three [[Cupid's Grenade]]s and a [[Blonde Impostor]]. It can only be collected by [[Blue Pikmin]], [[Winged Pikmin]], or [[Oatchi]]. | |||
{{notes|brittany=y}} | {{clear}} | ||
== Notes == | |||
=== Brittany's notes === | |||
{{transcript|{{Notes:Zest Bomb/brittany}}|block=y}} | |||
=== Schnauz's notes === | === Schnauz's notes === | ||
| Line 92: | Line 110: | ||
Zest Bomb Distant Tundra.jpg|The Zest Bomb in the [[Distant Tundra]]. | Zest Bomb Distant Tundra.jpg|The Zest Bomb in the [[Distant Tundra]]. | ||
Zest Bomb P3 closeup.jpg|Closeup of the Zest Bomb in the Garden of Hope. | Zest Bomb P3 closeup.jpg|Closeup of the Zest Bomb in the Garden of Hope. | ||
Zest Bomb P3 analysis.png|The Zest Bomb being analyzed in ''Pikmin 3''. | |||
P4 Zest Bomb Serene Shores location.jpg|The Zest Bomb in the [[Serene Shores]], in the location it is discovered. | P4 Zest Bomb Serene Shores location.jpg|The Zest Bomb in the [[Serene Shores]], in the location it is discovered. | ||
P4 Zest Bomb Frozen Inferno location.jpg|The Zest Bomb in the [[Frozen Inferno]], in the location it is discovered. | |||
P4 Zest Bomb Cavern for a King location.jpg|The Zest Bomb in the [[Cavern for a King]], in the location it is discovered. | |||
Purple Pikmin 3 Artwork 00.jpg|Artwork of a Zest Bomb being [[carry|carried]] by a [[Purple Pikmin]]. | Purple Pikmin 3 Artwork 00.jpg|Artwork of a Zest Bomb being [[carry|carried]] by a [[Purple Pikmin]]. | ||
Real Lime.jpg|A real world lime. | Real Lime.jpg|A real world lime. | ||
| Line 99: | Line 120: | ||
== Trivia == | == Trivia == | ||
[[File:Weird Juice.jpg|thumb|The result of combining Juicy Gaggle and Zest Bomb juice.]] | [[File:Weird Juice.jpg|thumb|The result of combining Juicy Gaggle and Zest Bomb juice.]] | ||
* If the player obtains a Zest Bomb and a [[Juicy Gaggle]] consecutively such that both [[juice]] | * If the player obtains a Zest Bomb and a [[Juicy Gaggle]] consecutively, such that both types of [[juice]] are combined into the same bottle, the resulting combination will be an odd cyan color, as explained [[Fruit#Blending|here]]. | ||
{{clear}} | {{clear}} | ||
| Line 107: | Line 128: | ||
|Jap = カボストニタリヨタリ | |Jap = カボストニタリヨタリ | ||
|JapR = Kabosu-to-nitari-yotari | |JapR = Kabosu-to-nitari-yotari | ||
|JapM = Just Like a ''{{w|Kabosu}}'' | |JapM = Just Like a ''{{w|Kabosu}}''; ''kabosu'' is a kind of specific green citrus fruit produced in limited sub-tropical areas of Japan. | ||
|ChiTrad = 酷似初戀滋味 | |ChiTrad = 酷似初戀滋味 | ||
|ChiTradR = Kùsì Chūliàn Zīwèi | |ChiTradR = Kùsì Chūliàn Zīwèi | ||
| Line 134: | Line 155: | ||
* [[Face Wrinkler]] | * [[Face Wrinkler]] | ||
{{featured|{{date|1|June|2024}}|{{date|1|August|2024}}}} | |||
{{Tropical Wilds}} | {{Tropical Wilds}} | ||
{{Garden of Hope}} | {{Garden of Hope}} | ||
Latest revision as of 17:25, August 1, 2024
| |||
|---|---|---|---|
| |||
| Juice amount | 1.5 (0.75 in Ultra-Spicy mode) | ||
| Mission Mode value | |||
| Weight | 5 | ||
| Max. carriers | 10 (normally) | ||
| Locations | Garden of Hope, Tropical Wilds, Distant Tundra | ||
| Mission Mode locations | Thirsty Desert Remix, Fortress of Festivity | ||
| Bingo Battle locations | None | ||
| Side Stories locations | River | ||
| |||
|---|---|---|---|
| Series | Autumn Harvest Series | ||
| Value | |||
| Weight | 7 | ||
| Maximum carriers | 14 | ||
| Locations | Serene Shores, Frozen Inferno, Cavern for a King | ||
| Dandori Challenge stages | None | ||
| Dandori Battle stages | Trial Run, Battle in a Box, Dandori Castle, Leafy Showdown, Hot Sandy Duel, Final Battle | ||
| Total amount | 3 | ||
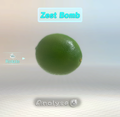
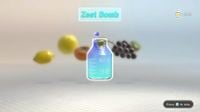
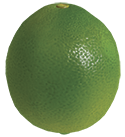
The Zest Bomb (カボストニタリヨタリ?, lit.: "Just Like a Kabosu") is a fruit in Pikmin 3 and a treasure in Pikmin 4. It is a lime, and it produces 1.5 bottles of juice in Pikmin 3 and is worth 60 Sparklium in Pikmin 4. In Pikmin 3's Story Mode, it can be found in the Tropical Wilds, the Garden of Hope, and the Distant Tundra. In Pikmin 4, it can be found in the Serene Shores, the Frozen Inferno, and the Cavern for a King.
Collecting the fruit[edit]
|
The following article or section contains guides. |
Tropical Wilds[edit]
- See also: Peckish Aristocrab strategy.
The Zest Bomb in the Tropical Wilds is held inside a Peckish Aristocrab located in the large, shallow body of water filled with Yellow Wollywogs in the northern part of the area. Killing the Aristocrab gives the fruit. Since the crab is usually in the water, it is recommended to defeat it with bomb rocks, as Rock Pikmin cannot traverse through the water. Although Winged Pikmin or Blue Pikmin will usually be needed to retrieve the fruit, the Aristocrab can be lured far enough out of the water to drop it on dry land once it dies.
Garden of Hope[edit]
In the Garden of Hope, there is a segment on the side of the area with two sets of elevator platforms. The first set is rather simple, and the Zest Bomb is on a plateau near the platforms. To obtain it, first throw a Pikmin onto one of the two platforms, weighing it down. Next, throw a leader and five Pikmin onto the lower platform. On the opposite platform, throw at least 7 Pikmin on it to rise the other leader up. Switch to the other leader, and the fruit will be easily reachable.
Distant Tundra[edit]
The Zest Bomb in the Distant Tundra is not far from the landing site, but it is recommended that you have rescued Captain Charlie before collecting it. Throw 2 leaders over to the plateau next to the Dodge Whistle. To the far left of the cliff is a Bouncy Mushroom. Throw a leader and a large amount of Yellow Pikmin onto it. Afterwards, the leader will be on another plateau near the landing site with 2 Bearded Amprats and a Citrus Lump. Kill the enemies and proceed to have the Pikmin work on assembling a slope with the nearby stack of hay. With the slope complete, the fruit is able to be reached, by following a narrow path between a wall and a small cliff. An Arctic Cannon Larva will shoot snowballs along this path, so use the alcoves to the left for safety. At the end lies the Zest Bomb encased in a crystal. Destroy it with Rock Pikmin to access the fruit. Alternatively, if you have not rescued Charlie, Rock Pikmin can be thrown from the ledge below, but this is an unreliable method.
Collecting the treasure[edit]
|
The following article or section contains guides. |
Serene Shores[edit]
The Zest Bomb in the Serene Shores is submerged underwater in the southeasternmost body of water. A cluster of Dawn Pustules is located nearby. It is guarded by a Pricklepuff and four Puckering Blinnows, which should be defeated before attempting to collect this treasure. It can only be collected by Blue Pikmin, or by Oatchi's Doggy-Paddle level 3 skill.
Frozen Inferno[edit]
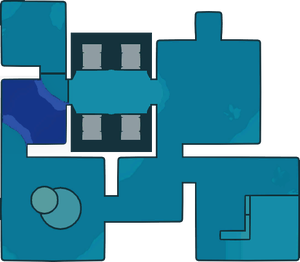
There is a Zest Bomb inside the Freezecake in the northeastern room of sublevel 3 of the Frozen Inferno. To collect this treasure, you must first defeat the Freezecake, then retrieve the treasure.
Cavern for a King[edit]
There is a Zest Bomb lying in a pond along the western edge of sublevel 19 of the Cavern for a King, near to three Cupid's Grenades and a Blonde Impostor. It can only be collected by Blue Pikmin, Winged Pikmin, or Oatchi.
Notes[edit]
Brittany's notes[edit]
Schnauz's notes[edit]
Olimar's notes[edit]
Louie's notes[edit]
Technical information[edit]
| Pikmin 3 technical information (?) | |
|---|---|
| Internal name | lime
|
| Juice | 1.5 |
| Juice color | (150, 255, 0, 255) |
| Mission Mode points | 70 |
| "Size"? | 3 |
Gallery[edit]
The Zest Bomb in the Tropical Wilds.
The Zest Bomb in the Garden of Hope.
The Zest Bomb in the Distant Tundra.
The Zest Bomb in the Serene Shores, in the location it is discovered.
The Zest Bomb in the Frozen Inferno, in the location it is discovered.
The Zest Bomb in the Cavern for a King, in the location it is discovered.
Artwork of a Zest Bomb being carried by a Purple Pikmin.
Trivia[edit]
- If the player obtains a Zest Bomb and a Juicy Gaggle consecutively, such that both types of juice are combined into the same bottle, the resulting combination will be an odd cyan color, as explained here.
Names in other languages[edit]
| Language | Name | Meaning |
|---|---|---|
| カボストニタリヨタリ? Kabosu-to-nitari-yotari |
Just Like a Kabosu; kabosu is a kind of specific green citrus fruit produced in limited sub-tropical areas of Japan. | |
(traditional) |
酷似初戀滋味 Kùsì Chūliàn Zīwèi |
Just Like the Face Wrinkler |
(simplified) |
酷似初恋滋味 Kùsì Chūliàn Zīwèi |
Just Like the Face Wrinkler |
| Frisheidsbom | Freshness bomb | |
| Grimacier aigri | Soured grimace maker | |
| Bitterbombe | Bitterbomb | |
| Deodorfrutto | Deodorant fruit | |
| 청귤데칼코마니 Cheonggyul-Dekalkomani |
Cheonggyul Décalcomanie | |
| Bomba caretadora | Ugly-facenator bomb | |
| Entusiasmo verde | Green enthusiasm |
See also[edit]
| Garden of Hope | |||||||||||||||||
|---|---|---|---|---|---|---|---|---|---|---|---|---|---|---|---|---|---|
|
Click an object |
| ||||||||||||||||
| Distant Tundra | ||||||||||||||||||
|---|---|---|---|---|---|---|---|---|---|---|---|---|---|---|---|---|---|---|
|
Click an object |
| |||||||||||||||||
| Serene Shores | ||||||||||||||||||||||||||||||||||||
|---|---|---|---|---|---|---|---|---|---|---|---|---|---|---|---|---|---|---|---|---|---|---|---|---|---|---|---|---|---|---|---|---|---|---|---|---|
|
Click an object |
| |||||||||||||||||||||||||||||||||||
| Fruits | |||||||||
|---|---|---|---|---|---|---|---|---|---|
| Astringent Clump • Blonde Impostor • Citrus Lump • Crimson Banquet • Crunchy Deluge • Cupid's Grenade • Dapper Blob • Dawn Pustules • Delectable Bouquet • Disguised Delicacy • Dusk Pustules • Face Wrinkler • Fire-Breathing Feast • Heroine's Tear • Insect Condo • Juicy Gaggle • Lesser Mock Bottom • Mock Bottom • Pocked Airhead • Portable Sunset • Scaly Custard • Searing Acidshock • Seed Hive • Slapstick Crescent • Stellar Extrusion • Sunseed Berry • Tremendous Sniffer • Velvety Dreamdrop • Wayward Moon • Zest Bomb | |||||||||
| Treasure Catalog | |
|---|---|
| Rubber Cutie Series | Universal Rubber Cutie • Planetary Rubber Cutie • Stately Rubber Cutie • Dapper Rubber Cutie |
| Sweet Tooth Series | Sweet Stumble-Not • Sweet Torrent • Deceptive Snack • Cookie of Nibbled Circles • Cookie of Prosperity • Vanishing Cookie • Love's Fortune Cookie • Hearty Container • Jiggle-Jiggle • S.S. Berry • S.S. Peppermint • S.S. Chocolate |
| Dazzle Series | Unbreakable Promise • Golden Vaulting Table • Olfactory Sculpture • Princess Pearl • Sticky Jewel • Hoop of Healing • Hoop of Passion • Hoop of Fortune |
| Recreation Recollection Series | Tandem Trainer • Sphere of Fuzzy Feelings • Orbital Communication Sphere • Orb of Destruction |
| Gimme Gimme Series | Greed-Inducement Device • Disk of Joyous Wisdom • Disk of Angry Wisdom • Disk of Sorrowful Wisdom • Disk of Amusing Wisdom • Disk of Surprising Wisdom |
| Modern Amenities Series | Secured Satchel • Floral Instigator • Fastening Item • Trap Lid • Perforated Raft • Gift of Friendship |
| Memory Fragment Series | Memory Fragment (Top Left) • Memory Fragment (Top-ish) • Memory Fragment (Top...Probably?) • Memory Fragment (Top Right) • Memory Fragment (Left Edge) • Memory Fragment (Center Left) • Memory Fragment (Center Right) • Memory Fragment (Right Edge) • Memory Fragment (Bottom Left) • Memory Fragment (Bottom-ish) • Memory Fragment (Bottom...Probably?) • Memory Fragment (Bottom Right) |
| Extravagant Breakfast Series | Condensed Sunshine • Flaky Temptation • Cushion Cake • Puzzle Snack |
| Sacred Sphere Series | Sphere of Desire • Sphere of Family • Sphere of Heart • Sphere of Beginnings • Sphere of Vitality • Sphere of Calm • Sphere of Good Fortune • Sphere of Trust • Sphere of Support • Sphere of Truth |
| Spring Crop Series | Sunseed Berry • Cupid's Grenade • Searing Acidshock • Velvety Dreamdrop • Astringent Clump • Wayward Moon |
| Summer Fruit Series | Lesser Mock Bottom • Mock Bottom • Dawn Pustules • Dusk Pustules • Crimson Banquet • Juicy Gaggle |
| Autumn Harvest Series | Zest Bomb • Delectable Bouquet • Portable Sunset • Tremendous Sniffer • Crunchy Deluge • Disguised Delicacy • Blonde Impostor |
| Winter Reserve Series | Merciless Extractor • Citrus Lump • Face Wrinkler • Pocked Airhead • Insect Condo |
| Tropical Pickings Series | Dapper Blob • Scaly Custard • Seed Hive • Stellar Extrusion • Heroine's Tear • Slapstick Crescent • Fire-Breathing Feast |
| Bedtime Series | Dusty Bed • Doggy Bed • Birdy Bed • Fishy Bed |
| Three Generations Series | Granddaughter Doll Head • Gifting Vase • Daughter Doll Head • Mooching Vase • Mama Doll Head • Empty Vase |
| Gourmet Series | King of Meats • Maestro of Flavor • Belted Delicacy • Fish-Bed Snack • The Four Grill Brothers |
| Soulful Musician Series | Harmonic Synthesizer • Spouse Alert • Path Creator • Time Marker • Wind Detector • Ambiguous Hostel • Mega Horn • Mechanical Harp (Memory Song) • Mechanical Harp (Lullabies) • Mechanical Harp (Windmills) • Emperor Whistle • Shake-a-Smile • Amplified Amplifier |
| Great Adventure Series | Double Dragon-Eyed Scope • Temporal Mechanism • Director of Destiny • Detective's Truth Seeker |
| Roundabout Express Series | Unlimited Locomotive • Middle-Management Tank Car • Leisure Car • Life Station • Straight-and-Narrow Track • Turn-of-Events Track • Back-at-the-Beginning Track • Thrill-Ride Track |
| Oral Arguments Series | Mouth of Lies • Monster Teeth • Brush of Wisdom • Brush of Foolishness • False Lollipop • Maternal Sculpture • Bathing Pool |
| Assembled Courage Series | Think-Tank Combobot • Nexus Combobot • Fist-Force Combobot • Peacemaker Combobot • Kick-Start Combobot • Sure-Footed Combobot |
| Soulful Artist Series | Uniquely You Goo • Decorative Goo • Illumination Goo • Noble Goo • True Goo • Ambiguous Goo • Captivation Goo • Refreshing Goo • Neon Goo |
| Ancient Secrets Series | Lamp of Inspiration • Beckoning Mannequin • Ancient Statue Head • Contemplation Station • Unfinished Statue • Persistence Machine • Giant's Fossil • Expression Hider • Buddy Display |
| Gifts from the Sages Series | Heat Sensor • Internal-Clock Measurer • Solar-Powered Computing Machine • Number Jumper |
| Paleontology Series | Octoplus • Mystery Squish Fish • Newtolite Shell • Slipper-Bug Fossil |
| Point of Honor Series | Relentless Spear • Noble Bident • Shattering Lance |
| Newly Nostalgic Series | Micromanagement Station • Glinty Circular Disc • Life Controller • Spinning Memories Plank • Masterpiece Plank • Telekinesis Detector • Connection Detector • Creativity Conduit • Stone of Advancement • Winged Freedom Sculpture |
| Ultra-Hyper-Technology Series | Dimension Converter • Soul Reverberator • Personal-Injury Plank • Don't-See-It Specs |
| Nature's Candy Series | Love Nugget • Crush Nugget • Anxious Sprout • Crew-Cut Gourd • Child of the Earth • Daughter of the Earth • Mysterious Carriage • Snack Bean • Foolish Fruit |
| Sword & Shield Series | Blast Shield • Ring-of-Return Shield • Satellite Shield • Heroic Shield • Shooting-Star Shield • Heart Sword • Spirit Sword • Ice Sword • Heroic Sword • Bright Sword |
| Toys of Giants Series | Unfloatable Boat • Faux Fishy • Space Spinner • Sweat-Soaked Blue Bird • Skin of the Phoenix • Priceless Bird • Aspiration-Ritual Ball • Aspiration-Ritual Pole • Divine Balloon |
| Collection Obsession Series | Deity's Portrait • Devil's Portrait • Courage Emblem • Power Emblem • Wisdom Emblem • Love Emblem • Money Emblem • Work Emblem • Gold Nugget |
| Hands of Fate Series | Long-Shot Totem • Go-with-the-Flow Totem • Chance Totem • Difficult-Choice Totem • Talisman of Life (Crane) • Talisman of Life (Cherry Blossom) • Talisman of Life (Moon) • Talisman of Life (Rain) • Talisman of Life (Phoenix) |
