
Giant's Hearth: Difference between revisions
mNo edit summary |
No edit summary |
||
| (32 intermediate revisions by 17 users not shown) | |||
| Line 1: | Line 1: | ||
{{game icons|p4=y}} | {{game icons|p4=y}} | ||
{{infobox area | {{infobox area | ||
|screenshot | |screenshot = P4 Giant's Hearth.jpg | ||
|map | |map = Giant's Hearth map.png | ||
|treasures | |rescues = 8 | ||
|caves | |treasures = 55 | ||
| | |onions = 3 | ||
| | |caves = 3 | ||
|requirements | |dandori_c = 3 | ||
|next | |dandori_b = 1 | ||
|music | |suggested = {{icon|Red Pikmin|v=P4 HUD}} {{icon|Blue Pikmin|v=P4 HUD}} {{icon|Rock Pikmin|v=P4 HUD}} | ||
|wild = {{icon|Red Pikmin|v=P4 HUD}} {{icon|Rock Pikmin|v=P4 HUD}} {{icon|Winged Pikmin|v=P4 HUD}} {{icon|Purple Pikmin|v=P4 HUD}} {{icon|White Pikmin|v=P4 HUD}} | |||
|requirements = {{sparklium|p4|11,000}} and cure Olimar | |||
|next = [[Primordial Thicket]] | |||
|music = [[Music in Pikmin 4#Giant's Hearth|''Giant's Hearth'']] | |||
}} | }} | ||
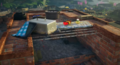
The '''Giant's Hearth''' is the fifth [[area]] in ''[[Pikmin 4]]''. It takes place just outside a camping site with a tent and fences visible in the background, and an extinguished brick fire pit and a wooden folding chair can be seen as prominent parts of the level. This area has {{sparklium|p4|5,200}} worth of treasure, of which {{sparklium|p4|1,760}} is above ground. | |||
The '''Giant's Hearth''' is the fifth [[area]] in ''Pikmin 4 | |||
== Plot == | == Plot == | ||
The [[Rescue Corps]] goes to this area in search of [[Nelle]], a [[Koppaite]] who may be able to cure [[Oatchi]]'s tail. Right after landing, the [[Pikmin 4 player character|player character]] and Oatchi see [[Louie]] and [[Moss]] with a [[castaway]] who looks like [[Alph]] from {{p3}}. They follow Louie into a cave where he tries to turn the castaway into a [[leafling]]. The process fails and he challenges them to a [[Dandori Battle]]. Upon defeat, Louie runs off with Moss and the Rescue Corps duo saves the castaway, a different Koppaite named [[Yorke]]. In one of the area's three regular caves, the player and Oatchi also rescue Yorke's partner [[Don Bergman]]. Yorke and Don Bergman can be rescued in either order. | |||
After Yorke and Don Bergman are reunited, [[Shepherd]] asks Don Bergman what happened to Nelle. He remembers seeing a [[Ancient Sirehound|dog-like creature]] drag her further into the [[Primordial Thicket]]. | |||
== Layout == | == Layout == | ||
{{game help|p4|Describe the layout of the area and its key sections.}} | {{game help|p4|Describe the layout of the area and its key sections.}} | ||
The following notable features can be found in this area. | |||
* A pool section with a few [[Wolpole]]s. | * A pool section with a few [[Wolpole]]s. | ||
* A large campfire, with | * A large campfire, with a pair of bases nearby. | ||
* A working water pump in the [[Dandori Battle]] area. | * A working water pump in the [[Dandori Battle]] area. | ||
* A box in which [[Dream Home]] is situated. | * A box in which [[Dream Home]] is situated. | ||
* An alley of pillows. | * An alley of pillows. | ||
* Several Sprinklers, requiring a [[ | * Several Sprinklers, requiring a [[clay]] valve to be built. | ||
* Several Dried plant obstacles requiring [[ | * Several Dried plant obstacles requiring [[fire starter]]s to remove them. | ||
* A [[reinforced wall]] that leads to the area's Sovereign Bulblax. | * A [[reinforced wall]] that leads to the area's Sovereign Bulblax and the Rock [[Onion]]. | ||
* As part of the background: | |||
** The trunk of a tree. Its leaves are too high to see. | |||
** A red camp chair. Its legs are visible on the terrain, and the player character can go under it. | |||
=== Bases === | === Bases === | ||
* Line of Logs: the default landing site | |||
* Line of Logs | * Abandoned Throne: guarded by a [[Fiery Bulblax]] | ||
* Abandoned Throne | * The Central Flame: covered by [[dried plant]]s | ||
* The Central Flame | |||
== Caves == | == Caves == | ||
{|class="wikitable" style="text-align: center;" | |||
!Image | |||
!Name | |||
!Sublevels | |||
![[Castaway]]s | |||
![[Treasure]]s | |||
![[Onion]]s | |||
!Suggested [[Pikmin]] | |||
!Wild Pikmin | |||
|- | |||
|[[File:P4 Voyage Log Louie 12.png|100px]] | |||
|[[Ultimate Testing Range]] | |||
|5 | |||
|2 | |||
|12 | |||
|0 | |||
|{{icon|Winged Pikmin|v=P4 HUD}} {{icon|White Pikmin|v=P4 HUD}} | |||
|{{icon|Winged Pikmin|v=P4 HUD}} {{icon|White Pikmin|v=P4 HUD}} | |||
|- | |||
|[[File:P4 Voyage Log Louie 13.png|100px]] | |||
|[[Dream Home]] | |||
|1 | |||
|1 | |||
|14 | |||
|1 | |||
|{{icon|Yellow Pikmin|v=P4 HUD}} {{icon|Winged Pikmin|v=P4 HUD}} {{icon|Purple Pikmin|v=P4 HUD}} | |||
|None | |||
|- | |||
|[[File:P4 Voyage Log Louie 14.png|100px]] | |||
|[[Cradle of the Beast]] | |||
|3 | |||
|1 | |||
|12 | |||
|0 | |||
|{{icon|Red Pikmin|v=P4 HUD}} {{icon|Rock Pikmin|v=P4 HUD}} {{icon|Purple Pikmin|v=P4 HUD}} | |||
|{{icon|Red Pikmin|v=P4 HUD}} {{icon|Rock Pikmin|v=P4 HUD}} | |||
|} | |||
=== Dandori Challenge 1 === | === Dandori Challenge 1 === | ||
Located at the top of the fire pit/grill, on the side that's only accessible by using a fire starter to reach the protruding bricks that can allow Oatchi to jump all the way to the top. | |||
=== Dandori Challenge 2 === | === Dandori Challenge 2 === | ||
Located past a sprinkler on the plateau near the Line of Logs base. | |||
Located past a sprinkler on the plateau near the | |||
=== Dandori Challenge 3 === | === Dandori Challenge 3 === | ||
Located near the entrance to [[Dream Home]], can be accessed either by pulling down a clipboard to make a bridge for the gap above or by turning off a sprinkler below and using a fire starter to reach the alcove. | Located near the entrance to [[Dream Home]], can be accessed either by pulling down a clipboard to make a bridge for the gap above or by turning off a sprinkler below and using a fire starter to reach the alcove. | ||
| Line 55: | Line 94: | ||
== Objects == | == Objects == | ||
=== Treasures === | === Treasures === | ||
{{columns|2| | {{columns|2| | ||
* {{icon|Anxious Sprout|v=P4|y}} | * {{icon|Anxious Sprout|v=P4|y}} × 1 | ||
* {{icon|Birdy Bed|v=P4|y}} | * {{icon|Birdy Bed|v=P4|y}} × 1 | ||
* {{icon|Crew-Cut Gourd|v=P4|y}} | * {{icon|Crew-Cut Gourd|v=P4|y}} × 1 | ||
* {{icon|Disk of Amusing Wisdom|v=P4|y}} | * {{icon|Disk of Amusing Wisdom|v=P4|y}} × 1 | ||
* {{icon|Face Wrinkler|v=P4|y}} | * {{icon|Face Wrinkler|v=P4|y}} × 1 | ||
* {{icon|Fish-Bed Snack|v=P4|y}} | * {{icon|Fish-Bed Snack|v=P4|y}} × 1 | ||
* {{icon|Ice Sword|v=P4|y}} × 2 | * {{icon|Ice Sword|v=P4|y}} × 2 | ||
* {{icon|Love Nugget|v=P4|y}} | * {{icon|Love Nugget|v=P4|y}} × 1 | ||
* {{icon|Persistence Machine|v=P4|y}} | * {{icon|Persistence Machine|v=P4|y}} × 1 | ||
* {{icon|Seed Hive|v=P4|y}} | * {{icon|Seed Hive|v=P4|y}} × 1 | ||
* {{icon|Slapstick Crescent|v=P4|y}} | * {{icon|Slapstick Crescent|v=P4|y}} × 1 | ||
* {{icon|Slipper-Bug Fossil|v=P4|y}} | * {{icon|Slipper-Bug Fossil|v=P4|y}} × 1 | ||
* {{icon|Snack Bean|v=P4|y}} | * {{icon|Snack Bean|v=P4|y}} × 1 | ||
* {{icon|Stately Rubber Cutie|v=P4|y}} | * {{icon|Stately Rubber Cutie|v=P4|y}} × 1 | ||
* {{icon|The Four Grill Brothers|v=P4|y}} | * {{icon|The Four Grill Brothers|v=P4|y}} × 1 | ||
* {{icon|Universal Rubber Cutie|v=P4|y}} | * {{icon|Universal Rubber Cutie|v=P4|y}} × 1 | ||
}} | }} | ||
=== Onions === | === Onions === | ||
*{{icon| | * {{icon|Flarlic|v=P4|y}} × 1 | ||
*{{icon| | * {{icon|Rock Onion|v=P4|y}} × 1 | ||
=== Enemies === | === Enemies === | ||
{{columns|2| | {{columns|2| | ||
* {{icon|Arachnode|v=P4|y}} | * {{icon|Arachnode|v=P4|y}} × 4 | ||
* {{icon|Bloomcap Bloyster|v=P4|y}} | * {{icon|Bloomcap Bloyster|v=P4|y}} × 1 | ||
* {{icon|Bug-Eyed Crawmad|v=P4|y}} | * {{icon|Bug-Eyed Crawmad|v=P4|y}} × 2 | ||
* {{icon|Dwarf Bulbear|v=P4|y}} | * {{icon|Dwarf Bulbear|v=P4|y}} × 6 | ||
* {{icon|Fiery Bulblax|v=P4|y}} | * {{icon|Fiery Bulblax|v=P4|y}} × 2 | ||
* {{icon|Fiery Dweevil|v=P4|y}} | * {{icon|Fiery Dweevil|v=P4|y}} × 3 | ||
* {{icon|Iridescent Glint Beetle|v=P4|y}} | * {{icon|Iridescent Flint Beetle|v=P4|y}} × 1 | ||
* {{icon|Mama Sheargrub|v=P4|y}} | * {{icon|Iridescent Glint Beetle|v=P4|y}} × 1 | ||
* {{icon|Masterhop|v=P4|y}} | * {{icon|Mama Sheargrub|v=P4|y}} × 2 | ||
* {{icon|Mitite|v=P4|y}} | * {{icon|Masterhop|v=P4|y}} × 2 | ||
* {{icon|Sovereign Bulblax|v=P4|y}} | * {{icon|Mitite|v=P4|y}} (group of 10) × 2 | ||
* {{icon|Spotty Bulbear|v=P4|y}} | * {{icon|Sovereign Bulblax|v=P4|y}} × 1 | ||
* {{icon|Wolpole|v=P4|y}} | * {{icon|Spotty Bulbear|v=P4|y}} × 3 | ||
* {{icon|Wolpole|v=P4|y}} × 5 | |||
}} | }} | ||
=== Obstacles === | === Obstacles === | ||
* | {{columns|2| | ||
* | * {{icon|Arachnode web|v=P4|y}} × 4 | ||
* | * {{icon|Cardboard box|y}} × 1 | ||
* | * {{icon|Clipboard|v=P4|y}} × 1 | ||
* | * {{icon|Crystal wall|v=P4|y}} × 1 | ||
* | * {{icon|Dried plant|v=P4|y}} × 65 | ||
* | * {{icon|Iron fence|v=P4|y}} × 1 | ||
* | * {{icon|Paper bag|v=P4|y}} × 2 | ||
* {{icon|Reinforced wall|v=P4|y}} × 1 | |||
* {{icon|Sprinkler|v=P4|y}} × 4 | |||
* {{icon|Water body|v=P4|y}} × 7 | |||
}} | |||
=== Tools === | === Tools === | ||
* | {{columns|2| | ||
* | * {{icon|Bonfire altar|v=P4|y}} × 9 (8 × unlit, 1 × lit) | ||
* {{icon|Bouncy Mushroom|v=P4|y}} × 2 | |||
* {{icon|Clay bridge|v=P4|y}} × 1 | |||
* {{icon|Clay mound|v=P4|y}} × 2 | |||
* {{icon|Clay valve|v=P4|y}} × 3 | |||
* {{icon|Climbing rope|v=P4|y}} × 1 | |||
* {{icon|Climbing stick|v=P4|y}} × 1 | |||
* {{icon|Climbing wall|v=P4|y}} × 1 | |||
* {{icon|Dirt-mound|v=P4|y}} × 5 (10 raw materials × 3, bomb rock × 2) | |||
* {{icon|Fire starter|v=P4|y}} × 1 | |||
* {{icon|Geyser|v=P4|y}} × 1 | |||
* {{icon|Switch|v=P4|y}} × 1 | |||
}} | |||
=== Others === | === Others === | ||
*{{icon|Burgeoning Spiderwort|v= | * {{icon|Burgeoning Spiderwort|v=P4|y}} × 2 | ||
* | * {{icon|Egg|v=P4|y}} × 2 (1 × small, 1 × large) | ||
* {{icon|Pellet Posy|v=P4|y}} × 13 (9 × 1 pellet, 4 × 5 pellet) | |||
* {{icon|Raw material pile|v=P4|n=Pile of raw material|l=Raw material|y}} × 5 (1 pile of 10, 3 piles of 20, 1 pile of 30) | |||
== Night | == Night expeditions == | ||
=== Line of Logs === | === Line of Logs === | ||
{{infobox night expedition | |||
|name = Line of Logs | |||
|image = P4 Save File Giant's Hearth Line of Logs Night.png | |||
|size = 200px | |||
|danger = 3 | |||
|lumiknolls = 2 | |||
|enemies = 21 | |||
|glow_pikmin = 10 | |||
}} | |||
There are two [[Lumiknoll|Lumiknolls]], the blue one located directly at the base and the orange one located up north near the clay mound. This location has a danger level of 3 and starts the player off with 10 [[Glow Pikmin]]. | There are two [[Lumiknoll|Lumiknolls]], the blue one located directly at the base and the orange one located up north near the clay mound. This location has a danger level of 3 and starts the player off with 10 [[Glow Pikmin]]. | ||
| Line 127: | Line 194: | ||
* {{icon|Spotty Bulbear|v=P4|y}} × 3 | * {{icon|Spotty Bulbear|v=P4|y}} × 3 | ||
}} | }} | ||
==== Objects ==== | |||
* {{icon|Glow pellet|v=P4|y}} × 410 | |||
** Pile of 10 × 14 | |||
** Pile of 15 × 3 | |||
** Pile of 20 × 3 | |||
** Pile of 25 × 1 | |||
{{clear}} | |||
=== Abandoned Throne === | === Abandoned Throne === | ||
{{infobox night expedition | |||
|name = Abandoned Throne | |||
|image = P4 Save File Giant's Hearth Abandoned Throne Night.png | |||
|size = 200px | |||
|danger = 4 | |||
|lumiknolls = 1 | |||
|enemies = 15 | |||
|glow_pikmin = 10 | |||
}} | |||
There is one Lumiknoll located directly at the base. This location has a danger level of 4 and starts the player off with 10 Glow Pikmin. | There is one Lumiknoll located directly at the base. This location has a danger level of 4 and starts the player off with 10 Glow Pikmin. | ||
==== Enemies ==== | ==== Enemies ==== | ||
{{columns|2| | {{columns|2| | ||
* {{icon|Baldy Long Legs|v=P4|y}} | * {{icon|Baldy Long Legs|v=P4|y}} × 1 | ||
* {{icon|Desiccated Skitter Leaf|v=P4|y}} × 10 | * {{icon|Desiccated Skitter Leaf|v=P4|y}} × 10 | ||
* {{icon|Pyroclasmic Slooch|v=P4|y}} × 4 | * {{icon|Pyroclasmic Slooch|v=P4|y}} × 4 | ||
}} | }} | ||
==== Objects ==== | |||
* {{icon|Glow pellet|v=P4|y}} × 360 | |||
** Pile of 5 × 1 | |||
** Pile of 10 × 5 | |||
** Pile of 15 × 10 | |||
** Pile of 20 × 2 | |||
** Pile of 30 × 3 | |||
{{clear}} | |||
== Guide == | == Guide == | ||
| Line 144: | Line 239: | ||
== Gallery == | == Gallery == | ||
<gallery> | <gallery> | ||
Giant's Hearth Intro2.png|The "hearth" of the area. | |||
</gallery> | </gallery> | ||
==Trivia== | ==Trivia== | ||
*This is the only area of ''Pikmin 4'' in which there are no | *This is the only area of ''Pikmin 4'' in which there are no wild [[Ice Pikmin]] and where Ice Pikmin are not recommended for use. | ||
*[[wikipedia:cuckoo|Cuckoo]] calls can be heard while walking through the area. | *[[wikipedia:cuckoo|Cuckoo]] calls can be heard while walking through the area. | ||
| Line 200: | Line 292: | ||
|Ger = Holzbarrikade | |Ger = Holzbarrikade | ||
|GerM = Wooden barricade | |GerM = Wooden barricade | ||
|Ita = | |Ita = Fila di tronchi | ||
|ItaM = | |ItaM = Row of logs | ||
|Kor = | |Kor = | ||
|KorM = | |KorM = | ||
| Line 227: | Line 319: | ||
|Ger = Verlassener Thron | |Ger = Verlassener Thron | ||
|GerM = Abandoned throne | |GerM = Abandoned throne | ||
|Ita = | |Ita = Trono abbandonato | ||
|ItaM = | |ItaM = Abandoned throne | ||
|Kor = | |Kor = | ||
|KorM = | |KorM = | ||
| Line 254: | Line 346: | ||
|Ger = Zentralflamme | |Ger = Zentralflamme | ||
|GerM = Central flame | |GerM = Central flame | ||
|Ita = | |Ita = Fiamma centrale | ||
|ItaM = | |ItaM = Central flame | ||
|Kor = | |Kor = | ||
|KorM = | |KorM = | ||
| Line 265: | Line 357: | ||
== See also == | == See also == | ||
* [[Sun-Speckled Terrace]] | |||
{{Giant's Hearth}} | |||
{{p4 areas}} | {{p4 areas}} | ||
Latest revision as of 09:28, July 10, 2024
| Giant's Hearth | |
|---|---|
| |
| Rescues | 8 |
| Treasures | 55 |
| Onions | 3 |
| Caves | 3 |
| Dandori Challenges | 3 |
| Dandori Battles | 1 |
| Suggested Pikmin | |
| Wild Pikmin | |
| Requirements | |
| Next area | Primordial Thicket |
| Music | Giant's Hearth |


The Giant's Hearth is the fifth area in Pikmin 4. It takes place just outside a camping site with a tent and fences visible in the background, and an extinguished brick fire pit and a wooden folding chair can be seen as prominent parts of the level. This area has ![]() × 5,200 worth of treasure, of which
× 5,200 worth of treasure, of which ![]() × 1,760 is above ground.
× 1,760 is above ground.
PlotEdit
The Rescue Corps goes to this area in search of Nelle, a Koppaite who may be able to cure Oatchi's tail. Right after landing, the player character and Oatchi see Louie and Moss with a castaway who looks like Alph from Pikmin 3. They follow Louie into a cave where he tries to turn the castaway into a leafling. The process fails and he challenges them to a Dandori Battle. Upon defeat, Louie runs off with Moss and the Rescue Corps duo saves the castaway, a different Koppaite named Yorke. In one of the area's three regular caves, the player and Oatchi also rescue Yorke's partner Don Bergman. Yorke and Don Bergman can be rescued in either order.
After Yorke and Don Bergman are reunited, Shepherd asks Don Bergman what happened to Nelle. He remembers seeing a dog-like creature drag her further into the Primordial Thicket.
LayoutEdit
|
The following article or section is in need of assistance from someone who plays Pikmin 4. |
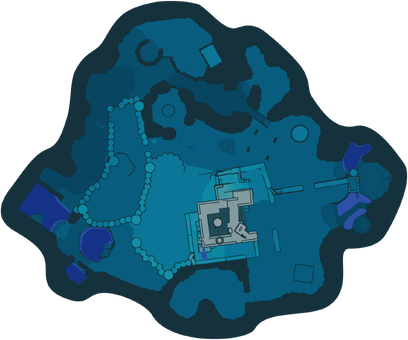
The following notable features can be found in this area.
- A pool section with a few Wolpoles.
- A large campfire, with a pair of bases nearby.
- A working water pump in the Dandori Battle area.
- A box in which Dream Home is situated.
- An alley of pillows.
- Several Sprinklers, requiring a clay valve to be built.
- Several Dried plant obstacles requiring fire starters to remove them.
- A reinforced wall that leads to the area's Sovereign Bulblax and the Rock Onion.
- As part of the background:
- The trunk of a tree. Its leaves are too high to see.
- A red camp chair. Its legs are visible on the terrain, and the player character can go under it.
BasesEdit
- Line of Logs: the default landing site
- Abandoned Throne: guarded by a Fiery Bulblax
- The Central Flame: covered by dried plants
CavesEdit
| Image | Name | Sublevels | Castaways | Treasures | Onions | Suggested Pikmin | Wild Pikmin |
|---|---|---|---|---|---|---|---|

|
Ultimate Testing Range | 5 | 2 | 12 | 0 | ||

|
Dream Home | 1 | 1 | 14 | 1 | None | |

|
Cradle of the Beast | 3 | 1 | 12 | 0 |
Dandori Challenge 1Edit
Located at the top of the fire pit/grill, on the side that's only accessible by using a fire starter to reach the protruding bricks that can allow Oatchi to jump all the way to the top.
Dandori Challenge 2Edit
Located past a sprinkler on the plateau near the Line of Logs base.
Dandori Challenge 3Edit
Located near the entrance to Dream Home, can be accessed either by pulling down a clipboard to make a bridge for the gap above or by turning off a sprinkler below and using a fire starter to reach the alcove.
Dandori BattleEdit
The area's Dandori Battle cave, Hot Sandy Duel, can be found near the 3rd base. Down the hill, it is surrounded by shallow water and a low ledge, meaning Oatchi can jump right up to it with ease.
ObjectsEdit
TreasuresEdit
 Anxious Sprout × 1
 Birdy Bed × 1
 Crew-Cut Gourd × 1
 Disk of Amusing Wisdom × 1
 Face Wrinkler × 1
 Fish-Bed Snack × 1
 Ice Sword × 2
 Love Nugget × 1
 Persistence Machine × 1
 Seed Hive × 1
 Slapstick Crescent × 1
 Slipper-Bug Fossil × 1
 Snack Bean × 1
 Stately Rubber Cutie × 1
 The Four Grill Brothers × 1
 Universal Rubber Cutie × 1
OnionsEdit
 Flarlic × 1
 Rock Onion × 1
EnemiesEdit
 Arachnode × 4
 Bloomcap Bloyster × 1
 Bug-Eyed Crawmad × 2
 Dwarf Bulbear × 6
 Fiery Bulblax × 2
 Fiery Dweevil × 3
 Iridescent Flint Beetle × 1
 Iridescent Glint Beetle × 1
 Mama Sheargrub × 2
 Masterhop × 2
 Mitite (group of 10) × 2
 Sovereign Bulblax × 1
 Spotty Bulbear × 3
 Wolpole × 5
ObstaclesEdit
 Arachnode web × 4
 Cardboard box × 1
 Clipboard × 1
 Crystal wall × 1
 Dried plant × 65
 Iron fence × 1
 Paper bag × 2
 Reinforced wall × 1
 Sprinkler × 4
 Water body × 7
ToolsEdit
 Bonfire altar × 9 (8 × unlit, 1 × lit)
 Bouncy Mushroom × 2
 Clay bridge × 1
 Clay mound × 2
 Clay valve × 3
 Climbing rope × 1
 Climbing stick × 1
 Climbing wall × 1
 Dirt-mound × 5 (10 raw materials × 3, bomb rock × 2)
 Fire starter × 1
 Geyser × 1
 Switch × 1
OthersEdit
 Burgeoning Spiderwort × 2
 Egg × 2 (1 × small, 1 × large)
 Pellet Posy × 13 (9 × 1 pellet, 4 × 5 pellet)
 Pile of raw material × 5 (1 pile of 10, 3 piles of 20, 1 pile of 30)
Night expeditionsEdit
Line of LogsEdit
| Line of Logs | |
|---|---|

| |
| Danger level | |
| Lumiknolls | 2 |
| Enemies | 21 |
| Starting Glow Pikmin | 10 |
There are two Lumiknolls, the blue one located directly at the base and the orange one located up north near the clay mound. This location has a danger level of 3 and starts the player off with 10 Glow Pikmin.
EnemiesEdit
- Dwarf Bulbear × 6
 Emperor Bulblax × 2
- Fiery Bulblax × 3
 Pyroclasmic Slooch × 7
- Spotty Bulbear × 3
ObjectsEdit
 Glow pellet × 410
- Pile of 10 × 14
- Pile of 15 × 3
- Pile of 20 × 3
- Pile of 25 × 1
Abandoned ThroneEdit
| Abandoned Throne | |
|---|---|

| |
| Danger level | |
| Lumiknolls | 1 |
| Enemies | 15 |
| Starting Glow Pikmin | 10 |
There is one Lumiknoll located directly at the base. This location has a danger level of 4 and starts the player off with 10 Glow Pikmin.
EnemiesEdit
 Baldy Long Legs × 1
 Desiccated Skitter Leaf × 10
- Pyroclasmic Slooch × 4
ObjectsEdit
- Glow pellet × 360
- Pile of 5 × 1
- Pile of 10 × 5
- Pile of 15 × 10
- Pile of 20 × 2
- Pile of 30 × 3
GuideEdit
|
The following article or section contains guides. |
|
The following article or section is in need of assistance from someone who plays Pikmin 4. |
GalleryEdit
The "hearth" of the area.

TriviaEdit
- This is the only area of Pikmin 4 in which there are no wild Ice Pikmin and where Ice Pikmin are not recommended for use.
- Cuckoo calls can be heard while walking through the area.
Names in other languagesEdit
Giant's Hearth
| Language | Name | Meaning |
|---|---|---|
| 巨人のかまど? Kyodai no Kamado |
Giant's Kamado | |
(traditional) |
巨人的爐灶 Jùrén de Lúzào |
Giant's Stove |
(simplified) |
巨人的炉灶 Jùrén de Lúzào |
Giant's Stove |
| Vlammenfort | Flame fortress | |
| Âtre des géants | Giants' hearth | |
| Garten der Giganten | Giants' Garden | |
| Forno del gigante | Giant's oven | |
| 거인의 화덕 Geoin-ui Hwadeok |
Giant's Oven | |
| Fornalha do gigante | Giant's furnace | |
| Fogones de gigante | Giant's stoves |
Line of Logs
| Language | Name | Meaning |
|---|---|---|
| Rangée de poteaux | Line of posts | |
| Holzbarrikade | Wooden barricade | |
| Fila di tronchi | Row of logs | |
| Fileira de troncos | Row of logs |
Abandoned Throne
| Language | Name | Meaning |
|---|---|---|
| Trône abandonné | Abandoned throne | |
| Verlassener Thron | Abandoned throne | |
| Trono abbandonato | Abandoned throne | |
| Trono abandonado | Abandoned throne |
The Central Flame
| Language | Name | Meaning |
|---|---|---|
| Foyer central | Central hearth | |
| Zentralflamme | Central flame | |
| Fiamma centrale | Central flame | |
| Chama central | Central flame |
See alsoEdit
| Pikmin 4 areas |
|---|
 Click an area on the image Rescue Command Post • Sun-Speckled Terrace • Blossoming Arcadia • Serene Shores • Hero's Hideaway • Giant's Hearth • Primordial Thicket |