Twilight Hollow: Difference between revisions
mNo edit summary Tag: Mobile edit |
|||
| Line 64: | Line 64: | ||
*{{icon|Dirt wall|y}} × 2 | *{{icon|Dirt wall|y}} × 2 | ||
*{{icon|Electric gate|v=P3|y}} × 2 | *{{icon|Electric gate|v=P3|y}} × 2 | ||
*{{icon|Spotcap|y}} × 5 | |||
*{{icon|Kingcap|y}} × 3 | |||
}} | |||
;Tools | |||
*{{icon|Bridge|v=P3|y}} (Brown) {{icon|Fragment}} × 24 | *{{icon|Bridge|v=P3|y}} (Brown) {{icon|Fragment}} × 24 | ||
*{{icon|Climbing stick|y}} × 2 | *{{icon|Climbing stick|y}} × 2 | ||
*{{icon|Lily pad|y}} × 3 | *{{icon|Lily pad|y}} × 3 | ||
;Other | ;Other | ||
| Line 143: | Line 145: | ||
*{{icon|Crystal wall|y}} × 2 | *{{icon|Crystal wall|y}} × 2 | ||
*{{icon|Bamboo gate|y}} × 2 | *{{icon|Bamboo gate|y}} × 2 | ||
*{{icon|Large crystal|y}} × 1 (encases geyser) | |||
}} | |||
;Tools | |||
*{{icon|Bridge|v=P3|y}} (Brown) {{icon|Fragment}} × 24 | *{{icon|Bridge|v=P3|y}} (Brown) {{icon|Fragment}} × 24 | ||
*{{icon|Geyser|y}} × 1 | *{{icon|Geyser|y}} × 1 | ||
*{{icon|Lily pad|y}} × 3 | |||
*{{icon|Lily pad|y}} × 3 | |||
;Other | ;Other | ||
Revision as of 10:03, March 19, 2023
Twilight Hollow is a Mission Mode stage in Pikmin 3. Based on the autumn theme of the Twilight River, it features a pool of water surrounded by areas of land separated by different barriers. The stage is playable in the Collect Treasure! and Battle Enemies! modes, and has a remixed version, Twilight Hollow Remix.
|
This article is a stub. You can help Pikipedia by expanding it.
|
Collect Treasure!
| Twilight Hollow Collect Treasure! | |||||||||
|---|---|---|---|---|---|---|---|---|---|

| |||||||||
| Starting Pikmin | |||||||||
| |||||||||
| Requirements | |||||||||
| |||||||||
| Time limit | 10:00 | ||||||||
| Music | Mission Mode (Levels 1-10) | ||||||||
Layout
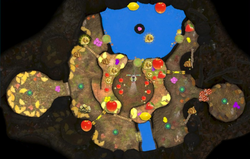
All three leaders start out in the center of the area, with a few of Cupid's Grenades littered throughout. A high area littered with treasure encases the area that can only be accessed from other areas. To the north of the starting area is a small lake, with a system of lily pads running throughout. In the center of the system is a Golden Sunseed, with three Winged Pikmin located on a stump next to it. Near the north of the system is a Face Wrinkler and an Insect Condo, both of which can only be obtained with Winged Pikmin, as the top of the fruits is sticking out of the water.
The eastern exit from the lily pad cycle leads to an area with planted Winged Pikmin, a Golden Sunseed, and a dirt wall. Past all that is a meandering path leading up to the elevated area closing off the SPERO. On this elevated area is an assortment of treasures, ranging from Insect Condos to piles of Nuggets, as well as a group of planted Yellow Pikmin. A leader can be thrown across to the other elevated area, which holds some more treasure as well as planted yellow and Purple Pikmin.
Back onto the east side is a Swooping Snitchbug. Next to it is a ledge with a group of planted Winged Pikmin. Further to the east is an alcove with a Puffy Blowhog, which the Winged Pikmin can take care of easily. Outside of the alcove is a pile of Fragments as well as an Insect Condo high up on a ledge. An electric gate must be destroyed for any of the treasure to be collected. Beyond the gate is yet another Swooping Snitchbug, as well as a dirt wall enclosing the SPERO. This wall must be defeated if any treasure should be collected without Winged Pikmin.
Past the Swooping Snitchbug is where a bridge must go. After going on the bridge, another Swooping Snitchbug awaits, with a nearby group of planted Yellow Pikmin. Further down the path, there are many piles of Nuggets. Along the path is another alcove closed off by some Kingcaps, in which a Bulborb is sleeping. Guarding those Kingcaps is another Swooping Snitchbug, as well as a bunch of planted Winged Pikmin. An electric gate is past the flying bug. Another pile of Nuggets is found beyond the gate. Further down, the player will find the same lily pad pond.
Objects
- Leaders
The order in Pikmin 3 is Alph, Brittany, Charlie. The order in Pikmin 3 Deluxe is Brittany, Charlie, Alph.
- Starting Pikmin
 Yellow Pikmin × 22
 Winged Pikmin × 43
 Purple Pikmin × 15
- Treasure
 Cupid's Grenade × 9
 Sunseed Berry × 8
 Face Wrinkler × 2
 Golden Grenade × 2
 Insect Condo × 7
 Golden Sunseed × 4
 Nuggets × 200 (4 piles of 50)
- Enemies
 Puffy Blowhog × 1
 Bulborb × 1
 Swooping Snitchbug × 4
- Obstacles
 Dirt wall × 2
 Electric gate × 2
 Spotcap × 5
 Kingcap × 3
- Tools
 Bridge (Brown)
  × 24
× 24 Climbing stick × 2
 Lily pad × 3
- Other
 Egg × 1 (contains ultra-spicy spray)
Strategy
|
This article or section needs to be cleaned up, either its format or general style. |
|
The following article or section contains guides. |
Bring all three leaders north onto the revolving lily pads. Leave two in this area to collect the Insect Condo, Face Wrinkler, and Golden Sunseed. Have the other pluck the Yellow Pikmin on the northeastern shore and begin destroying the nearby electric gate. Once the waterlogged fruit has been collected, send one leader back to the SPERO and send the other to join the leader at the electric gate. After the gate has been destroyed, unearth the flying Pikmin and defeat the first Swooping Snitchbug.
Meanwhile, the leader at the SPERO should take the Winged Pikmin there, collect the six Cupid's Grenades and then break down the nearby dirt wall. After the first Snitchbug has been defeated, throw a Winged Pikmin onto the wall of mushrooms blocking the way to the lone Bulborb and continue to move counter-clockwise around the map, unearthing more Yellow Pikmin and defeating the second Snitchbug. Toss all your Pikmin and a leader across the small pond of water. By this time the dirt wall will have broken and the two leaders can join forces to take down the third Snitchbug, and destroy the second electric gate.
Once this is done, charge the Pikmin at the 24 bridge fragment pile, and then use the leftovers to take down the last Snitchbug. As Winged Pikmin take the fourth Snitchbug back to the SPERO, toss a leader onto the western ledge so they can start unearthing the Winged Pikmin there. Once the bridge is complete, move your leader who has been waiting nearby to meet up with the one on the ledge. Collect any stray Pikmin on the way, and whistle to the ones waiting at the SPERO. Throw all your Pikmin onto the ledge with the leader and the Winged Pikmin, then take down the Puffy Blowhog. You should have around 36 Winged Pikmin and eleven Yellow Pikmin.
Now, Have 30 Winged Pikmin take back the three Insect Condos and the Blowhog's remains. Make sure you have at least 3 Winged Pikmin and ten Yellow Pikmin left over. Descend the ledge, and then have three Winged Pikmin collect the Golden Sunseed on the ledge next to the unbroken dirt wall. Take the ten Yellow Pikmin and throw them onto the stump near the (now cleared) electric gate to collect the fifth Insect Condo. Now take two leaders up the ramp on the west side of the SPERO while the third leader heads back to the SPERO itself.
Throw one of the leaders onto the raised wooden platform on the east side of the SPERO. As the thrown leader unearths six Winged Pikmin, have the leader on the western platform unearth ten Yellow Pikmin and use them to carry away the sixth Insect Condo. Have this leader then unearth the four nearby Purple Pikmin and use them to carry away the four remaining fruit on the western side. On the eastern side, assign three Winged Pikmin to each Sunseed Berry, then unearth the five nearby Purple Pikmin and use them to transport the remaining fruit on the eastern ledge.
Once the Pikmin have finished transporting fruit from the western side, have the leader waiting at the SPERO call the whole group there and then proceed to the piles of gold, starting with those on the west side and making their way counter-clockwise, throwing five Winged Pikmin onto each of the four piles. The leader should throw three Winged Pikmin onto the last Sunseed Berry in the northeast corner before charging the sleeping Red Bulborb and unearthing the final four Purple Pikmin. Allow Purple Pikmin to carry the Bulborb and the majority of the Sunseed Berries back to the SPERO. Finally, distribute any remaining Pikmin onto the piles of gold as needed.
Battle Enemies!
| Twilight Hollow Battle Enemies! | |||||||||
|---|---|---|---|---|---|---|---|---|---|

| |||||||||
| Starting Pikmin | |||||||||
| |||||||||
| Requirements | |||||||||
| |||||||||
| Time limit | 9:00 | ||||||||
| Music | Mission Mode (Levels 1-10) | ||||||||
Layout
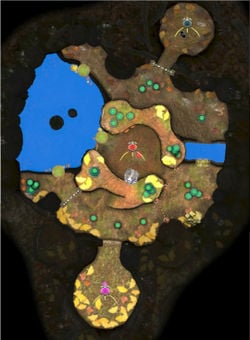
The 3 leaders are now littered about at the different Onions. The player starts with Alph at the rock Onion, the northernmost point on the map. A crystal wall encloses the rock Onion, but can be destroyed with the nearby planted Rock Pikmin. Right outside of the alcove is a group of 3 Skutterchucks, which should prove no danger to the Rock Pikmin. To the east lies the main enemy of the map; a Calcified Crushblat. To the west will bring the player to the lily pad system once again. The lily pad can be ridden to get to Charlie and the Red Onion.
The Red Onion, along with Charlie and a few Red Pikmin, are located in the center of the area. However, not much can be done, as the only things in the area is a crystal wall and a crystalized geyser, all of which are indestructible with Red Pikmin.
Further south on the lily pad system is a group of Male Sheargrubs. A crystal wall once again blocks further access to the area, so Rock Pikmin must be brought over. Upon breaking the gate, a group of Pyroclasmic Slooches can be found. South of them is where Brittany and the winged Onion, along with a few Winged Pikmin can be found. North of the Pyroclasmic Slooches is an elevated area closing off the Red Onion. On it, two groups of Shearwigs are present. The northern elevated area is home to a group of Female Sheargrubs and a few Dwarf Bulbears to the west.
At the far east of the area lies a Bulbear family, consisting of a Spotty Bulbear and 3 Dwarf Bulbears. In that same area, there is a pile of Fragments, which connects the Bulbear arena to the Calcified Crushblat arena, as well as a few nectar eggs.
Objects
- Leaders
The order in Pikmin 3 is Alph, Brittany, Charlie. The order in Pikmin 3 Deluxe is Brittany, Charlie, Alph.
- Starting Pikmin
 Red Pikmin × 6
 Rock Pikmin × 6
 Winged Pikmin × 10
- Enemies
 Shearwig × 11
 Female Sheargrub × 6
 Skutterchuck × 3
 Male Sheargrub × 5
 Dwarf Bulbear × 7
 Pyroclasmic Slooch × 3
 Spotty Bulbear × 1
 Calcified Crushblat × 1
- Obstacles
 Crystal wall × 2
 Bamboo gate × 2
 Large crystal × 1 (encases geyser)
- Tools
- Other
 Pellet Posy × 4
World records
In Pikmin 3, these are the world records for the challenge, as obtained from the in-game global rankings feature. The following scores were retrieved on June 20th, 2016. Since the in-game leaderboards have been compromised, it is impossible to obtain more up-to-date legitimate records from the game, though players may have obtained higher scores since.
In Pikmin 3 Deluxe, these are the world records for the challenge, as obtained from the in-game global rankings feature. The following scores were retrieved on June 27th, 2022.
Gallery
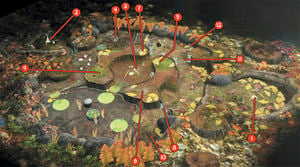
The second part of this elevated area contains a group of Shearwigs.
Names in other languages
| Language | Name | Meaning |
|---|---|---|
| 落ち葉の回廊? Ochiba no Kairō |
Corridor of Dead Leaves | |
| Dédale de l'automne | Autumn maze | |
| Dämmerlichtung | Twilight clearing | |
| Cratere arcipelago | ||
| Soto del Ocaso | Twilight Copse |


