Ranging Bloyster: Difference between revisions
Mrblob1012 (talk | contribs) mNo edit summary |
No edit summary |
||
| Line 5: | Line 5: | ||
|name=Molluschid predatoria | |name=Molluschid predatoria | ||
|family=Mollusking | |family=Mollusking | ||
|underground=[[Shower Room]], [[Hole of Heroes]] | |underground=[[Shower Room]], [[Hole of Heroes]], [[The Giant's Bath]] | ||
|weight=3 | |weight=3 | ||
|height=211 | |height=211 | ||
| Line 15: | Line 14: | ||
}} | }} | ||
The '''Ranging Bloyster''' resembles a large [[Toady Bloyster]], and is possibly named for its longer mouthparts or increased travel range. These creatures have an affinity for shiny objects and will track your active pilot's light beacon, making them impossible to approach unnoticed from behind. | The '''Ranging Bloyster''' resembles a large [[Toady Bloyster]], and is possibly named for its longer mouthparts or increased travel range. These creatures have an affinity for shiny objects and will track your active pilot's light beacon, making them impossible to approach unnoticed from behind. It is the boss. | ||
This creature is found only on the last sublevel (7) of the [[Shower Room]], Sublevel 7 of the [[Hole of Heroes]] along with two of each [[Armored Cannon Beetle Larva|Cannon Beetle Larvae]] and [[Decorated Cannon Beetle]]s, and the last sublevel (2) of [[The Giant's Bath]] in [[Challenge Mode (Pikmin 2)|Challenge Mode]]. It is possible to kill the Bloyster in a matter of seconds relatively easily with two players on the Challenge Mode level. | This creature is found only on the last sublevel (7) of the [[Shower Room]], Sublevel 7 of the [[Hole of Heroes]] along with two of each [[Armored Cannon Beetle Larva|Cannon Beetle Larvae]] and [[Decorated Cannon Beetle]]s, and the last sublevel (2) of [[The Giant's Bath]] in [[Challenge Mode (Pikmin 2)|Challenge Mode]]. It is possible to kill the Bloyster in a matter of seconds relatively easily with two players on the Challenge Mode level. | ||
There is a glitch that makes the Ranging Bloyster still "live" after you kill it. If you kill a Ranging Bloyster while its | There is a glitch that makes the Ranging Bloyster still "live" after you kill it. If you kill a Ranging Bloyster while its gill is still glowing, and if you're lucky, the gill left behind by the Bloyster will still glow and beep, however, it will only glow if you take it in the ship. When it is put in, there will be a strange light that appears on the ship. It is more explanatory if the player has seen it himself/herself. | ||
{{ | {{notes|enemy}} | ||
[[File:RangingBloyster.jpg|frame|Artwork of the Ranging Bloyster.]] | [[File:RangingBloyster.jpg|frame|Artwork of the Ranging Bloyster.]] | ||
==Strategies== | ==Strategies== | ||
This beast can be difficult to defeat in a timely manner, but with the right strategy, can be overcome without losing any | This beast can be difficult to defeat in a timely manner, but with the right strategy, can be overcome without losing any Pikmin. The Bloyster will hunt your active captain and will change its target accordingly if you switch. However, there is a slight delay between the time it stops chasing one captain and starts on the other. Use this to your advantage by placing each captain on either side of the beast. Lure it towards one, then switch with (Y) and quickly toss Pikmin onto its vulnerable gill. Call them back when the Bloyster turns to face you, then repeat. | ||
Another way to deal with this boss is to attack it with a single group of Pikmin led by both captains. Because it pauses slightly in order to track the leading captain, the idea is to keep switching control of your captains every time it turns your active captain's color. In this way, it is very easy to simply walk past it, step behind it and throw Pikmin at | Another way to deal with this boss is to attack it with a single group of Pikmin led by both captains. Because it pauses slightly in order to track the leading captain, the idea is to keep switching control of your captains every time it turns your active captain's color. In this way, it is very easy to simply walk past it, step behind it and throw Pikmin at it's gill without trouble. Be sure to call back any Pikmin that get shaken of their target. | ||
It is possible to tap Y as fast as you can it will confuse the bloyster. After confused, it is recommended that you petrify it then use an Ultra-Spicy Spray. The boss should go down no problem. | |||
If the Bloyster's gill is proving too difficult to reach, [[Purple Pikmin]] can simply be thrown onto its back which will deal damage upon impact and have a chance of stunning the creature, preventing it from fighting back. A large group of Purples is recommended, for if the Bloyster is not constantly kept subdued, it can quickly turn and gobble up the player's Pikmin. | |||
As a last resort, [[White Pikmin]] can be fed to the Bloyster, each dealing heavy damage when eaten. To ensure | A much more time consuming method is to have a 100 strong army, confront the Ranging Bloyster, spray it and then toss Pikmin onto its back. When it unfreezes, simply spray it again, and any Pikmin that were thrown off will leap back on it to continue the assault. Note that this can take multiple ultra bitter sprays and the Pikmin will likely revert back to leaf Pikmin when thrown off, but is a far safer method. | ||
As a last resort, [[White Pikmin]] can be fed to the Bloyster, each dealing heavy damage when eaten. To ensure minimal Pikmin loss, Ultra-spicy spray at least 4 White Pikmin. | |||
{{Enemies}} | {{Enemies}} | ||
[[Category:Pikmin 2 enemies]] | [[Category:Pikmin 2 enemies]] | ||
[[Category:Bosses]] | [[Category:Bosses]] | ||
[[Category:Shower Room]] | |||
[[Category:Pikmin 2]] | |||
Revision as of 08:21, June 15, 2012
| Ranging Bloyster | |
|---|---|

| |
| Appears in | Pikmin 2 |
| Scientific name | Molluschid predatoria |
| Family | Mollusking |
| Areas | None |
| Caves | Shower Room, Hole of Heroes, The Giant's Bath |
| Challenge Mode stages | None |
| 2-Player Battle stages | None |
| Attacks | Eats Pikmin |
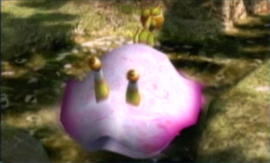
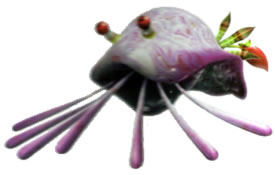
The Ranging Bloyster resembles a large Toady Bloyster, and is possibly named for its longer mouthparts or increased travel range. These creatures have an affinity for shiny objects and will track your active pilot's light beacon, making them impossible to approach unnoticed from behind. It is the boss.
This creature is found only on the last sublevel (7) of the Shower Room, Sublevel 7 of the Hole of Heroes along with two of each Cannon Beetle Larvae and Decorated Cannon Beetles, and the last sublevel (2) of The Giant's Bath in Challenge Mode. It is possible to kill the Bloyster in a matter of seconds relatively easily with two players on the Challenge Mode level.
There is a glitch that makes the Ranging Bloyster still "live" after you kill it. If you kill a Ranging Bloyster while its gill is still glowing, and if you're lucky, the gill left behind by the Bloyster will still glow and beep, however, it will only glow if you take it in the ship. When it is put in, there will be a strange light that appears on the ship. It is more explanatory if the player has seen it himself/herself.
“{{notes:enemy/{{{2}}}|block=y}}”
Strategies
This beast can be difficult to defeat in a timely manner, but with the right strategy, can be overcome without losing any Pikmin. The Bloyster will hunt your active captain and will change its target accordingly if you switch. However, there is a slight delay between the time it stops chasing one captain and starts on the other. Use this to your advantage by placing each captain on either side of the beast. Lure it towards one, then switch with (Y) and quickly toss Pikmin onto its vulnerable gill. Call them back when the Bloyster turns to face you, then repeat.
Another way to deal with this boss is to attack it with a single group of Pikmin led by both captains. Because it pauses slightly in order to track the leading captain, the idea is to keep switching control of your captains every time it turns your active captain's color. In this way, it is very easy to simply walk past it, step behind it and throw Pikmin at it's gill without trouble. Be sure to call back any Pikmin that get shaken of their target.
It is possible to tap Y as fast as you can it will confuse the bloyster. After confused, it is recommended that you petrify it then use an Ultra-Spicy Spray. The boss should go down no problem.
If the Bloyster's gill is proving too difficult to reach, Purple Pikmin can simply be thrown onto its back which will deal damage upon impact and have a chance of stunning the creature, preventing it from fighting back. A large group of Purples is recommended, for if the Bloyster is not constantly kept subdued, it can quickly turn and gobble up the player's Pikmin.
A much more time consuming method is to have a 100 strong army, confront the Ranging Bloyster, spray it and then toss Pikmin onto its back. When it unfreezes, simply spray it again, and any Pikmin that were thrown off will leap back on it to continue the assault. Note that this can take multiple ultra bitter sprays and the Pikmin will likely revert back to leaf Pikmin when thrown off, but is a far safer method.
As a last resort, White Pikmin can be fed to the Bloyster, each dealing heavy damage when eaten. To ensure minimal Pikmin loss, Ultra-spicy spray at least 4 White Pikmin.
