| Day 9: Another Part Found | |||||||||||
|---|---|---|---|---|---|---|---|---|---|---|---|
| Side Story | Olimar's Comeback | ||||||||||
| Objective | Carry the part! | ||||||||||
| Area | Formidable Oak | ||||||||||
| Starting Pikmin | |||||||||||
| |||||||||||
| Requirements | |||||||||||
| |||||||||||
| Time limit | 13:00 | ||||||||||
| Music | Olimar's Comeback (days 9-10) | ||||||||||
Another Part Found is the ninth day of Olimar's Comeback. It takes place in the Formidable Oak, with the objective of carrying a ship part to the SPERO. Like in the main game, all enemies are Plasm Wraith illusions, so the player cannot make new Pikmin.
Plot
After multiple warnings from the President, Olimar tracks the Chronos Reactor inside of the Formidable Oak. Despite it being "hideously filthy", the part is still intact. Although, much like in First Part Found, they have yet to clear the path back to the SPERO to transport it. Despite the enemies still being illusions (like in Story Mode), the Plasm Wraith is nowhere to be seen.
After this mission, Olimar detects the location of the final ships parts. However, he draws concern from being unable to pinpoint their location, implying local wildlife may have gotten to it first. This directly leads to the the final day of their exploration.
Description
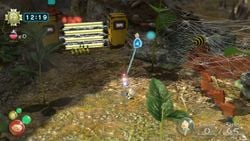
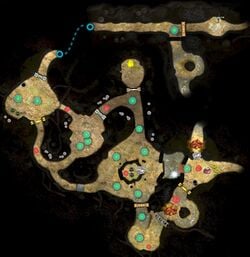
The day revolves around bringing the Hocotate ship's Chronos Reactor to the SPERO, which is located near the entrance of the Formidable Oak cave system. The part, as well as where the player begins the mission, is located just beside the entrance to the second water filled area of the Formidable Oak, so one must work to carry the part back through the cave system.
The second area as well as the exterior to the Oak is inaccessible, as is the shortcut connecting the cave's entrance to where the mission starts, so players must take the part back the long way. A surplus of different walls and enemies, as well as the inability to sprout more Pikmin due to the foes decomposing into golden goop will make it difficult to backtrack through the cave and return the part within the time limit.
Objects
Ship parts
Enemies
- Arachnode × 1
- Dwarf Orange Bulborb × 4
- Bearded Amprat × 2
- Swooping Snitchbug × 1
- Orange Bulborb × 2 (1 drops a bomb rock)
- Spotty Bulbear × 1 (drops 2 bomb rocks)
- Skutterchuck × 2
- Whiptongue Bulborb × 1
- Calcified Crushblat × 1
Obstacles
- Bridge (red) × 50, in piles of 20 and 30
- Electric gate × 2
- Dirt wall × 2
- Reinforced wall × 2
- Crystal wall × 1
- Crystal nodule × 6
- Large crystal × 2
- Geyser × 1
- Paper bag × 1
- Dirt mound × 3 (each contain 3 bomb rocks)
Others
- Egg × 7 (6 contain nectar, 1 contains ultra-spicy spray)
- Bomb rock × 12 (3 inside enemies, 9 in dirt mounds)
Guide
|
The following article or section contains guides. |
A bridge by the start of the mission needs to be built before progress through the Oak can be made, so you should turn the 10 Red Pikmin you're given into Yellow Pikmin with the Candypop Buds, then turn them into flower Pikmin using the nearby egg and set them on the electric gate guarding 30 bridge pieces to build it as soon as possible. While they work on the gate, use that time to use the 5 Rock Pikmin to break the large crystal and start carrying the 20 bridge pieces behind it under the Arachnode web. You may even throw a leader into the web to lure the creature down if you wish. Once the electric gate is busted, those Yellow Pikmin along with the 10 Red Pikmin behind it should work on carrying the 30 bridge pieces. Once the Yellow Pikmin finish working on the bridge they can take out the Arachnode with ease. You can use your Rock Pikmin to help if things go wrong or you can use them entirely beforehand if you used that leader bait trick. Now you may begin to carry the Chronos Reactor across the bridge.
Once you get past the bridge, the large crystal right past it should be the first priority as 5 Red Pikmin as well as 2 Rock Candypop Buds lie beyond it. It can be useful to convert 5 or 10 Red Pikmin into Rock Pikmin for the upcoming obstacles. You should now be able to use these to take out the enemies situated before any walls or bags and use the eggs around to power up your Pikmin, as well as pushing down the paper bag as a shortcut for later, though do take the 5 Red Pikmin recruits waiting behind it by the electrical gate. In fact, be sure to spot out and use any eggs hiding on the ledges of the area. What lies past the dirt wall is an Orange Bulborb and a Dwarf Orange Bulborb, the larger containing a bomb rock and both guarding 5 more Red Pikmin, so they should be taken on when you have a solid amount of Pikmin to take the big one down. Assign a couple of Pikmin on your way to begin working on the wall if you need those resources.
Your Pikmin for some reason will not carry the Chronos Reactor down the paper bag, so you must take it the other way past the reinforced wall. Your focus should now lie in destroying the nearby crystal wall, as it contains a batch of 10 Yellow Pikmin as well as a hole with 3 bomb rocks. Once you reach the crystal wall, you can assign some Pikmin to digging up the bomb rocks and others to start carrying the part. The 3 bomb rocks should be used straight on the reinforced wall. You should also be able to take on the Orange Bulborb mentioned earlier with ease, so do that and continue onwards past the paper bag. Make sure you have one leader to stop the Chronos Reactor before it falls into the jaws of the Bulbear and its jawless Skutterchuck cohorts.
It's recommended to take on this next part from the side from the paper bag as it will be easier to isolate the Bulbear from the Skutterchucks from that angle. Carefully take out the Skutterchucks, then you can use your bomb rock from the Orange Bulborb to assist in taking out the Bulbear, who will drop 2 more. After taking them out, you can begin digging out more bomb rocks from the nearby hole, taking the 5 Red Pikmin trapped behind them, and continue taking the part. It's a good idea to avoid taking down the electric wall to the left and just carrying the Reactor down the ledge whist dropping down yourself and using the bomb rocks to take out the Whiptongue Bulborb and Orange Bulborb, using what you have left between yourself and the nearby hole if necessary to take down the last reinforced wall.
Once that reinforced wall is down you should start carrying the Reactor towards the long hallway towards the SPERO, running ahead with the rest of your Red Pikmin and Rock Pikmin and leaving another leader to wait for the last bomb rocks to be dug up by the Yellow Pikmin. From here all that stands in your way is a Calcified Crushblat and a dirt wall, the former of which you should take down with your Rock Pikmin and Red Pikmin, or if you can spare the time, using the final bomb rocks. From there, just rush to take down the dirt wall and deliver the Chronos Reactor to the SPERO and finish the mission!
Quotes
Briefing
Outline
Loading screen tip
During gameplay
In some situations during gameplay, Olimar or Louie will leave a comment.
Assignment Report
Gallery
|
This article or section is in need of more images. |
The Chronos Reactor at the starting area.
Trivia
- Olimar mentions in his mission log the Chronos Reactor was found "in a cave", being the Formidable Oak. This signifies that Olimar does not remember the layout of the area very well, likely due to being unconscious.
Names in other languages
|
The following article or section is in need of assistance from someone who plays Pikmin 3 Deluxe. |
| Language | Name | Meaning |
|---|---|---|
| Japanese | またまた発見!2つ目のパーツ? | |
| French | La seconde pièce | The second piece |
| Italian | Un altro componente | Another part |
| Spanish | La segunda pieza | The second piece |
See also
| Side Story days | ||
|---|---|---|
| Olimar's Assignment | Flower Garden • Inside Forest • River • Tundra | |
| Olimar's Comeback | Pikmin Reunion • Creature Hunting • Land, Sea, and Sky • First Part Found • Team Monster Hunt • Channel Gone Dry • Looking for Louie • Big Fruit Carnival • Another Part Found • The Ship Restored | |


