Area selection menu
The area selection menu, also called the world map, is a menu that allows the player to select an area to explore. In the main series of Pikmin games, it appears before the start of each day, and provides information on each area so the player can make the best choice on which one to select. It only shows areas that have been unlocked, and thus changes appearance over the course of the game. As a major part of Story Mode, the area selection menu is much more detailed than most other menus, and it provides access to various features, such as the Piklopedia, to give the player a rest in between days.
Pikmin
| Area selection menu | |
|---|---|
| |
| Accessed from | Saved game selection menu, Day results menu |
| Provides access to | Olimar's voyage log menu, Story Mode gameplay |
| Music | View |
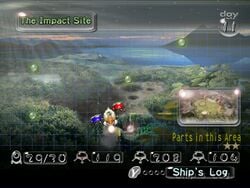
In Pikmin, the area selection menu contains an aerial view of a section of the Pikmin planet, with bubbles on top in set locations representing areas. By moving ![]() /
/ ![]() , the S.S. Dolphin and the Onions will fly between the bubbles. Pressing
, the S.S. Dolphin and the Onions will fly between the bubbles. Pressing ![]() /
/ ![]() while over one of the bubbles, and then confirming that in a message box, will select the area, bringing up the loading screen.
while over one of the bubbles, and then confirming that in a message box, will select the area, bringing up the loading screen.
Various information is shown about the currently-selected area and the current state of the game. The top-left of the screen says the name of the area. A preview image appears on the right side of the screen, as well as some stars that represent the area's ship parts. A gray star indicates an uncollected part, and a yellow one indicates a part that has been collected. The bottom of the screen shows the total number of salvaged ship parts, and the total number of Pikmin of each type in the Onions. In the top-right corner, a day counter can be seen, much like the one on the in-game HUD. On the bottom-right, a box tells the player that they can press ![]() /
/ ![]() to open Olimar's voyage log. The player may also press
to open Olimar's voyage log. The player may also press ![]() /
/ ![]() to open a message box, asking them if they want to remain or return to the title screen.
to open a message box, asking them if they want to remain or return to the title screen.
Pikmin 2
| Area selection menu | |
|---|---|
| |
| Accessed from | Saved game selection menu, Day results menu |
| Provides access to | Piklopedia and Treasure Hoard menus, Story Mode gameplay |
| Music | Area selection |
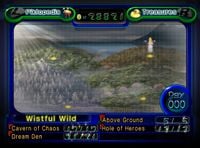
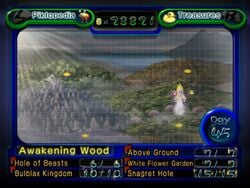
In Pikmin 2, the area selection menu contains an aerial view of a section of the Pikmin planet, with yellow markers on top in set locations representing areas. By moving ![]() /
/ ![]() , the Hocotate ship (in the color it appears in-game) and the Onions will fly between the markers. Pressing
, the Hocotate ship (in the color it appears in-game) and the Onions will fly between the markers. Pressing ![]() /
/ ![]() while over one of the markers, and then confirming that in a message box, will select the area, bringing up the loading screen.
while over one of the markers, and then confirming that in a message box, will select the area, bringing up the loading screen.
The top of the screen contains general information about the saved game. In the center, there is a display of the total number of Pokos the player has collected in that saved game. (Before repaying the debt, this appears as a proportion out of 10000.) On the sides, there are indicators that pressing ![]() /
/ ![]() opens the Piklopedia and pressing
opens the Piklopedia and pressing ![]() /
/ ![]() opens the Treasure Hoard.
opens the Treasure Hoard.
The bottom of the screen contains information about the area that is currently selected. This includes the area's name, and the number of treasures collected in the above-ground part of the area and in each of the area's caves. (Before repaying the debt, just the number of collected treasures is displayed, but after repaying the debt, the number of collected treasures and the total number of treasures are displayed.) If all treasures in a cave or above-ground area have been collected, the number will sparkle. There is also a day counter. The player can press ![]() /
/ ![]() to open a prompt, asking them if they wish to remain in this menu or go to the title screen.
to open a prompt, asking them if they wish to remain in this menu or go to the title screen.
Pikmin 3
| Area selection menu | |
|---|---|
| Accessed from | Day selection menu, Day results menu |
| Provides access to | KopPad, Check in, Story mode gameplay, Options menu (Pikmin 3 Deluxe only) |
| Music | S.S. Drake |
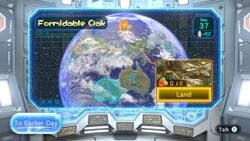
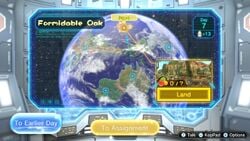
In Pikmin 3, the area selection menu takes place inside the S.S. Drake, with a 3D globe of PNF-404 on a large monitor. Areas are represented by continents on the globe, with outlines and a marker on each one. ![]() /
/ ![]() /
/ ![]() /
/ ![]() can be used to move the cursor between areas, and pressing
can be used to move the cursor between areas, and pressing ![]() /
/ ![]() /
/ ![]() /
/ ![]() will select it, bringing the cursor to a large "Land" button on the bottom right. Selecting the Land button will start the day in the selected area, bringing up the loading screen.
will select it, bringing the cursor to a large "Land" button on the bottom right. Selecting the Land button will start the day in the selected area, bringing up the loading screen.
(There are some details to the way areas are selected. The cursor can also be moved to the Land button with the stick. In Stylus Mode, areas and buttons can also be selected by tapping them. In Pikmin 3, moving the cursor around doesn't automatically select areas, but in Pikmin 3 Deluxe, it does. The cursor can only be moved to areas that have been unlocked; the appearance of the globe is different depending on how many areas are available.)
Some additional buttons are present in this menu. A large "To Earlier Day" button in the bottom left returns to the day selection menu when selected. In Pikmin 3 Deluxe, this button can also be reached by pressing ![]() /
/ ![]() , and there is also a pop-up to confirm the player's choice. In addition, after rescuing Captain Charlie in Pikmin 3 Deluxe, a new gold button on the bottom of the map labeled "To Assignment" appears. Selecting it takes the player directly to the Side Stories menu. This option remains on every future save file after being unlocked, even before Charlie is saved.
, and there is also a pop-up to confirm the player's choice. In addition, after rescuing Captain Charlie in Pikmin 3 Deluxe, a new gold button on the bottom of the map labeled "To Assignment" appears. Selecting it takes the player directly to the Side Stories menu. This option remains on every future save file after being unlocked, even before Charlie is saved.
In this menu, the player can press ![]() /
/ ![]() /
/ ![]() /
/ ![]() to open a Check in (or Talk) conversation; this causes the camera to zoom out to view the Koppaites talking. This button prompt is shown on-screen. In Pikmin 3 Deluxe, additional button prompts are shown:
to open a Check in (or Talk) conversation; this causes the camera to zoom out to view the Koppaites talking. This button prompt is shown on-screen. In Pikmin 3 Deluxe, additional button prompts are shown: ![]() will open the KopPad (with the area shown on the radar being the current selected area), and
will open the KopPad (with the area shown on the radar being the current selected area), and ![]() will open the pause menu. (In the original Pikmin 3, the KopPad is shown on the GamePad at all times, unless in GamePad-only mode, which will instead have a button in the top-left to open it.)
will open the pause menu. (In the original Pikmin 3, the KopPad is shown on the GamePad at all times, unless in GamePad-only mode, which will instead have a button in the top-left to open it.)
The menu also displays some additional information. On top of the map is a box in the top left with the name of the selected area, a box on the top right with the current day and amount of juice left, and a box in the bottom right with a slideshow of images of the selected area (the images shown are 3 preset images per area and the last 3 photos taken in that area with the KopPad Camera in the current playthrough) and a numerical display of the fruits collected in the area (and how many fruits there are in the area, if that information has been unlocked).
If a major story event happened on the previous day, the Koppaites will talk about it before the menu can be used. In addition, after Louie is saved for the first time, the menu will be skipped altogether, as Louie lands the ship in the Garden of Hope. When a new area is unlocked, there will also be a cutscene highlighting the new area, and the appearance of the globe will change after that.
Hey! Pikmin
| Sector selection menu | |
|---|---|
 Brilliant Garden selected. | |
| Accessed from | Saved game selection menu |
| Provides access to | Area selection menu, Pikmin Park, Fragment of Hope |
| Music | Sector selection |
| Area selection menu | |
|---|---|
 As seen in the Brilliant Garden. | |
| Accessed from | Sector selection menu |
| Provides access to | Logs menu, Options menu, Pikmin Park, Most areas |
| Music | Brilliant Garden area selection, Verdant Waterfront area selection, Sparkling Labyrinth area selection, Ravaged Rustworks area selection, Leafswirl Lagoon area selection, Sweltering Parchlands area selection, Snowfall Field area selection, Lushlife Murk area selection |
Hey! Pikmin does not have days, so the area selection menu appears in between levels. It has 2 distinct parts: a sector selection menu for selecting a sector, and an area selection menu for selecting an area within the sector. Each sector has a separate area selection menu, except for The Final Stretch, which only has 1 area and skips the menu as a result.
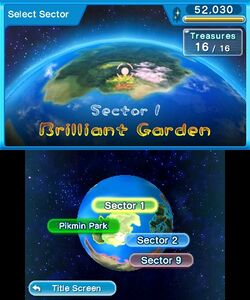
The sector selection menu shows a globe of the Hey! Pikmin planet on the bottom screen, which can be orbited around by dragging the ![]() stylus on the touch screen. Each sector is represented by a large landmass on the planet with a colored outline around it. The sector number is indicated above the landmass in a rounded box in the same color as the outline. Only sectors that are mostly visible from the current viewing angle have their numbers visible. Upon tapping a sector's continent or box, the top screen, which shows a closer view of the planet from a low angle, will quickly pan to show the sector selected, along with its name. Upon tapping the sector again, the area selection menu for that sector will be opened. The top screen also shows the text "Select Sector", the total amount of Sparklium collected, and the number of treasures collected in that sector. The bottom screen has a button to return to the title screen.
stylus on the touch screen. Each sector is represented by a large landmass on the planet with a colored outline around it. The sector number is indicated above the landmass in a rounded box in the same color as the outline. Only sectors that are mostly visible from the current viewing angle have their numbers visible. Upon tapping a sector's continent or box, the top screen, which shows a closer view of the planet from a low angle, will quickly pan to show the sector selected, along with its name. Upon tapping the sector again, the area selection menu for that sector will be opened. The top screen also shows the text "Select Sector", the total amount of Sparklium collected, and the number of treasures collected in that sector. The bottom screen has a button to return to the title screen.
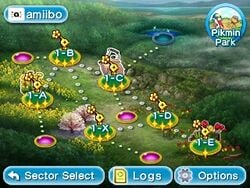
The area selection menu is like a traditional level map. It shows the areas within the sector as green bubbles on top of a landscape background on the bottom screen. Each bubble shows which treasures have been collected in the area as small icons which can be grey dots (for an uncollected treasure) or yellow stars (for a collected treasure), and also shows the area's number. Secret Spots are shown on the map as small purple bubbles, and Sparklium Springs are shown as small blue bubbles. Lines of white dots connect the areas, and smaller yellow dots connect the areas to Secret Spots or Sparklium Springs. Tapping a bubble will select it, placing a cursor over it, and tapping it again will confirm it, entering the area. The top screen shows an animated background representing the currently selected area, as well as the currently-selected area's name, and icons of the treasures collected there. The bottom screen has buttons to return to the sector selection menu, view the logs, open the options menu, scan an amiibo, and enter the Pikmin Park. The top screen also shows the text "Select Area", the sector number, and the total amount of Sparklium collected.
Gallery
Pikmin
Pikmin 2
Pikmin 3
Trivia
- The day counter bubble in Pikmin 2 can only contain 3 digits, so if the current day is greater than 999, it will not display properly.
- Pressing
 in New Play Control! Pikmin 2's area selection menu will cause the Wii Remote's speaker to sound a "boing!" sound, same as the one heard when picking an invalid number of Pikmin from the Onion menu.
 - In the area selection menu and 2-Player Battle menu of Pikmin and Pikmin 2, it is possible to press the whistle button to abort an area selection, provided the small animated ship or Onions have yet to land.
- Shooting stars occasionally fall in the background of the area selection menu in Pikmin and Pikmin 2. When the final area is being unlocked, several shooting stars in a row appear for some seconds.
- Pikmin 3's area selection menu contains several pieces of Koppaite text.
