Combat

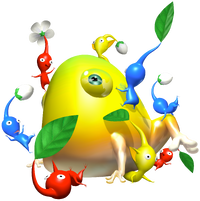
In the Pikmin series, Pikmin and leaders need to engage in combat against the many different enemies they encounter. Combat is a core mechanic of the series, as it is frequently required to open up paths or retrieve collectibles. There are many ways of damaging enemies and many technicalities of the combat system. To defeat an enemy, its health must be reduced to 0.
Dealing damage
Slap
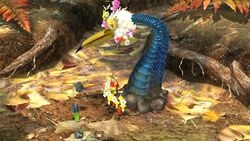
The main way Pikmin damage enemies is by slapping the enemies with their stems. Unless thrown directly onto an enemy, a Pikmin will stand next to an enemy, periodically jumping at it to slap it with the stem. There is also the possibility of the Pikmin eventually latching on and dealing damage at a much faster rate. Some enemies, like Female Sheargrubs, are too small to be latched onto but have a small enough amount of health that they die quickly. Other enemies, like the Anode Beetle, are larger but still cannot be latched onto. Idle Pikmin will automatically begin hitting enemies, obstacles, and eggs if they are near enough. In Pikmin and Pikmin 2, swarming an enemy will cause most of the involved Pikmin to latch onto it, if possible, and begin attacking. In Pikmin 3, Pikmin that are charged into an enemy will always immediately latch onto it if they make contact with it and if the enemy is possible to be latched onto.
In competitive modes like 2-Player Battle in Pikmin 2 and Bingo Battle in Pikmin 3, Pikmin can be commanded to harm other leaders or their Pikmin. This can be accomplished by throwing, swarming, or charging Pikmin into another player's leader or forces, although in 2-Player Battle, Pikmin merely need to be standing by the opposing leader or their Pikmin to initiate combat. In Pikmin, Mushroom Pikmin can also attack Captain Olimar and his Pikmin in a similar fashion.
Each Pikmin will attack with a constant rhythm, and as a result, having more Pikmin on an enemy increases the rate of damage. Different Pikmin types deal different amounts of damage per hit in different games, as shown in the following table:
| Type | Damage | ||
|---|---|---|---|
| Pikmin | Pikmin 2 | Pikmin 3 | |
| Red Pikmin | 15 | 15 | 15 |
| Yellow Pikmin | 10 | 10 | 10 |
| Blue Pikmin | 10 | 10 | 10 |
| Purple Pikmin | N/A | 20 | 15 |
| White Pikmin | N/A | 10 | 5 |
| Bulbmin | N/A | 10 | N/A |
| Rock Pikmin | N/A | N/A | 20 |
| Winged Pikmin | N/A | N/A | 5 |
Some notes:
- Rock Pikmin cannot latch onto enemies in most cases; see below.
- In Pikmin 3, the first hit that a Pikmin delivers to an enemy after latching on will inflict double damage.
- Maturity doesn't have an effect on how much damage a Pikmin does.
- When any type of Pikmin is under the effect of ultra-spicy spray, their damage output will be different; see here.
- Petrified enemies will remain immobile until they either die or break out. Whilst petrified, enemies may suffer more or less damage than normal; see here.
Purple Pikmin pound
- Main article: Purple Pikmin.
In Pikmin 2, when a Purple Pikmin is thrown onto an enemy, it will pound onto that enemy from above, dealing much more damage than a standard hit. For most enemies, this is 50 damage, but for the Segmented Crawbster, Waterwraith, and Emperor Bulblax it is 10 damage. After this pound, it will get off the enemy and hit it from the side as normal.
Each pound also has a chance of stunning an enemy. For most enemies, this chance is 30%, but some enemies have higher or lower chances. When an enemy is stunned, it is frozen and does not move, usually for 5 seconds, though a few enemies have longer stun times.
White Pikmin poison
When a White Pikmin is eaten by an enemy, the enemy will instantly take damage from the White Pikmin's internal poison. Each White Pikmin ingestion causes individual damage, even if multiple are eaten at once. Every species of enemy takes a different amount of damage from an ingestion, and this varies by game. This is defined in the game's files, and each game tackles it differently. On Pikipedia, that information can be found in the corresponding enemy's article, in the "Technical information" section.
In Pikmin 2, each enemy species specifies in its data the damage per ingestion. It is usually in the range of hundreds of damage points, with 300 being the most common value. Most enemies have it set to a value equal to or greater than their health, to ensure that a single White Pikmin ingestion will always defeat the enemy. Powerful enemies (such as bosses) have it set to a lower proportion, with the Pileated Snagret being the most resistant, only losing 8% of its health per White Pikmin ingestion (40 out of 5000).
In Pikmin 3, White Pikmin are only found in Mission Mode and Bingo Battle, but each enemy species still has data for how to get damaged by White Pikmin poison, including enemies that cannot eat Pikmin or are not found in stages with White Pikmin. The number in the game files specifies the amount of White Pikmin ingestions that are needed to kill the creature, so an enemy that eats a White Pikmin will lose a number of health points equal to its total health divided by that number. The damage thus varies by enemy, but for enemies requiring multiple ingestions to kill, it ranges between 150 and 360. Generally, small enemies take 1 ingestion to kill, medium-sized enemies take 3, large-sized enemies take 5, and mini-bosses take 10.
Rock Pikmin
- Main article: Rock Pikmin.
|
The following article or section is in need of assistance from someone who plays Pikmin 3 Deluxe. |
When Rock Pikmin are thrown directly at an enemy, instead of latching on and hitting it, they will bounce off it like a rock, dealing a high amount of damage. This damage varies by enemy, as every enemy has an internal value for the number of Rock Pikmin impacts it takes to defeat it. For example, a Bulborb normally has 1000 HP and takes 25 Rock Pikmin hits to kill, so each hit does 40 damage, whereas a Medusal Slurker normally has 750 HP and takes 10 Rock Pikmin hits to kill, so each hit does 75.
When charged onto an enemy or when running towards it while idle, Rock Pikmin will attack by rolling into the enemy. This normally deals 20 damage, but it happens much less frequently than slap attacks, which means calling Rock Pikmin and throwing them again usually deals more damage than letting them attack on their own. There are some situations where Rock Pikmin can latch onto enemies, such as on the legs of the Shaggy Long Legs, and they will attack at the normal speed in these situations.
Punch
- Main article: Punch.
When a leader doesn't have any Pikmin in their squad, they can perform a punch, or in the case of Pikmin 2 with the Rocket Fist, a series of punches. The exact damage depends on the game and the type of punch. In Pikmin, a punch deals 10 damage. In Pikmin 2, regular punches deal 7.5 damage, but after the Rocket Fist is obtained, the third punch in a series deals 18.75 points of damage. In Pikmin 3, a punch deals 3 damage.
Bomb rock
- Main article: Bomb rock.
|
To do: Describe the specifics of how bomb rock damage works. |
Bomb rocks can be used in combat. Their explosions deal a variable amount of damage to objects in range, though they usually cause much more damage to an enemy that ingests it directly.
Tactics
|
The following article or section contains guides. |
It's usually a good idea to pile as many Pikmin at once onto an enemy, maximizing the damage done to it as well as causing it to focus more on shaking off its attackers rather than eating them. That said, depending on the enemy, it may be even more advantageous to wait until the enemy is vulnerable before attacking. If an enemy is busy in the middle of an idle action that cannot be interrupted, like a Bearded Amprat stretching, that is a great opportunity to strike, since it buys the player more time before the beast counter-attacks. Enemies can also be coaxed into performing long, relatively safe actions using one or two Pikmin, like a Fiery Blowhog being enticed to buck Pikmin, since after this, it follows up with a flame-spitting attack, and this gives a lot of time to attack its back while it cannot do anything to the Pikmin. Whistling Pikmin off an enemy during combat can also be important, particularly when the enemy is about to shake Pikmin off, as Pikmin shaken to the ground are left vulnerable for a short period before they can be used again.
Some enemies have weak spots, can only be attacked at a certain part of their body, or can only be attacked in a special way. Bulborbs in Pikmin 3 can have Pikmin thrown at their eyes, which causes them flinch. Some enemies, such as the Quaggled Mireclops, are only vulnerable at certain parts of their bodies: in this case, the creature's fleshy hooves and fruit-like head are the only vulnerable parts. Breadbugs and their larger counterpart cannot be swarmed, but Pikmin can be thrown onto their back to inflict damage. Smaller enemies, such as Dwarf Bulborbs and most mandiblards, can be killed instantly by throwing a single Pikmin onto their back.
Although Pikmin that are captured by an enemy will quickly be swallowed and killed, they may be able to be saved. By killing an enemy with Pikmin in its grasp before it can swallow them, the Pikmin will be released safely. In Pikmin 2, enemies can also be petrified with a dose of ultra-bitter spray to prevent them from eating any Pikmin they may have in their mouth, buying precious time for the player to finish the creature off. Some enemies may also forcefully spit out Pikmin that haven't been swallowed yet when attacked in a certain way, like if a Pikmin is thrown at a Bulborb's eyes in Pikmin 3.
Taking damage

|
To do: Document in all games if and how Pikmin get up faster by being whistled. |
Leaders and Pikmin, too, can be damaged during combat. As with Pikmin, leaders can be bitten, knocked back, crushed, and suffer negative consequences for touching a harmful hazard. Leaders can collect upgrades, which can help protect them from damage. On top of losing health, leaders can also suffer other consequences from attacks, as elaborated here.
Pikmin do not seem to have health that can be depleted, although this is hard to confirm, as explained here. During combat they can still be harmed. In Pikmin and Pikmin 2, Pikmin that are knocked down by an enemy have a chance of their maturities being reduced as explained here. In Pikmin 3, Pikmin that are shaken off of an enemy or fall off of one will retain their maturities. In any Pikmin game, Pikmin that are shaken off of an enemy will briefly lie on the ground before getting up, but this is not always the case. Pikmin battling a Shaggy Long Legs that fall off one of its legs after picking the hairs off one of its joints will get up on their own, but Pikmin the creature shakes off normally will remain on the ground indefinitely until they are whistled, as bumping into them does nothing.
Flower-stage Pikmin that die in Pikmin have a chance of leaving behind a seed that becomes a sprout the following day and can be plucked. Hazards like fire, water, and poison will respectively cause all but Red Pikmin, Blue Pikmin, and White Pikmin to begin scrambling wildly with that corresponding hazard on the end of their stem. Enemies in Pikmin 2 that use electricity are arguably the deadliest, as electricity in that game can instantly kill Pikmin. Electricity in Pikmin 3, however, is harmless, only causing non-Yellow Pikmin that come in contact with it to be thrown back, onto the ground, paralyzed, until they are whistled.
Enemies have a variety of ways to harm or kill Pikmin, such as deflowering them, burying them, crushing them, eating them, or using another hazard against them. Most enemies have a limit on how many Pikmin they can kill or harm at once in a given attack. For example, a Spotty Bulborb in Pikmin can only gobble 3 Pikmin at most in a single chomp, but a Spotty Bulbear can capture up to 5. Some enemies can also harm other enemies or themselves; a prime example is the Decorated Cannon Beetle, a creature that spits boulders which can be led into other enemies or even the creature that launched it.
Likeliness to die
In Pikmin and Pikmin 2, some Pikmin are more likely to die than others, due to engine limitations. It boils down to how the games check which Pikmin should die for any given attack.[1][2] In Pikmin 3 and Hey! Pikmin, although it isn't clear, it seems that the Pikmin closest to the center of the attack are the ones that get hit by it.
The general idea is that each game keeps a list of loaded Pikmin in memory. This list can fit 100 entries, and normally, it starts off empty. When a Pikmin is loaded into memory, it fills in the next vacant slot. In the case of an empty list, this is slot 0. The second Pikmin to be called out fills slot 1, and so on. When an enemy attacks to eat, the game checks every loaded Pikmin to see if it is colliding with the mouth's hitbox, and starts checking slot 0, then slot 1, etc.
This behavior is also used for other enemy-related actions, like a Fiery Blowhog deciding whether to change targets or to keep the current one, in Pikmin.
General case
Suppose that a day starts, 100 Pikmin are taken out from Onions, and they are all bundled together within reach of a Red Bulborb's bite hitbox, which is an attack that will only chomp 5 Pikmin. The game will check the Pikmin in slot 0, confirm that it is within reach, and add it to the list of eating victims. It would then check slot 1, confirm that that one is as well, and add it. It would check slot 2, confirm that as well, and add it. It would do the same for slots 3 and 4. At this point, since it already added 5 Pikmin to the list of eating victims, it would stop checking, and would let the Bulborb's attack finish with those 5 Pikmin captured in its mouth. In this case, the five Pikmin that fell victim to the attack were the first five ones that got pulled out of the Onions. This means that, when starting a day normally, the first Pikmin that left the Onion are more likely to get eaten.
Cases with no "first" Pikmin
Above is what happens in the most plain cases, but there are times when the player enters an area or cave with a lot of Pikmin, and the player doesn't control the order in which Pikmin load.
In Pikmin, if the player lands on an area with buried Pikmin, those Pikmin are actually not a part of the list of Pikmin, but rather, a list of seeds. A Pikmin is only created and added to the list when it is plucked.
In the case of Pikmin 2, this scenario happens when a cave sublevel is entered, when the player exits a cave and lands on an overworld area along with the Pikmin that escaped, or when the player enters an area that already has buried Pikmin. The Pikmin here are all truly loaded outside of the player's control. The game does however follow an algorithm to decide how to place Pikmin in the area and to fill in the Pikmin list slots:
- Gather information about what Pikmin should be loaded when the area/cave loads. It does not matter how it is sorted.
- For every type of Pikmin declared in the game:
- Check the compiled information to see how many Pikmin of this type must be spawned.
- Spawn that number of Pikmin.
Internally, Pikmin types are declared with Blue Pikmin first. Then comes Red, Yellow, Purple, White, Bulbmin, and Pikpik carrot. The reasons for this seemingly random order are not known for certain. However, it is possible that a discovery order of Blue→Red→Yellow was planned during development for Pikmin, due to Blue Pikmin being the primary type shown off in old trailers.[3] So regardless, in scenarios where the game has to load multiple Pikmin of different types "at once", Blue Pikmin will be loaded first, meaning they will fill in the first Pikmin slots. If players find themselves in one of these scenarios then Blue Pikmin will be more likely to be eaten, since hitboxes that catch multiple Pikmin will pick the Blue Pikmin first.
As a matter of fact, some players have noticed that, in Pikmin 2, Blue Pikmin seem more likely to die than other types.[4][5] This is exactly why.
To note is that if the player lands in a sublevel with Bulbmin that can be collected after the parent is killed, then those Bulbmin have a higher priority than any of the Pikmin that the player had. After they are added to the player's group and the player heads to the next sublevel, the order of the group returns to the standard order stated above.[6]
In Hey! Pikmin

|
The following article or section is in need of assistance from someone who plays Hey! Pikmin. |
In Hey! Pikmin, combat works very differently to how it works in the main series of games. As a 2D game on the 3DS, combat is less focused on maneuvering around enemies and strategizing to defeat them, and is more about quick reactions and accurate aiming. Enemies rarely require complex strategies to defeat, with the exception of bosses. Some enemies cannot be defeated at all.
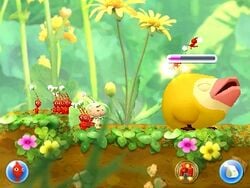
The main way of defeating enemies is by throwing Pikmin at them. Small enemies usually die in 1 hit, meaning positioning the cursor accurately is the most important skill in defeating them. Larger enemies usually have some amount of health, represented as a bar above the creature. When a non-Rock Pikmin is thrown on top of an enemy, it will begin to rapidly jump on it, dealing damage with each jump. Any number of Pikmin can be jumping on an enemy at once. Blue Pikmin, Yellow Pikmin, and Winged Pikmin all deal the standard amount of damage each jump. Red Pikmin deal twice the standard amount of damage each jump. When any of these types is thrown directly at an enemy, the initial impact does twice the damage of a single jump for that type. Rock Pikmin deal damage differently – they do not jump on enemies, and only deal damage on a direct impact before walking back to Olimar. The amount of damage dealt by a direct impact varies by enemy, and is generally much higher than a direct impact from another type. Note that limited research has been done into combat in Hey! Pikmin, and this information is unconfirmed.
Some areas are set up in ways where enemies can be defeated in other ways. Examples include Serene Stream, where a Mockiwi can be led into a pool of water where it drowns, and Barriers of Flame, where an iron block can be pushed into a pit, crushing a Fiery Blowlet.
Most enemies can attack Pikmin. If a Pikmin comes into contact with a dangerous part of an enemy, such as a Crumbug's mouth or the spore of a Spornet, it will die immediately, making it very easy to lose small numbers of Pikmin to a combat encounter. Combat in Hey! Pikmin is very fast-paced for this reason, with the goal almost always being to defeat an enemy as quickly as possible by accurately throwing large numbers of Pikmin at it. Olimar can also lose health to enemy attacks, but can regenerate health with the use of hearts scattered around areas.
Bosses in this game are by far the most complex enemies, and are fought in special areas. Each boss has various attack phases, during most of which it is invulnerable. By exploiting a weakness specific phase, the player can make the boss vulnerable. In these vulnerable phases, the player has a short period of time to deal as much damage as possible.
In Pikmin Adventure
|
The following article or section is in need of assistance from someone who plays Pikmin Adventure. |
See also
References
- ^ YouTube video explaining what Pikmin are more likely to die in Pikmin
- ^ YouTube video explaining what Pikmin are more likely to die in Pikmin 2
- ^ YouTube video of a prerelease trailer of Pikmin from 2000
- ^ Why do blue pikmin get eaten the most??? on IGN Boards, published on October 18th, 2008, retrieved on August 15th, 2017
- ^ Blue pikmin get eaten...alot on Pikipedia, published on February 9th, 2008, retrieved on August 15th, 2017
- ^ YouTube video demonstrating how untamed Bulbmin have a higher priority, published on August 8th, 2020, retrieved on August 12th, 2020
| Pikmin | |
|---|---|
| Types | Red Pikmin • Yellow Pikmin • Blue Pikmin • Purple Pikmin • White Pikmin Rock Pikmin • Winged Pikmin • Ice Pikmin • Bulbmin • Glow Pikmin |
| Biology | Candypop Bud • Idle • Maturity • Onion • Flarlic • Pellet Pikmin extinction • Trip • Sprout • Seedling • Soul • Squad |
| Abilities | Carry • Dig • Dodge • Fight • Hide |
| Controls | Charge • Dismiss • Swarm • Pluck • Throw • Whistle |
| Other | Decor Pikmin • Leafling • Mushroom Pikmin • Pikpik carrot |
