Glutton's Kitchen: Difference between revisions
Jimbo Jambo (talk | contribs) m (Reminds me of a certain Homestar Runner cartoon) |
|||
| Line 12: | Line 12: | ||
#*[[Master's Instrument]] | #*[[Master's Instrument]] | ||
# | # | ||
#*[[Massive Lid]] | #*[[Massive Lid]] | ||
#*[[Imperative Cookie]] | #*[[Imperative Cookie]] | ||
# | # | ||
| Line 18: | Line 18: | ||
#*[[Harmonic Synthesizer]] | #*[[Harmonic Synthesizer]] | ||
# | # | ||
#*[[Happiness Emblem]] | #*[[Happiness Emblem]] | ||
#*[[Invigorator]] | #*[[Invigorator]] | ||
#*[[White Goodness]] | #*[[White Goodness]] | ||
# | # | ||
#*[[Sulking Antenna]] | #*[[Sulking Antenna]] | ||
#*[[Boom Cone]] | #*[[Boom Cone]] | ||
# | # | ||
#*[[Hideous Victual]] | #*[[Hideous Victual]] | ||
Revision as of 10:23, January 30, 2009
| Glutton's Kitchen | |
|---|---|

| |
| Location | Perplexing Pool |
| Sublevels | 6 |
| Treasures | 14 |
| Hazards | Electricity |
The Glutton's Kitchen is likely the second or third cavern you'll enter in the Perplexing Pool. To enter the cave, you'll need to have found Yellow Pikmin, and you may need plenty of them. You will probably already have built and cleared a route to the cave, which involved killing several enemies, including Shearwigs, and building a bridge, if applicable, so take your yellows, maybe 50 or so, along with several other Pikmin, especially Purple Pikmin, and head towards the area where you may see three eggs, there you should easily see an electrical gate, and a Yellow Wollywog nearby, it would be useful if you eliminate it and then destroy the gate. Once that is done, proceed on in. A Honeywisp may also be nearby.
Treasures
Enemies
- Anode Beetle
- Armored Cannon Beetle Larva
- Breadbug
- Cloaking Burrow-nit
- Dwarf Bulbear
- Female Sheargrub
- Male Sheargrub
- Mitite
- Puffy Blowhog
- Spotty Bulbear
- Boss: Giant Breadbug
Pikmin:
As said: 50-70, depending on how many Purples you have.
Note: because of the many differences between the NTSC and PAL versions in this cave, you may encounter a different treasure/enemy from time to time.
Sublevel 1
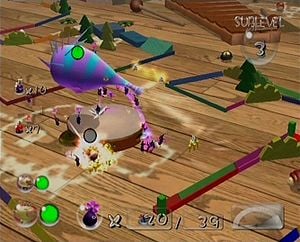
We meet quite a few Dwarf Bulbears here. Kill them by throwing the Purple Pikmin, but aim well, then go to to a wooden box. Inside should be another Bulbear. Defeat it too by throwing Pikmin over the edge, and grab the Master's Instrument. Hold "R" to see walls from a house! Continue to the next Sublevel.
Sublevel 2
This is quite cute. There's a toy train track surrounding the Pod. You can go onto it, but there's nothing special. Here we meet the Breadbugs. Read the link on details on defeating it. There are multiple ways. Also, you will encounter napkins on the floor. They don't seem to have a function, they just seem to be there because this cave has a house/food theme. Watch out for Cloaking Burrow-nits and Sheargrubs as you nab the Massive Lid and Imperative Cookie.
Sublevel 3
A xylophone and a small tambourine. Those are the decorations on this level. Lots of electric nodes and Anode Beetles will be in your way, so take care of those with your Yellow Pikmin; if you're low on Yellows, you're in luck, as this sublevel is the only place in the game to find a Golden Candypop Bud. A Puffy Blowhog also flies around here. Watch out for its strong breath! Breadbugs will be stealing the Harmonic Synthesizer and Director of Destiny since they lie in the open.
Sublevel 4
Not much here. A few Breadbugs and a Spotty Bulbear with its young. Try to take them out with a single bitter spray. Grab the Happiness Emblem, Invigorator and White Goodness, then leave.
Sublevel 5
Again, lots of Dwarf Bulbears, but your main concern should be the Armored Cannon Beetle Larvae which burrow out of dirt piles. To defeat them, throw Pikmin onto their plates/blocks. Repeat on all three. Get the Dwarf Bulbears, then go for the Sulking Antenna and the Boom Cone.
Alternatively, the Cannon Beetles can be used to defeat the Dwarf Bulbears and, if lucky, other Cannon Beetles. Using only a Captain, lure them into hurling their rocks at the other beasts.
After you've cleared the enemies from this sublevel, search for the Violet Candypop Bud and the Queen Candypop Bud to aid your forces before you head down to the final floor. The flowers should fall from above in one of the "dead ends."
Sublevel 6
The final floor with the boss. It is a Giant Breadbug. Check the link for info on how to defeat it. Once done, you should be able to obtain the Hideous Victual, the Meat of Champions, the Sweet Dreamer and the most important one: the Dream Material. It makes you immune to the hazard you have been fighting the whole time here: electricity. Escape with the geyser for the "Cave Complete" blur.
|
This page is currently pending deletion. Reason: |
#REDIRECT Template:P2 caves
