Category:Pikmin 1 images
Jump to navigation
Jump to search
The following is a collection of images related to the first Pikmin game and the New Play Control! remake.
Subcategories
This category has the following 11 subcategories, out of 11 total.
P
- Pikmin 1 artwork (185 F)
- Pikmin 1 Challenge Mode images (34 F)
- Pikmin 1 IGN prerelease images (38 F)
- Pikmin 1 log pictures (33 F)
- Pikmin 1 prerelease images (36 F)
- Pikmin 1 unused images (8 F)
T
- The Distant Spring images (93 F)
- The Final Trial images (30 F)
- The Forest Navel images (105 F)
- The Forest of Hope images (95 F)
- The Impact Site images (64 F)
Media in category "Pikmin 1 images"
The following 135 files are in this category, out of 1,073 total.
(previous page) (next page) TDS start.png 640 × 480; 512 KB
 TDS top 2.png 640 × 480; 480 KB
 TDS top.png 640 × 480; 451 KB
 TDS uv lamp.png 640 × 480; 554 KB
 TDS water 1.png 640 × 480; 347 KB
 TDS water 2.png 640 × 480; 431 KB
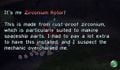
 TDS zirconium.png 640 × 480; 509 KB
 TestFont txe.png 512 × 256; 76 KB
 Testmap HD.jpg 666 × 659; 141 KB
 TFH ACB arena.png 640 × 480; 613 KB
 TFH before ACB.png 640 × 480; 586 KB
 TFH before snagrets.png 640 × 480; 564 KB
 TFH bolt path.png 640 × 480; 520 KB
 TFH bolt.png 640 × 480; 442 KB
 TFH can.png 640 × 480; 570 KB
 TFH hole.png 640 × 480; 523 KB
 TFH map cropped.jpg 300 × 203; 22 KB
 TFH open 1.png 640 × 480; 495 KB
 TFH open 2.png 640 × 480; 560 KB
 TFH pond.png 640 × 480; 506 KB
 TFH sagittarius.png 640 × 480; 537 KB
 TFH shock absorber.png 640 × 480; 579 KB
 TFH snagrets.png 640 × 480; 539 KB
 TFH start.png 640 × 480; 510 KB
 TFH yellows.png 640 × 480; 554 KB
 TFN BLL.png 640 × 480; 337 KB
 TFN blowhogs.png 640 × 480; 358 KB
 TFN blues entrance.png 640 × 480; 469 KB
 TFN blues.png 640 × 480; 458 KB
 TFN bottle.png 640 × 480; 345 KB
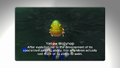
 TFN bridge.png 640 × 480; 447 KB
 TFN gravity jumper.png 640 × 480; 378 KB
 TFN libra entrance.png 640 × 480; 432 KB
 TFN libra.png 640 × 480; 325 KB
 TFN map cropped.jpg 300 × 257; 24 KB
 TFN open.png 640 × 480; 447 KB
 TFN paths.png 3,416 × 4,326; 219 KB
 TFN puffstool arena.png 640 × 480; 376 KB
 TFN puffstool entrance.png 640 × 480; 352 KB
 TFN shearwigs.png 640 × 480; 454 KB
 TFN start.png 640 × 480; 530 KB
 TFN top.png 640 × 480; 417 KB
 TFoH paths.png 3,304 × 4,536; 179 KB
 TFT before boss.png 640 × 480; 541 KB
 TFT bombs 2.png 640 × 480; 552 KB
 TFT bombs.png 640 × 480; 572 KB
 TFT boss east.png 640 × 480; 518 KB
 TFT boss north.png 640 × 480; 490 KB
 TFT boss west.png 640 × 480; 550 KB
 TFT boss.png 640 × 480; 378 KB
 TFT bridge.png 640 × 480; 526 KB
 TFT fire.png 640 × 480; 546 KB
 TFT map cropped.jpg 300 × 152; 16 KB
 TFT paths.png 2,324 × 4,214; 110 KB
 TFT start 2.png 640 × 480; 599 KB
 TFT start.png 640 × 480; 524 KB
 TFT water.png 640 × 480; 574 KB
 TFT west.png 640 × 480; 563 KB
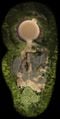
 The Distant Spring HD.jpg 1,328 × 2,090; 610 KB
 The Distant Spring P1S map.png 2,119 × 3,609; 1,018 KB
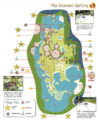 The Distant Spring Player's Guide Map.png 1,680 × 2,030; 4.44 MB
 The Final Trial HD.jpg 1,254 × 2,481; 839 KB
 The Final Trial P1S map.png 1,330 × 2,410; 559 KB
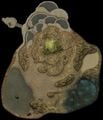 The Forest Navel HD.jpg 1,830 × 2,133; 865 KB
 The Forest Navel P1S map.png 1,953 × 2,474; 805 KB
 The Forest Navel Player's Guide Map.png 1,679 × 2,040; 4.58 MB
 The Forest of Hope HD.jpg 1,584 × 2,344; 1,008 KB
 The Forest of Hope P1 bomb rocks.jpg 340 × 280; 48 KB
 The Forest of Hope P1S map.png 2,176 × 2,593; 721 KB
 The Forest of Hope Player's Guide Map.png 1,680 × 2,000; 3.41 MB
 The Forest of Hope preview.png 152 × 88; 24 KB
 The Impact Site Challenge.gif 475 × 398; 11 KB
 The Impact Site Challenge.png 475 × 398; 7 KB
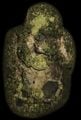
 The Impact Site HD.jpg 1,560 × 1,466; 508 KB
 The Impact Site P1S map.png 1,425 × 1,377; 348 KB
 The Impact Site.jpg 640 × 480; 279 KB
 Time passage P1.gif 250 × 200; 620 KB
 TIS clam.png 640 × 480; 439 KB
 TIS exit.png 640 × 480; 538 KB
 TIS flint 1.png 640 × 480; 498 KB
 TIS flint 2.png 640 × 480; 519 KB
 TIS goolix.png 640 × 480; 510 KB
 TIS paths.png 2,492 × 2,408; 81 KB
 TIS start 2.png 640 × 480; 563 KB
 TIS start.png 640 × 480; 496 KB
 TIS trunk 1.png 640 × 480; 520 KB
 TIS trunk 2.png 640 × 480; 602 KB
 Tuto1 HD.jpg 406 × 1,978; 214 KB
 Tuto2 HD.jpg 593 × 907; 226 KB
 TwigsP1.png 104 × 142; 22 KB
 Usuba.png 381 × 472; 193 KB
 UV Lamp 2.jpg 1,123 × 637; 133 KB
 UV Lamp 4.jpg 1,104 × 592; 164 KB
 UV Lamp P1S icon.png 128 × 128; 22 KB
 UV Lamp.png 957 × 849; 1.19 MB
 Uvlamp.jpg 429 × 226; 22 KB
 UVLampPikmin.jpg 594 × 642; 73 KB
 Veronica persica.png 640 × 524; 591 KB
 Water Dumple Enemy Reel Switch.png 1,920 × 1,080; 1.41 MB
 Water Dumple P1 art.png 916 × 702; 397 KB
 Weeds.jpg 539 × 216; 33 KB
 Whimsical Radar 2.jpg 1,146 × 713; 148 KB
 Whimsical Radar 3.jpg 934 × 870; 280 KB
 Whimsical Radar 4.jpg 1,140 × 706; 164 KB
 Whimsical Radar P1S icon.png 128 × 128; 20 KB
 WhimsicalRadarPikmin.jpg 642 × 649; 57 KB
 Whistle.png 421 × 334; 182 KB
 Wogpole P1 art.png 800 × 448; 165 KB
 Wollyhop Enemy Reel Switch.png 1,920 × 1,080; 1.38 MB
 Wollywog back.jpg 640 × 468; 63 KB
 Wolpole Enemy Reel Switch.png 1,920 × 1,080; 1.49 MB
 Wolpole enemy reel.jpg 1,280 × 1,024; 114 KB
 Yellow Bud Pikmin Bomb Rock P1S icon.png 128 × 128; 19 KB
 Yellow Bud Pikmin P1S icon.png 128 × 128; 15 KB
 Yellow Flower Pikmin Bomb Rock P1S icon.png 128 × 128; 18 KB
 Yellow Flower Pikmin P1S icon.png 128 × 128; 14 KB
 Yellow Leaf Pikmin Bomb Rock P1S icon.png 128 × 128; 19 KB
 Yellow Leaf Pikmin P1S icon.png 128 × 128; 16 KB
 Yellow Onion.png 1,587 × 1,884; 480 KB
 Yellow Pellet Posy P1 art.png 558 × 1,824; 422 KB
 Yellow Pikmin Curious.jpg 311 × 508; 70 KB
 Yellow Pikmin holds bomb rock P1 art.png 1,872 × 951; 1.2 MB
 Yellow Pikmin Looking Back.jpg 1,056 × 1,418; 366 KB
 Yellow Pikmin P1 art.png 720 × 833; 188 KB
 Yellow Pikmin Pose.png 313 × 329; 103 KB
 Yellow Pikmin shocked P1 art.png 766 × 1,200; 275 KB
 Yellow Pikmin Surprised.png 236 × 379; 58 KB
 Yellow Wollyhop Enemy Reel Switch.png 1,920 × 1,080; 1.44 MB
 Yellow Wollywog attacked P1 art.png 3,052 × 3,074; 4.03 MB
 Yellow Wollywog P1 art.png 657 × 722; 214 KB
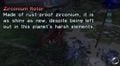
 Zirconium Rotor 2.jpg 1,134 × 658; 135 KB
 Zirconium Rotor 3.jpg 962 × 818; 235 KB
 Zirconium Rotor 4.jpg 1,111 × 610; 146 KB
 Zirconium Rotor P1S icon.png 128 × 128; 16 KB
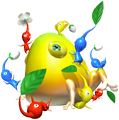
 ZirconiumRotorPikmin.jpg 514 × 610; 48 KB


