Treacherous Currents
| Treacherous Currents Sector 2 – Area X | |
|---|---|

| |
| Treasures | 2 |
| Pikmin available | Blue Pikmin |
| Requirements | Complete Glowing Bloom Pond via secret exit |
| Next area | The Keeper of the Lake |
| Music | Verdant Waterfront area Verdant Waterfront area - back side |
Treacherous Currents (うごく すいめん?, lit.: "Moving water surface") is the secret area in the Verdant Waterfront. At the start, nothing in the area is submerged. When the player progresses a bit past the start, the main gameplay mechanic starts: the level of water goes up rapidly, and submerges most of the stage. After 10 seconds have passed, it slowly dips back down, stopping a bit before going off-camera. After 2 seconds, it speeds back up again, repeating the cycle. This creates scenarios where the player has to wait and time their actions to make the most out of both dry land and underwater movement.
Description
The area is submerged in water, whose level goes up and down very regularly. The player must let the water rise in order to be able to swim up and down to avoid obstacles, such as brambles and Hydroe brambles, and keep going in the level. After some walking in the area, Olimar can enter a doorway. On the other side stands a Young Yellow Wollywog and the Everyday Cell. The second treasure, the Giant Rodent Skull can be found later in the area, before a wall of dirt blocks. The player has to be careful of the Large Splurchin near the treasure. The exit isn't too far away; the player just has to go through a horizontal corridor filled with Puckering Blinnows.
Cutscenes
| Cutscene | Screenshot | Trigger | Description |
|---|---|---|---|
| Lazy Pikmin | 
|
The player whistles near the rock above the first dirt block. | Three Blue Pikmin come out of the rock and then run to Olimar. A fourth Pikmin eventually pokes its stem out, and lazily walks in Olimar's direction, with its body slumped. After a bit of this, one of the first three Pikmin comes back and starts pushing the lazy Pikmin. |
| Small hole | 
|
The player enters the first doorway, not counting the one that leads to the Everyday Cell. | Olimar and four of his Blue Pikmin are going inside a tunnel that has a short gap on the floor. Olimar goes first, and when he notices this, he stops at the edge. The Blue Pikmin racing behind doesn't break in time and skids into him, causing him to teeter. He eventually falls in it, feet first, and ends up filling the hole. The Pikmin take this opportunity to, one by one, jump on his helmet and bounce to the other side of the gap. Following this, Olimar tries to jump to the ledge himself, but can't make it. After a bit, he manages to grab on to the Pikmin waiting for him, who fling him to safety out of the hole. The group then makes its way forward. |
| Baseball | 
|
After the four red Sparklium Seeds and large heart, the player climbs to dry land and moves forward a bit. | Two Blue Pikmin are pushing a baseball on top of a branch. Their goal is to drop the ball down, where two other Blue Pikmin are ready to catch it. When the ball hits the ground below, however, it bounces away, making the lower Pikmin jump back, and they all end up losing the object. All four become upset, but quickly snap out of it and run to Olimar, when they realize he is nearby. |
Pikmin locations
| Spot | Location | Pikmin | Requirements | Notes |
|---|---|---|---|---|
| Behind a rock | On elevated ground near the start | 4 Blue Pikmin | Have less than 4 Blue Pikmin | First group of 4 activates the lazy Pikmin cutscene. |
| Behind a rock | On elevated ground near a Young Yellow Wollywog | 4 Blue Pikmin | Have less than 4 Blue Pikmin | |
| Out in the open | On a dirt block near a group of Puckering Blinnows | 4 Blue Pikmin | First time only | |
| Behind a rock | To the left of a doorway | 4 Blue Pikmin | Have less than 4 Blue Pikmin | |
| Behind a rock | To the right of a doorway | 4 Blue Pikmin | Have less than 4 Blue Pikmin | |
| Behind a rock | On elevated ground near a Young Yellow Wollywog | 4 Blue Pikmin | Have less than 4 Blue Pikmin | |
| Out in the open | Near a rock | 4 Blue Pikmin | First time only | |
| Behind a rock | Near a group of wild Pikmin | 4 Blue Pikmin | Have less than 8 Blue Pikmin | |
| In an underwater bush | In a room hidden by three dirt blocks | 4 Blue Pikmin | Have less than 8 Blue Pikmin | |
| Behind a rock | Near a water body | 4 Blue Pikmin | Have less than 8 Blue Pikmin | |
| In an underwater bush | To the right of a doorway | 4 Blue Pikmin | ||
| Behind a rock | To the left the Giant Rodent Skull | 4 Blue Pikmin | Have less than 8 Blue Pikmin | |
| In an underwater bush | To the left of a doorway | 4 Blue Pikmin | Have less than 8 Blue Pikmin |
Objects
Treasures
Enemies
 Young Yellow Wollywog × 12
 Puckering Blinnow × 11
 Large Splurchin × 3
Obstacles
 Dirt block × 21
 Hydroe bramble × 14
- Spiked plant × 25
Plants
 Vine × 9
Others
 Sparklium Seed × 144
 Red Sparklium Seed × 14
 Heart (small) × 5
- Heart (large) × 1
Guide
|
The following article or section contains guides. |
From the start of the area head to the right before encountering some spiked plants. Wait for the water to rise up and swim along a path of Sparklium Seeds to a nearby rock to whistle four Blue Pikmin in order to break down a dirt block and progress further. While continuing forward make sure to take out the Young Yellow Wollywogs along the path until encountering a group of Puckering Blinnows alongside some Blue Pikmin above a dirt block. Break the block in order to collect the group and head to the right until encountering a vine heading up to a doorway.
Upon entering the area head up the nearby vine while avoiding the Young Yellow Wollywog and throw three Blue Pikmin at the Everyday Cell in order to bring it to Olimar. After collecting the treasure head back down the vine and head back into the main area.
Upon leaving the area head to the right until encountering some mroe dirt blocks alongside some Young Yellow Wollywogs. Along the path is a vine leading to a path with more Wollywogs and a doorway at the end of the path.
Upon entering the doorway head down the nearby vine and head to the right while being careful with the water current as there are plenty of spiked plants that could harm Olimar and the Blue Pikmin. Along the path is a minor intersection, with the lower path containing a path blocked by three large dirt blocks hiding a small room with some Sparklium and a group of four Blue Pikmin. After collecting the Pikmin and Sparklium head towards the upper path either by using the nearby vine or by swimming when the water is rising. Head to the right until encountering four more Blue Pikmin and another water body. HEad down the path quickly before encountering a doorway at the end of the path.
Upon entering the area, whistle at the group of Blue Pikmin near the door and try to avoid the Large Splurchin that's along the path. After the first Large Splurchin is a group of dirt blocks, Large Splurchins, and Young Yellow Wollywogs. Clear out the dirt blocks and Young Yellow Wollywogs in order to navigate towards a vine that leads up to the Giant Rodent Skull. After collecting the treasure head to the left in order to safely navigate around the Giant Rodent Skull and continue to the right until encountering the doorway to the last area.
Upon entering the last doorway swim up as soon as the water body rises while avoiding the Puckering Blinnows and head to the right to reach the end of the area.
Gallery
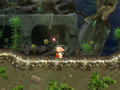
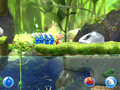
The start of the area.
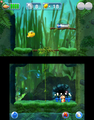
The location of the Everyday Cell.
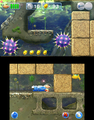
Four red Sparklium Seeds.
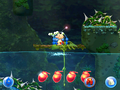
The Large Splurchin area.
The location of the Giant Rodent Skull.


Names in other languages
| Language | Name | Meaning |
|---|---|---|
| うごく すいめん? Ugoku suimen |
Moving water surface | |
| Eb en vloed | Ebb and flood | |
| Grande marée | Great tide | |
| Ebbe und Flut | Ebb and Flood | |
| Marea insidiosa | Insidious tide | |
| Rápidos traicioneros | Treacherous rapids | |
| Marea Insidiosa | Insidious Tide |
| Sector 2: Verdant Waterfront | |
|---|---|
| Normal areas | 2-A: Foaming Lake • 2-B: Serene Stream • 2-C: Glowing Bloom Pond • 2-D: The Shallow End • 2-E: The Keeper of the Lake |
| Extra areas | 2-X: Treacherous Currents • Secret Spot 5 • Secret Spot 6 • Secret Spot 7 • Secret Spot 8 • Sparklium Springs |