Back-and-Forth Road: Difference between revisions
m (→Enemies) |
(Replaced images, added a guide, and added some other minor info.) |
||
| Line 3: | Line 3: | ||
|screenshot = | |screenshot = | ||
|map = | |map = | ||
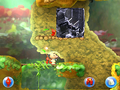
|image = Back-and-Forth Road | |image = HP Back-and-Forth Road Breakable Block Area.png | ||
|size = 320px | |size = 320px | ||
|caption = | |caption = | ||
| Line 24: | Line 24: | ||
== Cutscenes == | == Cutscenes == | ||
{| class="wikitable" | {| class="wikitable" | ||
! Cutscene || Screenshot || Trigger || Description | ! Cutscene || Screenshot || Trigger || Description | ||
|- | |- | ||
! Male Sheargrub | ! Male Sheargrub | ||
| [[File:Back-and-Forth Road Sheargrub | | [[File:HP Back-and-Forth Road Male Sheargrub Cutscene.png|200px]] | ||
| The player enters the first doorway in the area, with at least four Pikmin. | | The player enters the first doorway in the area, with at least four Pikmin. | ||
| Olimar and four of his Red Pikmin approach a rock in the tunnel that is shaking. Two of the Pikmin lift the rock, one on each end, and once they figure out what was causing the rumbling, a Male Sheargrub digging out of the ground, they become startled and quickly drop the rock down. This kills the creature, as proven by its [[soul]]. The two Pikmin look at Olimar, who shakes his head, and the group rushes on forward. | | Olimar and four of his Red Pikmin approach a rock in the tunnel that is shaking. Two of the Pikmin lift the rock, one on each end, and once they figure out what was causing the rumbling, a Male Sheargrub digging out of the ground, they become startled and quickly drop the rock down. This kills the creature, as proven by its [[soul]]. The two Pikmin look at Olimar, who shakes his head, and the group rushes on forward. | ||
|- | |- | ||
! Spectralids | ! Spectralids | ||
| [[File:Back-and-Forth Road | | [[File:HP Back-and-Forth Road Spectralids Cutscene.png|200px]] | ||
| The player explores a bit after the room with [[vine]]s and [[Shooting Spiner (Female)|female Shooting Spiners]]. | | The player explores a bit after the room with [[vine]]s and [[Shooting Spiner (Female)|female Shooting Spiners]] with at least two Red Pikmin. | ||
| Olimar and his Pikmin notice something up ahead. Four of the | | Olimar and his Pikmin notice something up ahead. Four of the Pikmin step forward and start jumping in place, happy to see [[Flutterbie family#Other Spectralids|some type of Spectralids]]. The creature flies right, and the Pikmin chase after it. Olimar sighs and shakes his head, after having failed to stop them. Following this, the wayward Pikmin eventually return and everybody regroups. | ||
|- | |- | ||
! Horn | ! Horn | ||
| [[File:Back-and-Forth Road | | [[File:HP Back-and-Forth Road Horn Cutscene.png|200px]] | ||
| The player proceeds past the room with three levels and two doorways. | | The player proceeds past the room with three levels and two doorways. | ||
| Three Yellow Pikmin are inside the tubes of a bulb horn, one on each tube. A fourth Yellow Pikmin is behind the bulb. This last Pikmin jumps on the bulb itself, causing the other Pikmin to jump out of their tubes, startled. They land flat on the ground, but quickly get up. All four of them then head towards Olimar. | | Three Yellow Pikmin are inside the tubes of a bulb horn, one on each tube. A fourth Yellow Pikmin is behind the bulb. This last Pikmin jumps on the bulb itself, causing the other Pikmin to jump out of their tubes, startled. They land flat on the ground, but quickly get up. All four of them then head towards Olimar. | ||
| Line 45: | Line 44: | ||
== Pikmin locations == | == Pikmin locations == | ||
{| class = "wikitable sortable" | {| class = "wikitable sortable" | ||
|- | |- | ||
! Spot || Location || Pikmin || Requirements || Notes | ! Spot || Location || Pikmin || Requirements || Notes | ||
|- | |- | ||
| On a [[Seeding Dandelion]] || At the start of the area. || 2 Red Pikmin || | | On a [[Seeding Dandelion]] || At the start of the area. || 2 Red Pikmin || First-time only || | ||
|- | |- | ||
| Behind an [[ | | Behind an [[iron block]] || Right after the Seeding Dandelions. || 2 Red Pikmin || First-time only || | ||
|- | |- | ||
| In a twig || || || || | | In a twig || Above the first Iron Block. || 4 Red Pikmin || Have less than 4 Red Pikmin || | ||
|- | |- | ||
| In a twig || After some vines, close to an Iron block. || || || | | In a twig || After some vines, close to an Iron block. || 4 Red Pikmin || Have less than 4 Red Pikmin || | ||
|- | |- | ||
| In a bush || After the first doorway, next to a line of Female Shooting Spiners. || 4 Yellow Pikmin || || | | In a bush || After the first doorway, next to a line of Female Shooting Spiners. || 4 Yellow Pikmin || Have less than 4 Yellow Pikmin || | ||
|- | |- | ||
| In a bush || Next to the exit of a doorway, under an Iron Block. || || || | | In a bush || Next to the exit of a doorway, under an Iron Block. || 4 Red Pikmin || || | ||
|- | |- | ||
| In a horn || After pushing an | | In a horn || After pushing an iron block. || 4 Yellow Pikmin || First-time only || | ||
|- | |- | ||
| In a twig || || || || | | In a twig || After the horn. || 4 Yellow Pikmin || Have less than 8 Yellow Pikmin || | ||
|- | |- | ||
| In a twig || After entering a doorway, next to a big-sized | | In a twig || After entering a doorway, next to a big-sized iron block. || 4 Yellow Pikmin || Have less than 8 Yellow Pikmin || | ||
|- | |- | ||
| In a twig || || || || | | In a twig || Next to the exit of the doorway behind the big-sized iron nlock.|| 4 Red Pikmin || Have less than 8 Red Pikmin || | ||
|} | |} | ||
| Line 78: | Line 76: | ||
=== Enemies === | === Enemies === | ||
* {{icon|Shooting Spiner (Female)|y}} × 13 | * {{icon|Shooting Spiner (Female)|y}} × 13 | ||
* {{icon|Male Sheargrub|y|v=HP}} × 10 | * {{icon|Male Sheargrub|y|v=HP}} × 10 | ||
| Line 101: | Line 98: | ||
== Guide == | == Guide == | ||
{{guide}} | {{guide}} | ||
Start by moving forward, whisting the two [[Red Pikmin]] in the [[Seeding Dandelion]] along the way to help two other Pikmin push a nearby [[iron block]]. Continue forward while attacking the [[Shooting Spiner (Female)|female Shooting Spiner]] and [[Male Sheargrub]] along the way before coming across another iron block that needs to be pushed in order to proceed further. Continue moving forward while attacking two female Shooting Spiners and climb down the first [[vine]] at the end of the path while avoiding the female Shooting Spiner next to it before climbing down another nearby vine to reach another iron block. Using the Pikmin to weigh down a vine, head to the other side of the iron block to allow the Pikmin to easily cross the gap forward and enter the [[doorway]] at the end of the path. | |||
From the doorway continue moving forward while attacking the four female Shooting Spiners and a Male Sheargrub until encpuntering the first four [[Yellow Pikmin]]. After finding the Yellow Pikmin, backtrack to the middle of the room and throw the Yellow Pikmin at a hanging vine in order for Olimar and the other Pikmin to reach the upper part of the room. From here, use the [[jetpack]] to enter the doorway to the left of the room. | |||
From here the player has to avoid two Male Sheargrubs using the jetpack while four Red Pikmin push an iron block in order to break the [[dirt block]]s keeping Olimar in the area. After the dirt blocks are broken head up the vine with the four Red Pikmin before heading beyond the doorway and continue forward until the [[Stopped Doomsday Clock]]. After collecting it, head into the doorway back into the previous area. Head back down the vine and head to the right while attacking two Male Sheargrubs along the way until another doorway at the end of the path. | |||
After entering the first room whistle four more Red Pikmin from a nearby bush and make them start pushing the nearby iron block to allow Olimar enter the doorway. After entering the doorway, attack the female Shooting Spiner before [[dig|digging up]] the buried [[Smile Detector]] and collect it before returning to the previous room. After returning to the main area have the Pikmin continue with pushing the iron block until it falls allowing for them to proceed further. Continue forward until the vine leading up to a small area involving iron and dirt blocks. Make sure not to push the second iron block because it will block the doorway behind the dirt block. Instead, destroy the dirt block to reveal the doorway and head up a nearby vine while attacking a Male Sheargrub on the way to push the first iron block in order to reach the doorway. | |||
After entering the secret doorway, head forward and climb up the vine to find a giant iron block blocking the path forward. After pushing it down with the Pikmin continue heading forward, attacking the nearby Crested Mockiwi and female Shooting Spiner, and head to the doorway at the end of the path that is located behind the level exit. From here dead left while attacking the three female Shooting Spiners, collecting the [[Independence Monument]] until you reach the end of the area. | |||
{{clear}} | |||
== Gallery == | == Gallery == | ||
<gallery> | <gallery> | ||
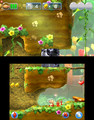
Back-and-Forth Road | HP Back-and-Forth Road First Moving Block.png|The first [[obstacle]] in the area. | ||
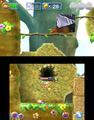
Back-and-Forth Road | HP Back-and-Forth Road Third Moving Block.png|The room where the Pikmin have to push an iron block in the opposite direction. | ||
Back-and-Forth Road | HP Back-and-Forth Road Vine Room.png|The room with several [[Shooting Spiner (Female)|Shooting Spiners]] and [[vine]]s. | ||
Back-and-Forth Road | HP Back-and-Forth Road Male Sheargrub Room.png|The room where the player must evade two [[Male Sheargrub]]s. | ||
HP Stopped Doomsday Clock Location.png|Location of the [[Stopped Doomsday Clock]]. | |||
HP Smile Detector Location.png|Location of the [[Smile Detector]]. | |||
Back-and-Forth Road | HP Back-and-Forth Road Male Large Moving Block Room.png|The massive iron block. | ||
HP Independence Monument Location.png|The [[Independence Monument]] on the other side of the exit. | |||
</gallery> | </gallery> | ||
Revision as of 11:18, August 3, 2024
| Back-and-Forth Road Sector 1 – Area D | |
|---|---|

| |
| Treasures | 3 |
| Pikmin available | Red Pikmin, Yellow Pikmin |
| Requirements | Complete Mushroom Valley or Cherrystone Pass |
| Next area | The Shadow in the Brush |
| Music | Brilliant Garden area Brilliant Garden area - back side |
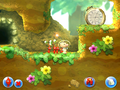
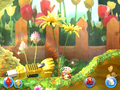
Back-and-Forth Road (おせば ひらくみち?, lit.: "Path that opens when pushed") is the fourth main area in Hey! Pikmin. This area features several iron blocks, and most of them need to be pushed in non-trivial ways, including pushing them in the opposite direction as expected, pushing them only partially to reach hidden areas, and needing several Pikmin to drag a large block.
Description
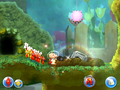
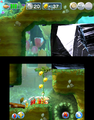
At the beginning, the player can call some Red Pikmin that are jumping on some Seeding Dandelions. After that, Olimar will encounter some Red Pikmin, trying to push an iron block. Those obstacles are omnipresent in this level, and need to be pushed in order to progress in the area. Some time after this, the player will meet some Yellow Pikmin, that are required in order to access the first treasure, the Stopped Doomsday Clock. After walking some time, the player needs to push an iron block, and to place it right under a doorway, in order to access the second treasure, the Smile Detector, which is buried. Not so long after this, the player has to solve a little puzzle to reach the Independence Monument. To do this, the player has to break a dirt block with a Pikmin to reveal a doorway, then, Olimar has to push an iron block to create a path towards the door. On the other side, the player has to push a huge iron block and kill a Crested Mockiwi in order to go through a door that leads to the last treasure, and the exit.
Cutscenes
| Cutscene | Screenshot | Trigger | Description |
|---|---|---|---|
| Male Sheargrub | 
|
The player enters the first doorway in the area, with at least four Pikmin. | Olimar and four of his Red Pikmin approach a rock in the tunnel that is shaking. Two of the Pikmin lift the rock, one on each end, and once they figure out what was causing the rumbling, a Male Sheargrub digging out of the ground, they become startled and quickly drop the rock down. This kills the creature, as proven by its soul. The two Pikmin look at Olimar, who shakes his head, and the group rushes on forward. |
| Spectralids | 
|
The player explores a bit after the room with vines and female Shooting Spiners with at least two Red Pikmin. | Olimar and his Pikmin notice something up ahead. Four of the Pikmin step forward and start jumping in place, happy to see some type of Spectralids. The creature flies right, and the Pikmin chase after it. Olimar sighs and shakes his head, after having failed to stop them. Following this, the wayward Pikmin eventually return and everybody regroups. |
| Horn | 
|
The player proceeds past the room with three levels and two doorways. | Three Yellow Pikmin are inside the tubes of a bulb horn, one on each tube. A fourth Yellow Pikmin is behind the bulb. This last Pikmin jumps on the bulb itself, causing the other Pikmin to jump out of their tubes, startled. They land flat on the ground, but quickly get up. All four of them then head towards Olimar. |
Pikmin locations
| Spot | Location | Pikmin | Requirements | Notes |
|---|---|---|---|---|
| On a Seeding Dandelion | At the start of the area. | 2 Red Pikmin | First-time only | |
| Behind an iron block | Right after the Seeding Dandelions. | 2 Red Pikmin | First-time only | |
| In a twig | Above the first Iron Block. | 4 Red Pikmin | Have less than 4 Red Pikmin | |
| In a twig | After some vines, close to an Iron block. | 4 Red Pikmin | Have less than 4 Red Pikmin | |
| In a bush | After the first doorway, next to a line of Female Shooting Spiners. | 4 Yellow Pikmin | Have less than 4 Yellow Pikmin | |
| In a bush | Next to the exit of a doorway, under an Iron Block. | 4 Red Pikmin | ||
| In a horn | After pushing an iron block. | 4 Yellow Pikmin | First-time only | |
| In a twig | After the horn. | 4 Yellow Pikmin | Have less than 8 Yellow Pikmin | |
| In a twig | After entering a doorway, next to a big-sized iron block. | 4 Yellow Pikmin | Have less than 8 Yellow Pikmin | |
| In a twig | Next to the exit of the doorway behind the big-sized iron nlock. | 4 Red Pikmin | Have less than 8 Red Pikmin |
Objects
Treasures
Enemies
 Shooting Spiner (Female) × 13
 Male Sheargrub × 10
 Crested Mockiwi × 2
Obstacles
 Buried treasure × 1
- Buried Sparklium Seeds × 1
 Dirt block × 4
 Iron block × 8 (small)
- Iron block × 1 (large)
Plants
 Seeding Dandelion × 1
 Vine × 13
Others
 Yellow Sparklium Seed × 57 (4 of them come from Crested Mockiwis, 10 of them come from a pulley vine, and 10 of them are buried)
 Red Sparklium Seed × 6
 Heart × 3 (small)
Guide
|
The following article or section contains guides. |
Start by moving forward, whisting the two Red Pikmin in the Seeding Dandelion along the way to help two other Pikmin push a nearby iron block. Continue forward while attacking the female Shooting Spiner and Male Sheargrub along the way before coming across another iron block that needs to be pushed in order to proceed further. Continue moving forward while attacking two female Shooting Spiners and climb down the first vine at the end of the path while avoiding the female Shooting Spiner next to it before climbing down another nearby vine to reach another iron block. Using the Pikmin to weigh down a vine, head to the other side of the iron block to allow the Pikmin to easily cross the gap forward and enter the doorway at the end of the path.
From the doorway continue moving forward while attacking the four female Shooting Spiners and a Male Sheargrub until encpuntering the first four Yellow Pikmin. After finding the Yellow Pikmin, backtrack to the middle of the room and throw the Yellow Pikmin at a hanging vine in order for Olimar and the other Pikmin to reach the upper part of the room. From here, use the jetpack to enter the doorway to the left of the room.
From here the player has to avoid two Male Sheargrubs using the jetpack while four Red Pikmin push an iron block in order to break the dirt blocks keeping Olimar in the area. After the dirt blocks are broken head up the vine with the four Red Pikmin before heading beyond the doorway and continue forward until the Stopped Doomsday Clock. After collecting it, head into the doorway back into the previous area. Head back down the vine and head to the right while attacking two Male Sheargrubs along the way until another doorway at the end of the path.
After entering the first room whistle four more Red Pikmin from a nearby bush and make them start pushing the nearby iron block to allow Olimar enter the doorway. After entering the doorway, attack the female Shooting Spiner before digging up the buried Smile Detector and collect it before returning to the previous room. After returning to the main area have the Pikmin continue with pushing the iron block until it falls allowing for them to proceed further. Continue forward until the vine leading up to a small area involving iron and dirt blocks. Make sure not to push the second iron block because it will block the doorway behind the dirt block. Instead, destroy the dirt block to reveal the doorway and head up a nearby vine while attacking a Male Sheargrub on the way to push the first iron block in order to reach the doorway.
After entering the secret doorway, head forward and climb up the vine to find a giant iron block blocking the path forward. After pushing it down with the Pikmin continue heading forward, attacking the nearby Crested Mockiwi and female Shooting Spiner, and head to the doorway at the end of the path that is located behind the level exit. From here dead left while attacking the three female Shooting Spiners, collecting the Independence Monument until you reach the end of the area.
Gallery
The first obstacle in the area.
The room where the Pikmin have to push an iron block in the opposite direction.
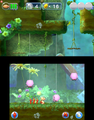
The room with several Shooting Spiners and vines.
The room where the player must evade two Male Sheargrubs.
Location of the Stopped Doomsday Clock.
Location of the Smile Detector.
The massive iron block.
The Independence Monument on the other side of the exit.


Names in other languages
| Language | Name | Meaning |
|---|---|---|
| おせば ひらくみち? Oseba hiraku michi |
Path that opens when pushed | |
| Kronkelpad | Twirlpath | |
| Route déroutante | Confusing road | |
| Schiebung | Cheating | |
| Sentiero viavai | Coming and going trail | |
| Senda vaivén | Swaying footpath | |
| Senda Vaivén | Swaying Footpath |
| Sector 1: Brilliant Garden | |
|---|---|
| Normal areas | 1-A: First Expedition • 1-B: Cavern of Confusion • 1-C: Mushroom Valley • 1-D: Back-and-Forth Road • 1-E: The Shadow in the Brush |
| Extra areas | 1-X: Cherrystone Pass • Secret Spot 1 • Secret Spot 2 • Secret Spot 3 • Secret Spot 4 • Sparklium Springs |