Hole of Beasts: Difference between revisions
(Added images and edited intro paragraph slightly) |
Kalel4Ever (talk | contribs) mNo edit summary |
||
| Line 8: | Line 8: | ||
}} | }} | ||
{{guide}} | {{guide}} | ||
The '''Hole of Beasts''' ({{j|けだものの穴|Keda Mono no Ana|Hole of Beasts}}) is a [[cave]] in the [[Awakening Wood]] in {{p2}}. It is likely the second cave one will enter in the game, and has a fairly short length and low difficulty. This cave contains | The '''Hole of Beasts''' ({{j|けだものの穴|Keda Mono no Ana|Hole of Beasts}}) is a [[cave]] in the [[Awakening Wood]] in {{p2}}. It is likely the second cave one will enter in the game, and has a fairly short length and low difficulty. This cave contains a number of [[Hazard generator#Fire geyser|fire geysers]], and its boss is an [[Empress Bulblax]]. There is a total of {{pokos|1,100}} worth of treasure in this cave. | ||
==How to reach== | ==How to reach== | ||
Revision as of 19:36, January 8, 2025
| Hole of Beasts | |
|---|---|

| |
| Location | Awakening Wood |
| Sublevels | 5 |
| Treasures | 6 |
| Hazards | |
|
The following article or section contains guides. |
The Hole of Beasts (けだものの穴?, lit.: "Hole of Beasts") is a cave in the Awakening Wood in Pikmin 2. It is likely the second cave one will enter in the game, and has a fairly short length and low difficulty. This cave contains a number of fire geysers, and its boss is an Empress Bulblax. There is a total of ![]() × 1,100 worth of treasure in this cave.
× 1,100 worth of treasure in this cave.
How to reach
Near the landing site is a pair of Burgeoning Spiderworts bearing ultra-spicy berries. Beyond is a Cloaking Burrow-Nit and Creeping Chrysanthemum. Following the path both are on and turning right leads to the cave, located in the spot where the Extraordinary Bolt was found in Pikmin.
Like the Emergence Cave, very few Pikmin are likely available to you, and your squad is thus equally limited. Bringing all Purple Pikmin available to you, and filling the remainder of your squad with as many Red Pikmin as you can is recommended.
Notes
Ship's dialogs
“Krrzt! Bzzrrt! Biological sensors are reacting violently. The readings are ominous.
A beast of unknown power lurks in these depths. A large Pikmin group would be reassuring.
My sound sensors are picking up hostile roars of many beasts. Expect dangerous encounters.
Sensors are also showing extreme heat pockets. You may need flame-resistant Pikmin...
But my sensors indicate no such data! Are my records incomplete?”Sublevel 1
- Theme: Soil
- Music: Soil 1
- Treasures:
- Enemies:
 Female Sheargrub × 6
 Male Sheargrub × 4
- Obstacles:
- None
- Vegetation:
- Others:
- None
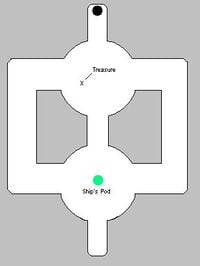
The first sublevel of the Hole of Beasts is relatively simple, with only a few Sheargrubs to worry about, all in the room after the landing site. Only the Male Sheargrubs need defeating, as the others are harmless. Once that has been done, it is time to retrieve the Stone of Glory, the sublevel's only treasure.
| Technical sublevel information | |||||
|---|---|---|---|---|---|
| Internal cave name | forest_1 | ||||
| "Main" object maximum (?) | 10 | ||||
| "Treasure" object maximum (?) | 1 | ||||
| "Gate" object maximum (?) | 0 | ||||
| Dead end unit probability (?) | 50 | ||||
| Number of rooms (?) | 2 | ||||
| Corridor-to-room ratio (?) | 0 | ||||
| Escape geyser (?) | No | ||||
| Clogged hole (?) | No | ||||
| Cave units file (?) | 1_units_cent3_tsuchi.txt | ||||
| Lighting file (?) | normal_light_lv0.ini | ||||
| Background (?) | None | ||||
| Cave units (?) | |||||
| Dead end with item | Three-way crossing | Four-way crossing | Turning corridor | Corridor | Long corridor |
| Circular room with 4 exits | |||||
| Detailed object list | ||||
|---|---|---|---|---|
| The game spawns these "main" objects: | ||||
| ID | Object | Amount | Fall method | Spawn location |
| 1 | 4 | None | "Hard" enemy spots | |
| 2 | 2 | None | "Easy" enemy spots | |
| 3 | 2 | None | "Easy" enemy spots | |
| 4 | 2 | None | "Easy" enemy spots | |
| Then it spawns these "decoration" objects: | ||||
| ID | Object | Amount | Fall method | Spawn location |
| 5 | 4 | None | Plant spots | |
| 6 | 2 | None | Plant spots | |
| 7 | 2 | None | Plant spots | |
| Then it spawns these "treasure" objects: | ||||
| ID | Object | Amount | Fall method | Spawn location |
| 8 | 1 | None | Treasure spots | |
- For details on how objects are spawned, and how some may fail to spawn, see here.
Sublevel 2
- Theme: Soil
- Music: Relax
- Treasures:
- None
- Enemies:
 Mitite (group of 10) × 0 - 2 (from eggs)
- Obstacles:
- None
- Vegetation:
 Common Glowcap × 6
 Figwort (small brown) × 2
 Violet Candypop Bud × 2 (if max Pikmin requirement is met)
- Others:
 Egg × 2
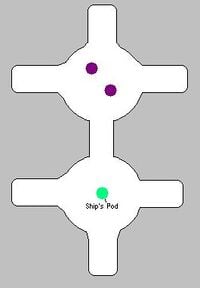
If 20 or more Purple Pikmin have been collected, the two Violet Candypop Buds here will not show up, leaving the sublevel nearly completely empty. This is possible only if the 10 Purples in Emergence Cave have been obtained twice or more. If that is the case, besides the two eggs that provide nectar and spray, there is nothing to do here.
| Technical sublevel information | |||||
|---|---|---|---|---|---|
| Internal cave name | forest_1 | ||||
| "Main" object maximum (?) | 2 | ||||
| "Treasure" object maximum (?) | 0 | ||||
| "Gate" object maximum (?) | 0 | ||||
| Dead end unit probability (?) | 100 | ||||
| Number of rooms (?) | 2 | ||||
| Corridor-to-room ratio (?) | 0 | ||||
| Escape geyser (?) | No | ||||
| Clogged hole (?) | No | ||||
| Cave units file (?) | 1_units_cent2_tsuchi.txt | ||||
| Lighting file (?) | muraon_light_lv2.ini | ||||
| Background (?) | None | ||||
| Cave units (?) | |||||
| Dead end | Dead end with item | Three-way crossing | Four-way crossing | Turning corridor | Corridor |
| Long corridor | Circular room with 4 exits | ||||
| Detailed object list | ||||
|---|---|---|---|---|
| The game spawns these "main" objects: | ||||
| ID | Object | Amount | Fall method | Spawn location |
| 1 | 2 | None | "Special" enemy spots | |
| Then it spawns these "decoration" objects: | ||||
| ID | Object | Amount | Fall method | Spawn location |
| 2 | 6 | None | Plant spots | |
| 3 | 2 | None | Plant spots | |
| Then it spawns these "dead end" objects: | ||||
| ID | Object | Amount | Fall method | Spawn location |
| 4 | 2 | None | Dead ends | |
- For details on how objects are spawned, and how some may fail to spawn, see here.
Sublevel 3
- Theme: Soil
- Music: Fire
- Treasures:
- Enemies:
- None
- Obstacles:
 Fire geyser × 14
- Vegetation:
 Common Glowcap × 8
- Others:
- None
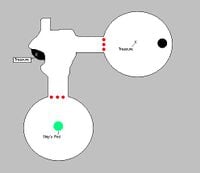
This sublevel has no enemies, but may be the first place where you are introduced to the game's most common hazard: fire. As long as you have at least 15 Red Pikmin, this sublevel should pose no problems. If any Purple or other non-Red Pikmin catch on fire, just whistle them to save them.
Take only Red Pikmin through into the next room and swarm them to pick up the Strife Monolith, which is in the fireplace-like dark space, and the Cosmic Archive, located near the hole to the next sublevel.
| Technical sublevel information | |||||
|---|---|---|---|---|---|
| Internal cave name | forest_1 | ||||
| "Main" object maximum (?) | 14 | ||||
| "Treasure" object maximum (?) | 2 | ||||
| "Gate" object maximum (?) | 0 | ||||
| Dead end unit probability (?) | 0 | ||||
| Number of rooms (?) | 3 | ||||
| Corridor-to-room ratio (?) | 0 | ||||
| Escape geyser (?) | No | ||||
| Clogged hole (?) | No | ||||
| Cave units file (?) | 2_ABE_norhiba_blkhiba_tsuchi.txt | ||||
| Lighting file (?) | normal_light_lv2.ini | ||||
| Background (?) | None | ||||
| Cave units (?) | |||||
| Dead end | Three-way crossing | Four-way crossing | Turning corridor | Corridor | Long corridor |
| Circular room with 1 exit | Room with hole in wall | ||||
| Detailed object list | ||||
|---|---|---|---|---|
| The game spawns these "main" objects: | ||||
| ID | Object | Amount | Fall method | Spawn location |
| 1 | 7 | None | "Hard" enemy spots | |
| 2 | 7 | None | "Special" enemy spots | |
| Then it spawns these "decoration" objects: | ||||
| ID | Object | Amount | Fall method | Spawn location |
| 3 | 8 | None | Plant spots | |
| Then it spawns these "treasure" objects: | ||||
| ID | Object | Amount | Fall method | Spawn location |
| 4 | 1 | None | Treasure spots | |
| 5 | 1 | None | Treasure spots | |
- For details on how objects are spawned, and how some may fail to spawn, see here.
Sublevel 4
- Theme: Soil
- Music: Soil 2
- Treasures:
 Dream Architect (inside Red Bulborb)
 Luck Wafer
- Enemies:
 Mitite (group of 10) × 1 (from the ground)
 Mitite (group of 10) × 0 - 2 (from eggs)
 Red Bulborb × 1
- Obstacles:
 Fire geyser × 4
- Vegetation:
 Common Glowcap × 6
 Violet Candypop Bud × 1
- Others:
 Egg × 2
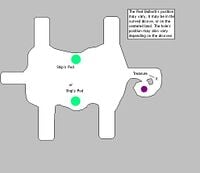
Find the Red Bulborb and throw Purple Pikmin at it to defeat the enemy and get the Dream Architect. Then take your Pikmin to the curved alcove to find the Luck Wafer, a very light, but valuable treasure. Nearby is a Violet Candypop Bud; this one never disappears no matter how many Purples you possess.
In one of the alcoves not containing any of the eggs found here, there will be a swarm of Mitites that reveal themselves before scuttling around. Throw your Purple Pikmin to defeat them in order to get, in some cases, much-needed nectar. After your scavenging is complete, proceed to the final sublevel of this cave.
| Technical sublevel information | |||||
|---|---|---|---|---|---|
| Internal cave name | forest_1 | ||||
| "Main" object maximum (?) | 6 | ||||
| "Treasure" object maximum (?) | 1 | ||||
| "Gate" object maximum (?) | 0 | ||||
| Dead end unit probability (?) | 50 | ||||
| Number of rooms (?) | 2 | ||||
| Corridor-to-room ratio (?) | 0 | ||||
| Escape geyser (?) | No | ||||
| Clogged hole (?) | No | ||||
| Cave units file (?) | 2_ABE_mid1_nor3_tsuchi.txt | ||||
| Lighting file (?) | normal_light_lv3.ini | ||||
| Background (?) | None | ||||
| Cave units (?) | |||||
| Dead end with item | Three-way crossing | Four-way crossing | Turning corridor | Corridor | Long corridor |
| Room with 6 exits | Room with long dead end | ||||
| Detailed object list | ||||
|---|---|---|---|---|
| The game spawns these "main" objects: | ||||
| ID | Object | Amount | Fall method | Spawn location |
| 1 | 1 | None | "Hard" enemy spots | |
| - | Carried inside entry with ID 1 | |||
| 2 | 1 | None | "Special" enemy spots | |
| 3 | 4 | None | "Hard" enemy spots | |
| Then it spawns these "decoration" objects: | ||||
| ID | Object | Amount | Fall method | Spawn location |
| 4 | 6 | None | Plant spots | |
| Then it spawns these "treasure" objects: | ||||
| ID | Object | Amount | Fall method | Spawn location |
| 5 | 1 | None | Treasure spots | |
| Then it spawns these "dead end" objects: | ||||
| ID | Object | Amount | Fall method | Spawn location |
| 6 | 1 | None | Dead ends | |
| 7 | 2 | None | Dead ends | |
- For details on how objects are spawned, and how some may fail to spawn, see here.
Sublevel 5
- Theme: Soil
- Music: Boss (only when combating)
- Treasures:
 Prototype Detector (inside Empress Bulblax)
- Enemies:
 Empress Bulblax × 1
- Obstacles:
- None
- Vegetation:
 Common Glowcap × 8
- Others:
- None
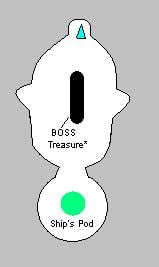
- See also: Empress Bulblax strategy.
The last sublevel of the Hole of Beasts holds a very strange and large creature, an Empress Bulblax. This is the only enemy in the sublevel, and unlike later Empress Bulblaxes in the game, it does not produce Bulborb Larvae, and it also has less health. To defeat it, throw Pikmin onto its head, and then whistle them to prevent them from being shaken off when necessary. Do not attempt to pursue it from the side though, as it has a dangerous rolling attack that can crush Pikmin. Once defeated, it will drop the Prototype Detector, a treasure that will make finding other treasures much easier. Collect it and leave the cave via the geyser.
| Technical sublevel information | |||||
|---|---|---|---|---|---|
| Internal cave name | forest_1 | ||||
| "Main" object maximum (?) | 1 | ||||
| "Treasure" object maximum (?) | 0 | ||||
| "Gate" object maximum (?) | 0 | ||||
| Dead end unit probability (?) | 0 | ||||
| Number of rooms (?) | 1 | ||||
| Corridor-to-room ratio (?) | 0 | ||||
| Escape geyser (?) | Yes | ||||
| Clogged hole (?) | Yes | ||||
| Cave units file (?) | 1_units_boss_tsuchi.txt | ||||
| Lighting file (?) | qchap_light.ini | ||||
| Background (?) | None | ||||
| Cave units (?) | |||||
| Empress Bulblax arena | |||||
| Detailed object list | ||||
|---|---|---|---|---|
| The game spawns these "main" objects: | ||||
| ID | Object | Amount | Fall method | Spawn location |
| 1 | 1 | None | "Hard" enemy spots | |
| - | Carried inside entry with ID 1 | |||
| Then it spawns these "decoration" objects: | ||||
| ID | Object | Amount | Fall method | Spawn location |
| 2 | 8 | None | Plant spots | |
- For details on how objects are spawned, and how some may fail to spawn, see here.
Gallery
Names in other languages
| Language | Name | Meaning |
|---|---|---|
| けだものの穴? Keda Mono no Ana |
Hole of Beasts | |
(traditional) |
野獸洞穴 | |
| Gîte des Bêtes | Shelter of Beasts | |
| Höhle der Bestien | Cave of Beasts | |
| Covo di Bestie | Lair of Beasts | |
| Sima de las Bestias | Chasm of the Beasts |
See also
| Caves in Pikmin 2 | |
|---|---|
| Valley of Repose | Emergence Cave • Subterranean Complex • Frontier Cavern |
| Awakening Wood | Hole of Beasts • White Flower Garden • Bulblax Kingdom • Snagret Hole |
| Perplexing Pool | Citadel of Spiders • Glutton's Kitchen • Shower Room • Submerged Castle |
| Wistful Wild | Cavern of Chaos • Hole of Heroes • Dream Den |

