Steel Pipe Forest: Difference between revisions
No edit summary |
|||
| Line 25: | Line 25: | ||
== Description == | == Description == | ||
At the beginning, the player can call some [[Yellow Pikmin]], and has to fight some [[Sporegrub]]s with them. Not so long after that, Olimar has to throw his Yellow Pikmin on the [[Lopsided Barbell]] in order to retrieve it, while being careful of the few Sporegrubs around. After some walking in the level, the player can enter a doorway, without his Pikmin though. In the other side, Olimar can retrieve the second treasure, the [[Whisper Broadcaster]]. The player has to be careful, however, of the [[Shooting Spiner (Male)| Male Shooting Spiner]]s that are obstacles in the way for the treasure. Just after this, when heading to the right, the player has to avoid some Sporegrubs and climb up vines in order to get the [[Metamorphocistern]]. After that, Olimar can get back to his Research Pod, while being careful of the few enemies that are standing on the way to the end of the area. | |||
== Cutscenes == | == Cutscenes == | ||
Revision as of 09:42, September 26, 2018
| Steel Pipe Forest Sector 4 – Area B | |
|---|---|

| |
| Treasures | 3 |
| Pikmin available | Yellow Pikmin, Red Pikmin |
| Requirements | Complete The Lonely Tower |
| Next area | Pollution Pool |
| Music | |
Steel Pipe Forest is the second main area in the Ravaged Rustworks. There are several pipes in the area, as the name would imply, as well as several intertwining paths. On top of that, the area has several plant stalks connected to walls and ceilings, and Sporegrubs that show up walk on the paths lined out by the stalks.
|
The following article or section is in need of assistance from someone who plays Hey! Pikmin. |
Plot
|
The following article or section is in need of assistance from someone who plays Hey! Pikmin. |
Description
At the beginning, the player can call some Yellow Pikmin, and has to fight some Sporegrubs with them. Not so long after that, Olimar has to throw his Yellow Pikmin on the Lopsided Barbell in order to retrieve it, while being careful of the few Sporegrubs around. After some walking in the level, the player can enter a doorway, without his Pikmin though. In the other side, Olimar can retrieve the second treasure, the Whisper Broadcaster. The player has to be careful, however, of the Male Shooting Spiners that are obstacles in the way for the treasure. Just after this, when heading to the right, the player has to avoid some Sporegrubs and climb up vines in order to get the Metamorphocistern. After that, Olimar can get back to his Research Pod, while being careful of the few enemies that are standing on the way to the end of the area.
Cutscenes
| Cutscene | Screenshot | Trigger | Description |
|---|---|---|---|
| Sporegrub ambush | 
|
At the start, the player advances a bit beyond the stick with Yellow Pikmin behind. | Two Yellow Pikmin in Olimar's group notice something up ahead and rush off. Some seconds pass, and some Sporegrubs show up on the top screen, crawling on some stalks. The two Pikmin come back with a yellow Sparklium Seed each, just before the enemies drop down from the stalks and fall onto the ground, where the Pikmin just passed. The Pikmin hear the landing thuds, turn around, and throw the seeds away startled. They run to Olimar's side, with the bugs slowly chasing after them. They stop after a bit, only to continue their chase. |
| Grommet tower | 
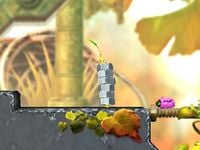
|
The player advances a bit after the part with three stalks and five Sparklium Seeds. | A Yellow Pikmin is inside an in the bottom of a pile of grommets, carrying the whole stack. Another Yellow Pikmin is on top of the pile, also inside of it, keeping watch. The bottom Pikmin goes left, stumbles for a bit, turns around, and starts going right. As it does this, a Sporegrub shows up from the right side and walks right into the Pikmin. As soon as they collide, the insect is sent flying away with the impact, and the tower of grommets falls apart. The four Pikmin – not two – that were inside also fall off. They quickly get up, though, and then go left to join Olimar. |
| Leaf in the wind | 
|
The player advances forward after the doorway that leads to the Whisper Broadcaster's room. | Two Yellow Pikmin step forward, and one of them grabs a dried leaf off the ground. The two Pikmin start celebrating, but a gust of wind picks up and the one with the leaf eventually lets go. The leaf goes with the wind, and lands on the backside of a sleeping Mockiwi. It then slips off and flies away, and the Mockiwi turns around to face the Pikmin. It squawks and the Pikmin run back to Olimar. |
Pikmin locations
|
The following article or section is in need of assistance from someone who plays Hey! Pikmin. |
| Spot | Location | Pikmin | Requirements | Notes |
|---|---|---|---|---|
Objects
|
The following article or section is in need of assistance from someone who plays Hey! Pikmin. |
Treasures
Enemies
Obstacles
Others
Guide
|
The following article or section contains guides. |
|
The following article or section is in need of assistance from someone who plays Hey! Pikmin. |
Gallery
Location of the Lopsided Barbell.
A Mockiwi coming out of the hole.
Location of the Whisper Broadcaster.
Location of the Metamorphocistern.
Names in other languages
| Language | Name | Meaning |
|---|---|---|
| Het buizenbos | The pipeforest | |
| Jungle de métal | Metal jungle | |
| Der Metalldschungel | The Metal Jungle | |
| Foresta siderurgica | Iron and steel forest | |
| Bosque tubería | Pipe forest | |
| Bosque Tubería | Pipe Forest |
| Sector 4: Ravaged Rustworks | |
|---|---|
| Normal areas | 4-A: The Lonely Tower • 4-B: Steel Pipe Forest • 4-C: Pollution Pool • 4-D: Space of Silence • 4-E: Flashes of Fear |
| Extra areas | 4-X: Drenchnozzle Den • Secret Spot 13 • Secret Spot 14 • Secret Spot 15 • Secret Spot 16 • Sparklium Springs |


