
Cherrystone Pass: Difference between revisions
No edit summary |
m (→Gallery: Minor changes to gallery captions) Tags: Mobile edit Advanced mobile edit |
||
| (4 intermediate revisions by 4 users not shown) | |||
| Line 3: | Line 3: | ||
|screenshot = | |screenshot = | ||
|map = | |map = | ||
|image = Cherrystone Pass | |image = HP Cherrystone Pass Large Lifting Rock.png | ||
|size = 320px | |size = 320px | ||
|caption = | |caption = | ||
| Line 17: | Line 17: | ||
}} | }} | ||
'''Cherrystone Pass''' ({{j| | '''Cherrystone Pass''' ({{j|さくらと岩の峠道|Sakura to Iwa no Tōge Michi|Mountain pass of cherry blossoms and rocks}}) is the first [[secret area]] in {{hp}}. The environment is themed around {{w|cherry blossom}}s, and the puzzles mostly revolve around [[vine]]s and [[pulley rock]]s. | ||
== Description == | == Description == | ||
| Line 27: | Line 27: | ||
|- | |- | ||
! Coppeller swarm | ! Coppeller swarm | ||
| [[File:Cherrystone Pass Coppeller | | [[File:HP Cherrystone Pass Coppeller Cutscene.png|200px]] | ||
| The player moves forward after the starting point. | | The player moves forward after the starting point. | ||
| A Coppeller flies by carrying a [[Sparklium Seed]]. Four Red Pikmin pop out of a bush, and chase after it till they're all off-camera. Eventually, the Pikmin return in a panic and dive into the bush. Behind them come four Coppellers, all carrying Sparklium Seeds. | | A Coppeller flies by carrying a [[Sparklium Seed]]. Four Red Pikmin pop out of a bush, and chase after it till they're all off-camera. Eventually, the Pikmin return in a panic and dive into the bush. Behind them come four Coppellers, all carrying Sparklium Seeds. | ||
|- | |- | ||
! Sparklium Seed stack | ! Sparklium Seed stack | ||
| [[File:Cherrystone Pass | | [[File:HP Cherrystone Pass Sparklium Seed Stack Cutscene.png|200px]] | ||
| The player moves a bit forward after the first [[Mockiwi]]. | | The player moves a bit forward after the first [[Mockiwi]]. | ||
| Some of the Pikmin in Olimar's group notice something – four Sparklium Seeds lying on the ground. Two of the Pikmin move up, and while the first grabs one seed and brings it back, the second grabs one, then stacks another below, and then the final one below that stack. This Pikmin struggles to balance the three seeds, until it eventually trips and loses all of them. It sighs in disappointment, and slowly makes its way back to the group, with its head held low. | | Some of the Pikmin in Olimar's group notice something – four Sparklium Seeds lying on the ground. Two of the Pikmin move up, and while the first grabs one seed and brings it back, the second grabs one, then stacks another below, and then the final one below that stack. This Pikmin struggles to balance the three seeds, until it eventually trips and loses all of them. It sighs in disappointment, and slowly makes its way back to the group, with its head held low. Another Pikmin eventually peeks from the corner of the screen, beckons the disappointed Pikmin to hurry, and the two quickly dash off to regroup. When the cutscene ends, one of the Pikmin is carrying a seed. | ||
|- | |- | ||
! Dusty Pikmin | ! Dusty Pikmin | ||
| [[File:Cherrystone Pass | | [[File:HP Cherrystone Pass Dusty Pikmin Cutscene.png|200px]] | ||
| When there is a path split going down and to the right, the player goes right, climbs the [[vine]], and moves forward. | | When there is a path split going down and to the right, the player goes right, climbs the [[vine]], and moves forward. | ||
| A Red Pikmin shows up and looks inside a rumbling tube. It quickly becomes startled as some shadowy creatures show up from the inside. The Pikmin runs off and the three creatures come outside. They get up and shake themselves, revealing that they were actually Red Pikmin, just covered in dust. The Pikmin from before eventually realizes this and stands from a far with a relieved expression. The four then rush off to meet up with Olimar. | | A Red Pikmin shows up and looks inside a rumbling tube. It quickly becomes startled as some shadowy creatures show up from the inside. The Pikmin runs off and the three creatures come outside. They get up and shake themselves, revealing that they were actually Red Pikmin, just covered in dust. The Pikmin from before eventually realizes this and stands from a far with a relieved expression. The four then rush off to meet up with Olimar. | ||
| Line 43: | Line 43: | ||
== Pikmin locations == | == Pikmin locations == | ||
{| class = "wikitable sortable" | {| class = "wikitable sortable" | ||
|- | |- | ||
! Spot || Location || Pikmin || Requirements || Notes | ! Spot || Location || Pikmin || Requirements || Notes | ||
|- | |- | ||
| || || || || | | In a bush || At the start of the area. || 4 Red Pikmin || || | ||
|- | |||
| On a vine || Near the first pulley rock. || 2 Red Pikmin || First-time only || | |||
|- | |||
| Idle || Behind the first pulley rock. || 2 Red Pikmin || First-time only || | |||
|- | |||
| In a twig || Near the vine leading to [[Sparklium Seeds]] and a [[heart]]. || 4 Red Pikmin || || | |||
|- | |||
| In a bush || Near two vines leading to the second [[Mockiwi]].|| 4 Red Pikmin || Have less than 8 Pikmin after the first time || | |||
|- | |||
| In a rumbling tube || After the the rightmost vine after the second Mockiwi. || 4 Red Pikmin || First-time only || | |||
|- | |||
| In a bush || After the the vine heading down after the second Mockiwi. || 4 Red Pikmin || Have less than 8 Pikmin || | |||
|- | |||
|} | |} | ||
| Line 61: | Line 73: | ||
* {{icon|Coppeller|y}} × 4 | * {{icon|Coppeller|y}} × 4 | ||
* {{icon|Male Sheargrub|y|v=HP}} × 9 | * {{icon|Male Sheargrub|y|v=HP}} × 9 | ||
* {{icon|Mockiwi|y}} × | * {{icon|Mockiwi|y}} × 4 | ||
=== Obstacles === | === Obstacles === | ||
| Line 76: | Line 88: | ||
== Guide == | == Guide == | ||
{{guide}} | {{guide}} | ||
From the the area head right until the out of reach [[vine]], whistling the first four [[Red Pikmin]] along the way. Throw the Pikmin at the stick in order to lower the vine and climb it to proceed further. Continue moving right while avoiding the [[Male Sheargrub]] until the first [[pulley rock]]. Throw four Pikmin at the stick in order to lift the rock until it rests on an elevated platform in order to proceed. From here continue forward and climb up the vines leading up to a [[Mockiwi]]. From here head to the left to whistle four more Pikmin before heading to the right while dealing with the Mockiwi along the way until the set of three vines. After the vines there is a bush with four Red Pikmin to whistle before encountering another Mockiwi above another set of vines. From there head to the left and have four Pikmin on the pulley rock's stick in order to throw the other Pikmin at the [[Preservation Door]] perched on an elevated platform. After collecting the treasure head right while avoiding four Male Sheargrubs until the out of reach vine at the end of the path. After lowering the vine head right and find four more Red Pikmin. After collecting the Pikmin head to the vine heading down until encountering the third Mockiwi. From here head to the left and enter the [[doorway]] into the room with the [[Despair-o-Sphere]]. In this room there are three vines that need to be lowered by the Pikmin before the treasure can be reached. After collecting the treasure, head back to the main area and head right while avoiding the three Male Sheargrubs until the last set of vines. While climbing the vines head to the right in order to lift a large pulley rock requiring at least 16 Pikmin in order to lift. After lifting the pulley rock head to the right until encountering the last Mockiwi that holds the [[Revenge Fantasy]]. After collecting the treasure head to the left and climb the vines to the left in order to reach the ed of the area. | |||
== Gallery == | == Gallery == | ||
<gallery> | <gallery> | ||
Cherrystone Pass | HP Cherrystone Pass Start.png|The start of the area. | ||
HP Cherrystone Pass First Lifting Rock.png|The first [[pulley rock]] before being raised and locked into place. | |||
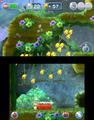
HP Preservation Door Location.png|The location of the [[Preservation Door]]. | |||
HP Despair-o-Sphere Location.png|The location of the [[Despair-o-Sphere]]. | |||
HP Revenge Fantasy Location.png|The location of the [[Revenge Fantasy]]. | |||
</gallery> | </gallery> | ||
==Names in other languages== | ==Names in other languages== | ||
{{foreignname | {{foreignname | ||
|Jap= | |Jap=さくらと岩の峠道 | ||
|JapR=Sakura to | |JapR=Sakura to Iwa no Tōge Michi | ||
|JapM=Mountain pass of cherry blossoms and rocks | |JapM=Mountain pass of cherry blossoms and rocks | ||
|Dut=Bloesempassage | |Dut=Bloesempassage | ||
| Line 106: | Line 119: | ||
== See also == | == See also == | ||
*[[Back-and-Forth Road]] | |||
{{Brilliant Garden}} | {{Brilliant Garden}} | ||
Latest revision as of 05:49, September 18, 2024
| Cherrystone Pass Sector 1 – Area X | |
|---|---|

| |
| Treasures | 3 |
| Pikmin available | Red Pikmin |
| Requirements | Complete Cavern of Confusion via secret exit |
| Next area | Back-and-Forth Road |
| Music | Brilliant Garden area Brilliant Garden area - back side |
Cherrystone Pass (さくらと岩の峠道?, lit.: "Mountain pass of cherry blossoms and rocks") is the first secret area in Hey! Pikmin. The environment is themed around cherry blossoms, and the puzzles mostly revolve around vines and pulley rocks.
DescriptionEdit
Right at the beginning, the player has to advance a little in the area to trigger a cutscene, that shows some Red Pikmin trying to reach a flying Coppeller. After this event, the player has to launch their Pikmin onto a vine in order to lower it, and allow Olimar to progress in the level. The protagonist travels through a long corridor filled with Male Sheargrubs, and at the end of it, the player needs to raise a pulley rock in order to clear the path. Some time after this, Olimar needs to kill or avoid a Mockiwi to gain access of the first treasure of the area, the Preservation Door. To recover it, the player has to use a pulley rock. After going through a second corridor filled with Sheargrubs, the player has to, once again, kill a sleeping Mockiwi in order to access the doorway leading to the Despair-o-Sphere. To reach it, Olimar has to climb up vines. After another corridor, the player must have at least 16 Pikmin to raise and lock a big pulley rock, which is blocking the path to the last treasure, the Revenge Fantasy, that is kept inside a Mockiwi. The exit is right above it, but the player needs to turn a little back to reach it.
CutscenesEdit
| Cutscene | Screenshot | Trigger | Description |
|---|---|---|---|
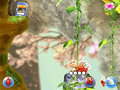
| Coppeller swarm | 
|
The player moves forward after the starting point. | A Coppeller flies by carrying a Sparklium Seed. Four Red Pikmin pop out of a bush, and chase after it till they're all off-camera. Eventually, the Pikmin return in a panic and dive into the bush. Behind them come four Coppellers, all carrying Sparklium Seeds. |
| Sparklium Seed stack | 
|
The player moves a bit forward after the first Mockiwi. | Some of the Pikmin in Olimar's group notice something – four Sparklium Seeds lying on the ground. Two of the Pikmin move up, and while the first grabs one seed and brings it back, the second grabs one, then stacks another below, and then the final one below that stack. This Pikmin struggles to balance the three seeds, until it eventually trips and loses all of them. It sighs in disappointment, and slowly makes its way back to the group, with its head held low. Another Pikmin eventually peeks from the corner of the screen, beckons the disappointed Pikmin to hurry, and the two quickly dash off to regroup. When the cutscene ends, one of the Pikmin is carrying a seed. |
| Dusty Pikmin | 
|
When there is a path split going down and to the right, the player goes right, climbs the vine, and moves forward. | A Red Pikmin shows up and looks inside a rumbling tube. It quickly becomes startled as some shadowy creatures show up from the inside. The Pikmin runs off and the three creatures come outside. They get up and shake themselves, revealing that they were actually Red Pikmin, just covered in dust. The Pikmin from before eventually realizes this and stands from a far with a relieved expression. The four then rush off to meet up with Olimar. |
Pikmin locationsEdit
| Spot | Location | Pikmin | Requirements | Notes |
|---|---|---|---|---|
| In a bush | At the start of the area. | 4 Red Pikmin | ||
| On a vine | Near the first pulley rock. | 2 Red Pikmin | First-time only | |
| Idle | Behind the first pulley rock. | 2 Red Pikmin | First-time only | |
| In a twig | Near the vine leading to Sparklium Seeds and a heart. | 4 Red Pikmin | ||
| In a bush | Near two vines leading to the second Mockiwi. | 4 Red Pikmin | Have less than 8 Pikmin after the first time | |
| In a rumbling tube | After the the rightmost vine after the second Mockiwi. | 4 Red Pikmin | First-time only | |
| In a bush | After the the vine heading down after the second Mockiwi. | 4 Red Pikmin | Have less than 8 Pikmin |
ObjectsEdit
TreasuresEdit
EnemiesEdit
 Coppeller × 4
 Male Sheargrub × 9
 Mockiwi × 4
ObstaclesEdit
 Pulley rock × 3
PlantsEdit
 Vine × 29
OthersEdit
 Yellow Sparklium Seed × 93 (4 from Coppellers, 6 from Mockiwis and 1 in a cutscene)
 Red Sparklium Seed × 1
 Heart × 4 (small)
GuideEdit
|
The following article or section contains guides. |
From the the area head right until the out of reach vine, whistling the first four Red Pikmin along the way. Throw the Pikmin at the stick in order to lower the vine and climb it to proceed further. Continue moving right while avoiding the Male Sheargrub until the first pulley rock. Throw four Pikmin at the stick in order to lift the rock until it rests on an elevated platform in order to proceed. From here continue forward and climb up the vines leading up to a Mockiwi. From here head to the left to whistle four more Pikmin before heading to the right while dealing with the Mockiwi along the way until the set of three vines. After the vines there is a bush with four Red Pikmin to whistle before encountering another Mockiwi above another set of vines. From there head to the left and have four Pikmin on the pulley rock's stick in order to throw the other Pikmin at the Preservation Door perched on an elevated platform. After collecting the treasure head right while avoiding four Male Sheargrubs until the out of reach vine at the end of the path. After lowering the vine head right and find four more Red Pikmin. After collecting the Pikmin head to the vine heading down until encountering the third Mockiwi. From here head to the left and enter the doorway into the room with the Despair-o-Sphere. In this room there are three vines that need to be lowered by the Pikmin before the treasure can be reached. After collecting the treasure, head back to the main area and head right while avoiding the three Male Sheargrubs until the last set of vines. While climbing the vines head to the right in order to lift a large pulley rock requiring at least 16 Pikmin in order to lift. After lifting the pulley rock head to the right until encountering the last Mockiwi that holds the Revenge Fantasy. After collecting the treasure head to the left and climb the vines to the left in order to reach the ed of the area.
GalleryEdit
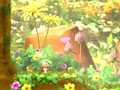
The start of the area.
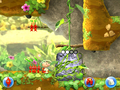
The first pulley rock before being raised and locked into place.
The location of the Preservation Door.
The location of the Despair-o-Sphere.

The location of the Revenge Fantasy.


Names in other languagesEdit
| Language | Name | Meaning |
|---|---|---|
| さくらと岩の峠道? Sakura to Iwa no Tōge Michi |
Mountain pass of cherry blossoms and rocks | |
| Bloesempassage | Blossom passage | |
| Montagne Millepétales | Thousand petals moutain | |
| Der Kirschblütenpass | The Cherry blossom pass | |
| Varco dei ciliegi | Cherry tree passage | |
| Pasaje cerezo | Cherry tree passage | |
| Brisa del Cerezo | Cherry tree Breeze |
See alsoEdit
| Sector 1: Brilliant Garden | |
|---|---|
| Normal areas | 1-A: First Expedition • 1-B: Cavern of Confusion • 1-C: Mushroom Valley • 1-D: Back-and-Forth Road • 1-E: The Shadow in the Brush |
| Extra areas | 1-X: Cherrystone Pass • Secret Spot 1 • Secret Spot 2 • Secret Spot 3 • Secret Spot 4 • Sparklium Springs |