Springpetal Cave: Difference between revisions
(Kanji name) |
|||
| (5 intermediate revisions by 4 users not shown) | |||
| Line 14: | Line 14: | ||
|requirements = Complete [[Echo Cavern]] or [[The Hollow Sky]] | |requirements = Complete [[Echo Cavern]] or [[The Hollow Sky]] | ||
|next = [[The Burning Sky]] | |next = [[The Burning Sky]] | ||
|music = | |music = ''[[Music in Hey! Pikmin#Underground area|Underground area]]''<br>''[[Music in Hey! Pikmin#Underground area - back side|Underground area - back side]]'' | ||
}} | }} | ||
'''Springpetal Cave''' ({{j| | '''Springpetal Cave''' ({{j|ねじ巻く花の洞くつ|Neji Maku Hana no Dōkutsu|Screw Coiling Flower Cave}}) is the third main area of the [[Sparkling Labyrinth]] in ''[[Hey! Pikmin]]''. It makes great use of the eponymous [[Springpetal]]s. There are two main rooms in this area: both are large rooms with a Springpetal on the bottom floor, and with several floors higher up, made of branches, and with pathways to other sections of the area. The mechanic in these rooms involves the player getting as many Pikmin as they can in the bottom floor, then using the extra weight to jump to a higher floor, and using the Pikmin found there to jump even higher, or to continue forward. | ||
{{game help|hp|Fill in the infobox.}} | {{game help|hp|Fill in the infobox.}} | ||
| Line 62: | Line 62: | ||
* {{icon|Grabbit|y}} × 3 | * {{icon|Grabbit|y}} × 3 | ||
* {{icon|Male Sheargrub|y|v=HP}} × 9 | * {{icon|Male Sheargrub|y|v=HP}} × 9 | ||
* {{icon|Skutterchuck|y|v=HP}} × | * {{icon|Skutterchuck|y|v=HP}} × 6 | ||
=== Obstacles === | === Obstacles === | ||
| Line 68: | Line 69: | ||
* {{icon|Dirt block|y}} × 1 | * {{icon|Dirt block|y}} × 1 | ||
* {{icon|Springpetal|y}} × 5 | * {{icon|Springpetal|y}} × 5 | ||
* [[Crystal|Crystal nest]] × | * [[Crystal#Crystal nest|Crystal nest]] × 4 | ||
=== Plants and fungi === | === Plants and fungi === | ||
| Line 101: | Line 102: | ||
==Names in other languages== | ==Names in other languages== | ||
{{foreignname | {{foreignname | ||
|Jap= | |Jap=ねじ巻く花の洞くつ | ||
|JapR=Neji | |JapR=Neji Maku Hana no Dōkutsu | ||
|JapM= | |JapM=Screw Coiling Flower Cave | ||
|Dut=Stuiterblomgrot | |Dut=Stuiterblomgrot | ||
|DutM=Bounce flower cave | |DutM=Bounce flower cave | ||
Latest revision as of 11:47, December 6, 2024
| Springpetal Cave Sector 3 – Area C | |
|---|---|

| |
| Treasures | 2 |
| Pikmin available | Red Pikmin, Rock Pikmin |
| Requirements | Complete Echo Cavern or The Hollow Sky |
| Next area | The Burning Sky |
| Music | Underground area Underground area - back side |
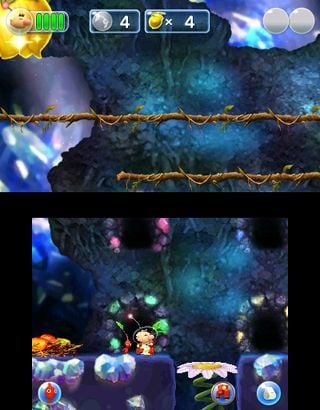
Springpetal Cave (ねじ巻く花の洞くつ?, lit.: "Screw Coiling Flower Cave") is the third main area of the Sparkling Labyrinth in Hey! Pikmin. It makes great use of the eponymous Springpetals. There are two main rooms in this area: both are large rooms with a Springpetal on the bottom floor, and with several floors higher up, made of branches, and with pathways to other sections of the area. The mechanic in these rooms involves the player getting as many Pikmin as they can in the bottom floor, then using the extra weight to jump to a higher floor, and using the Pikmin found there to jump even higher, or to continue forward.
|
The following article or section is in need of assistance from someone who plays Hey! Pikmin. |
Description[edit]
In this area, the player is introduced to Springpetals, that are used to jump more or less high in the air, depending of how many Pikmin Olimar has with him. This area also contains many doorways. After making some progress in the level, the player can retrieve the first treasure, the Manifested Time Container. In order to do that, Olimar has to break a crystal with his Rock Pikmin, then spring to the treasure. Near the end of the level, there are some doorways making some kind of labyrinth. In the rooms on the other side, the player can find some Pikmin. The player needs at least 18 Pikmin, in order to use the Springpetal to jump high enough to get access of the Dutiful Watchdog. After that, the player can go to the end of the level.
Cutscenes[edit]
| Cutscene | Screenshot | Trigger | Description |
|---|---|---|---|
| Springpetal introduction | 
|
After going down the two vines, the player continues a bit forward. | Olimar notices a Springpetal up ahead, and a lone Red Pikmin above it, on a branch. This Pikmin is trying to reach a higher branch with some Sparklium Seeds on it. The Pikmin then jumps on top of the flower, presses down, and is barely shot high at all. Three other Pikmin show up on the same starting branch in the meantime, and they all decide to jump down to cause more pressure onto the flower. This proves to be a success, since they manage to actually reach the seeds this time. They celebrate for a bit with the seeds in their hands, and then make their way to Olimar. |
| Glass cup | 
|
In the main room of the area, the player enters a doorway, goes down the vine, and advances to the right. | Four Rock Pikmin are carrying a small glass cup. One of the Pikmin that are going backwards trips, and the whole group tips the cup, dropping it. This causes it to break. As the cup vanishes, the Pikmin look down and shake their heads in disappointment. They eventually snap out of it and run to Olimar's side. |
| Firework cone | 
|
From the vine that leads to the second main room, the player climbs all the way up the vine, drops to the pathway on the right, and advances forward. | Four Red Pikmin are idling next to a partially buried firework cone. Three of them jump inside the popper, while the fourth one stays close to the cord. Curious, it starts to tug at the cord, until the popper eventually explodes. All that remains is the three Red Pikmin, standing upright, all charred up. After a second of standing still, all four jump up, run in a circle panicking, and rush in Olimar's direction. |
Pikmin locations[edit]
|
The following article or section is in need of assistance from someone who plays Hey! Pikmin. |
| Spot | Location | Pikmin | Requirements | Notes |
|---|---|---|---|---|
Objects[edit]
|
The following article or section is in need of assistance from someone who plays Hey! Pikmin. |
Treasures[edit]
Enemies[edit]
 Crystalline Crushblat × 2
 Grabbit × 3
 Male Sheargrub × 9
 Skutterchuck × 6
Obstacles[edit]
 Cobblestone block × 1
 Dirt block × 1
 Springpetal × 5
- Crystal nest × 4
Plants and fungi[edit]
Others[edit]
 Yellow Sparklium Seed × 41
 Red Sparklium Seed × 12
 Sparklium flower (small) × 1
 Sparklium flower (large) × 1
 Heart (small) × 3
Guide[edit]
|
The following article or section contains guides. |
From where Olimar lands, go down the two vines. Before going forward, you can use your jetpack to go through the fake wall and grab the six red Sparklium Seeds for a total of 30 Sparklium. If you want to be quick, you can also drop onto the second branch and walk off it, continuing to hold left until you reach the fake wall. After that, the Springpetal introduction cutscene will play, upon which the Pikmin will automatically grant you 4 Sparklium.
Continuing forward will bring you into a room with four multi-colored doorways, two of which are too high up for Olimar to directly access, with a Springpetal between them that, with the five Pikmin you should have now, won't yet take you to the branches above. Instead of going into one of the bottom two doorways, continue right – there should be another doorway. Through it is a room with two Grabbits and a Sparklium flower, and more importantly, two Rock Pikmin up the vine. Going out the exit will take you back to the room with four doorways, upon which you should go through one of them – it doesn't matter which, as both will lead to the same room, with a vine going down. Going down it will trigger a cutscene that will grant you four Rock Pikmin. Take the heart at the end of the room if you need it, then go back.
You should now have enough Pikmin that the Springpetal will take you to the second branch up – destroy the flower for 20 Sparklium, then go through the door. Two Rock Pikmin will be wandering atop a dirt block that requires at least 5 Pikmin on the Springpetal to destroy. Go through the red doorway, and then back on the central Springpetal, before dropping off onto the lower branch. To obtain the Manifested Time Container, clear away the Skutterchucks and go onto the platform up the vine, using the jetpack to fly over the crystal and to the treasure. Going up, there will be another Skutterchuck and a fake wall accessible using the jetpack from the ledge that hides 15 Sparklium.
Go up the vine until you see the bottom ledge. Now, go to the other side of the Springpetal, before going left to kill the Crystalline Crushblat. Pulling down the pulley will grant you 10 Sparklium, while going further left will present a crystal sealing away two Red Pikmin. Jump on the Springpetal, and go left from where you land. Entering the door will take you to a room with two more Red Pikmin that can only be accessed with a bomb rock. Eight Pikmin on the Springpetal will be enough to grab a bomb rock, and from there, throw four Pikmin – including the one holding the bomb rock – to the right side of the Springpetal; too far to the left, and you'll miss the rock. If you pull this off, your army should now be 16 strong. Go all the way back to the vine near the Springpetal room, and go to the top level. Going right will begin a cutscene that will end with you having 20 Pikmin – more than enough to go back to the Springpetal, jump on it, and reach the Dutiful Watchdog. Be careful, as you can only afford to lose two Pikmin while going towards this treasure. Now, go back down either of the vines on either side, landing you on a branch very close to the ship pod.
Gallery[edit]
Location of the Manifested Time Container.
The room with a bomb rock.
Location of the Dutiful Watchdog.
Names in other languages[edit]
| Language | Name | Meaning |
|---|---|---|
| ねじ巻く花の洞くつ? Neji Maku Hana no Dōkutsu |
Screw Coiling Flower Cave | |
| Stuiterblomgrot | Bounce flower cave | |
| Cahots sur marguerites | Bump on daisies | |
| Höhle der Sprungfeder-Blumen | Cave of the Spring Feather Flowers | |
| Antro balzafiore | Jumpflower cave | |
| Caverna florida | Blooming cavern | |
| Caverna Florida | Blooming Cavern |
| Sector 3: Sparkling Labyrinth | |
|---|---|
| Normal areas | 3-A: Crystal Tunnels • 3-B: Echo Cavern • 3-C: Springpetal Cave • 3-D: The Burning Sky • 3-E: Subterranean Tyrant |
| Extra areas | 3-X: The Hollow Sky • Secret Spot 9 • Secret Spot 10 • Secret Spot 11 • Secret Spot 12 • Sparklium Springs |


