Piklopedia and Treasure Hoard menu: Difference between revisions
m (Added category) |
No edit summary |
||
| Line 4: | Line 4: | ||
==Piklopedia== | ==Piklopedia== | ||
[[File:Piklopedia.jpg|thumb|right|Piklopedia screen in ''Pikmin 2''.]] | [[File:Piklopedia.jpg|thumb|right|Piklopedia screen in ''Pikmin 2''.]] | ||
{{main|Piklopedia}} | {{main|Piklopedia (Pikmin 2)|t1=Piklopedia (''Pikmin 2'')}} | ||
Accessed by pressing {{button|gc|l|wii|padl}} on the [[#Area selection|area selection screen]], this screen contains a scrollable list of the game's [[Enemy|enemies]] and [[plant]]s on the right side, with 3 per row (except bosses, which take up an entire row with bigger boxes). The right side of the menu contains a screen showing the currently highlighted enemy, which can be opened further by pressing the [[throw]] button. Below that screen are some stats about the creature, like the treasure value, in Pokos, how many Pikmin have been lost to it, and how many of this enemy have been defeated. These values appear as "----" when not applicable. | Accessed by pressing {{button|gc|l|wii|padl}} on the [[#Area selection|area selection screen]], this screen contains a scrollable list of the game's [[Enemy|enemies]] and [[plant]]s on the right side, with 3 per row (except bosses, which take up an entire row with bigger boxes). The right side of the menu contains a screen showing the currently highlighted enemy, which can be opened further by pressing the [[throw]] button. Below that screen are some stats about the creature, like the treasure value, in Pokos, how many Pikmin have been lost to it, and how many of this enemy have been defeated. These values appear as "----" when not applicable. | ||
Revision as of 19:43, November 1, 2020
From the area selection menu in Pikmin 2, the Piklopedia and Treasure Hoard menus can be accessed, and these function quite similarly.
Piklopedia
- Main article: Piklopedia (Pikmin 2).
Accessed by pressing ![]() /
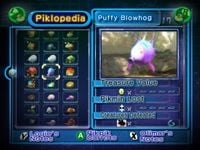
/ ![]() on the area selection screen, this screen contains a scrollable list of the game's enemies and plants on the right side, with 3 per row (except bosses, which take up an entire row with bigger boxes). The right side of the menu contains a screen showing the currently highlighted enemy, which can be opened further by pressing the throw button. Below that screen are some stats about the creature, like the treasure value, in Pokos, how many Pikmin have been lost to it, and how many of this enemy have been defeated. These values appear as "----" when not applicable.
on the area selection screen, this screen contains a scrollable list of the game's enemies and plants on the right side, with 3 per row (except bosses, which take up an entire row with bigger boxes). The right side of the menu contains a screen showing the currently highlighted enemy, which can be opened further by pressing the throw button. Below that screen are some stats about the creature, like the treasure value, in Pokos, how many Pikmin have been lost to it, and how many of this enemy have been defeated. These values appear as "----" when not applicable.
The bottom of the screen contains instructions on what some buttons do: ![]() /
/ ![]() throws pikpik carrots and zooms in on the creature's screen,
throws pikpik carrots and zooms in on the creature's screen, ![]() /
/ ![]() opens Louie's notes, and
opens Louie's notes, and ![]() /
/ ![]() opens Olimar's notes. Finally, on the top-left and top-right corners of the screen,
opens Olimar's notes. Finally, on the top-left and top-right corners of the screen, ![]() /
/ ![]() and
and ![]() /
/ ![]() appear, indicating that the buttons can be used to open the Treasure Hoard screen.
appear, indicating that the buttons can be used to open the Treasure Hoard screen.
Treasure Hoard
- Main article: Treasure Hoard.
This menu is quite similar to the Piklopedia's screen, and is accessible by pressing ![]() /
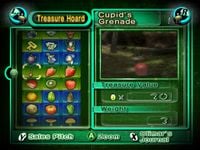
/ ![]() on the area selection screen. The left side contains a list of treasures, three per row, and with a background colored green or blue, to separate between the existing series. The right side contains a screen that shows the treasure, as well as two sections detailing its value in Pokos and carrying weight. The bottom of the screen explains what some buttons do. Like the Piklopedia, the throw button zooms in, while
on the area selection screen. The left side contains a list of treasures, three per row, and with a background colored green or blue, to separate between the existing series. The right side contains a screen that shows the treasure, as well as two sections detailing its value in Pokos and carrying weight. The bottom of the screen explains what some buttons do. Like the Piklopedia, the throw button zooms in, while ![]() /
/ ![]() shows Olimar's journal.
shows Olimar's journal. ![]() /
/ ![]() shows the sales pitch. Finally, the top-left and top-right corners show that
shows the sales pitch. Finally, the top-left and top-right corners show that ![]() /
/ ![]() and
and ![]() /
/ ![]() can be used to open the Piklopedia's menu.
can be used to open the Piklopedia's menu.

