Category:Captain Olimar images: Difference between revisions
Jump to navigation
Jump to search
(created wanted category.) |
(No difference)
|
Revision as of 13:41, June 23, 2016
Images of Captain Olimar.
Media in category "Captain Olimar images"
The following 129 files are in this category, out of 775 total.
(previous page) (next page) Alien Ceremony Area.jpg 320 × 240; 76 KB
 AlphCharacterSelect.jpg 800 × 450; 165 KB
 AlphSSB4.jpg 800 × 450; 167 KB
 Amiibo Pikmin calling.jpg 320 × 240; 61 KB
 Anatomical Enigma Secret Spot.jpg 320 × 240; 87 KB
 Argyle Collector Secret Spot.jpg 320 × 240; 77 KB
 Armurk ball.jpg 320 × 240; 52 KB
 Armurk ceiling.jpg 400 × 240; 58 KB
 Armurk dead.jpg 320 × 240; 72 KB
 Armurk defeated.jpg 320 × 240; 54 KB
 Armurk falling.jpg 400 × 240; 62 KB
 Armurk moving.jpg 320 × 240; 54 KB
 Armurk raising.jpg 320 × 240; 55 KB
 Armurk retreat.jpg 320 × 240; 53 KB
 Armurk spitting.jpg 320 × 240; 53 KB
 Armurk stomping.jpg 320 × 240; 52 KB
 Armurk thrown.jpg 320 × 240; 59 KB
 Armurk turning.jpg 320 × 240; 54 KB
 Armurk wall.jpg 320 × 240; 57 KB
 B Down.jpg 400 × 315; 44 KB
 Back-and-Forth Road 1.jpg 400 × 512; 119 KB
 Back-and-Forth Road 2.jpg 400 × 512; 128 KB
 Back-and-Forth Road 3.jpg 400 × 512; 116 KB
 Back-and-Forth Road 4.jpg 400 × 512; 122 KB
 Back-and-Forth Road 5.jpg 320 × 240; 57 KB
 Back-and-Forth Road 6.jpg 320 × 240; 53 KB
 Back-and-Forth Road 7.jpg 400 × 512; 135 KB
 Back-and-Forth Road 8.jpg 400 × 512; 116 KB
 Back-and-Forth Road 9.jpg 320 × 240; 61 KB
 Back-and-Forth Road Sheargrub cutscene.jpg 320 × 240; 45 KB
 Back-and-Forth Road Spectralid cutscene.jpg 320 × 240; 50 KB
 Barriers of Flame 1.jpg 320 × 240; 56 KB
 Barriers of Flame 2.jpg 320 × 240; 57 KB
 Barriers of Flame 3.jpg 320 × 240; 55 KB
 Barriers of Flame 4.jpg 400 × 512; 115 KB
 Barriers of Flame 5.jpg 320 × 240; 55 KB
 Barriers of Flame 6.jpg 320 × 240; 57 KB
 Barriers of Flame 7.jpg 320 × 240; 43 KB
 Bed of Fallen Leaves 1.jpg 320 × 240; 45 KB
 Bed of Fallen Leaves 2.jpg 400 × 512; 113 KB
 Bed of Fallen Leaves 3.jpg 320 × 240; 49 KB
 Bed of Fallen Leaves 4.jpg 320 × 240; 63 KB
 Below the Ice 1.jpg 400 × 512; 115 KB
 Below the Ice 2.jpg 320 × 240; 53 KB
 Below the Ice 3.jpg 320 × 240; 49 KB
 Below the Ice 4.jpg 320 × 240; 47 KB
 Below the Ice 5.jpg 320 × 240; 51 KB
 Below the Ice 6.jpg 320 × 240; 43 KB
 Below the Ice 7.jpg 320 × 240; 50 KB
 Below the Ice tripping cutscene.jpg 320 × 240; 37 KB
 Berserk Leech Hydroe 1 attacked.jpg 400 × 512; 119 KB
 Berserk Leech Hydroe 1 idling.jpg 400 × 512; 120 KB
 Berserk Leech Hydroe 1 ready.jpg 400 × 512; 118 KB
 Berserk Leech Hydroe 1 shooting.jpg 400 × 512; 123 KB
 Berserk Leech Hydroe 1 stuck.jpg 320 × 240; 57 KB
 Berserk Leech Hydroe 2 idling.jpg 400 × 512; 123 KB
 Berserk Leech Hydroe 2 raising both.jpg 400 × 512; 120 KB
 Berserk Leech Hydroe 2 raising one.jpg 400 × 512; 120 KB
 Berserk Leech Hydroe 2 toppled.jpg 320 × 240; 62 KB
 Berserk Leech Hydroe 3 attacked.jpg 400 × 512; 109 KB
 Berserk Leech Hydroe 3 beam.jpg 400 × 512; 117 KB
 Berserk Leech Hydroe 3 idling.jpg 400 × 512; 119 KB
 Berserk Leech Hydroe 3 shooting.jpg 400 × 512; 115 KB
 Blazing Winds 1.jpg 320 × 240; 49 KB
 Blazing Winds 2.jpg 320 × 240; 57 KB
 Blazing Winds Fiery Blowhog cutscene.jpg 400 × 512; 111 KB
 BrawlimarvMarth.jpg 688 × 387; 115 KB
 Bridge chomping.jpg 640 × 472; 178 KB
 Buried Pond P3 Red Team Onion.jpg 397 × 450; 64 KB
 Burning Bog 1.jpg 320 × 240; 57 KB
 Burning Bog 2.jpg 320 × 240; 55 KB
 Burning Bog 3.jpg 320 × 240; 57 KB
 Burning Bog 4.jpg 400 × 512; 136 KB
 Burning Bog 5.jpg 320 × 240; 67 KB
 Burning Bog 6.jpg 400 × 512; 110 KB
 Burning Bog 7.jpg 320 × 240; 65 KB
 Burning Bog 8.jpg 320 × 240; 59 KB
 Burning Bog 9.jpg 320 × 240; 56 KB
 Captain Olimar opening.png 608 × 320; 249 KB
 Captain Olimar P2 clay art.png 740 × 1,731; 774 KB
 Captain Olimar Pikmin 4 Render.png 451 × 662; 166 KB
 Caustic Dweevil attack.png 591 × 504; 296 KB
 Cavern of Confusion 1.jpg 320 × 240; 68 KB
 Cavern of Confusion 2.jpg 400 × 512; 108 KB
 Cavern of Confusion 3.jpg 400 × 512; 101 KB
 Cavern of Confusion 4.jpg 400 × 512; 102 KB
 Cavern of Confusion 5.jpg 320 × 240; 77 KB
 Cavern of Confusion 6.jpg 400 × 512; 108 KB
 Cavern of Confusion 7.jpg 400 × 512; 112 KB
 Cavern of Confusion 8.jpg 320 × 240; 72 KB
 Cavernous Abyss.jpg 668 × 536; 58 KB
 Challengemode white.png 530 × 481; 173 KB
 Cherrystone Pass 1.jpg 320 × 240; 62 KB
 Cherrystone Pass 2.jpg 400 × 512; 125 KB
 Cherrystone Pass 3.jpg 400 × 512; 134 KB
 Cherrystone Pass 4.jpg 400 × 512; 137 KB
 Cherrystone Pass 5.jpg 320 × 240; 63 KB
 Cold-Hearted Guardian 1.jpg 320 × 240; 42 KB
 Cold-Hearted Guardian 2.jpg 320 × 240; 50 KB
 Colossus in Suspenders Secret Spot.jpg 320 × 240; 61 KB
 Crystal Tunnels 1.jpg 320 × 240; 57 KB
 Crystal Tunnels 2.jpg 400 × 512; 125 KB
 Crystal Tunnels 3.jpg 320 × 240; 74 KB
 Crystal Tunnels 4.jpg 400 × 512; 128 KB
 Crystal Tunnels 5.jpg 400 × 512; 121 KB
 Crystal Tunnels 6.jpg 320 × 240; 64 KB
 Crystal Tunnels 7.jpg 400 × 512; 139 KB
 Crystal Tunnels 8.jpg 320 × 240; 51 KB
 Downpour Thicket 1.jpg 320 × 240; 55 KB
 Downpour Thicket 2.jpg 400 × 240; 59 KB
 Downpour Thicket 3.jpg 320 × 240; 54 KB
 Downpour Thicket 4.jpg 320 × 240; 44 KB
 Downpour Thicket 5.jpg 400 × 240; 63 KB
 Downpour Thicket 6.jpg 320 × 240; 50 KB
 Drenchnozzle Den 1.jpg 320 × 240; 45 KB
 Drenchnozzle Den 2.jpg 320 × 240; 44 KB
 Drenchnozzle Den 3.jpg 320 × 240; 49 KB
 Drenchnozzle Den 4.jpg 320 × 240; 51 KB
 Drenchnozzle Den 5.jpg 320 × 240; 58 KB
 Drenchnozzle Den 6.jpg 320 × 240; 55 KB
 Drenchnozzle Den stuck cutscene.jpg 320 × 240; 38 KB
 Dutiful Watchdog Area.jpg 320 × 240; 76 KB
 Early Bowsprit P1 carrying.png 666 × 500; 453 KB
 Early Breadbug P1 screenshot.png 666 × 500; 665 KB
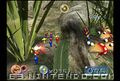
 Early First Red Pikmin P1.png 640 × 480; 539 KB
 Early Mushroom Pikmin.jpg 600 × 450; 65 KB
 Early Pikmin 5 Pellets.jpg 450 × 338; 59 KB
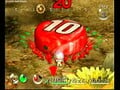 Early Pikmin 10 Pellet.jpg 640 × 480; 69 KB
 Early Pikmin Big Root.jpg 400 × 270; 29 KB


